

Hey, Pawel here. Welcome to the Product Compass Newsletter. It’s #1 most hands-on AI PM newsletter. I strategize, prototype, experiment, and build with AI every day.
And every week I share actionable tips, templates, and step-by-step guides for PMs.
Here’s what you might have missed:
What Is Product Discovery? The Ultimate Guide for PMs (2026 Edition)
How to Create an AI Product Strategy: The AI Strategic Lens Framework
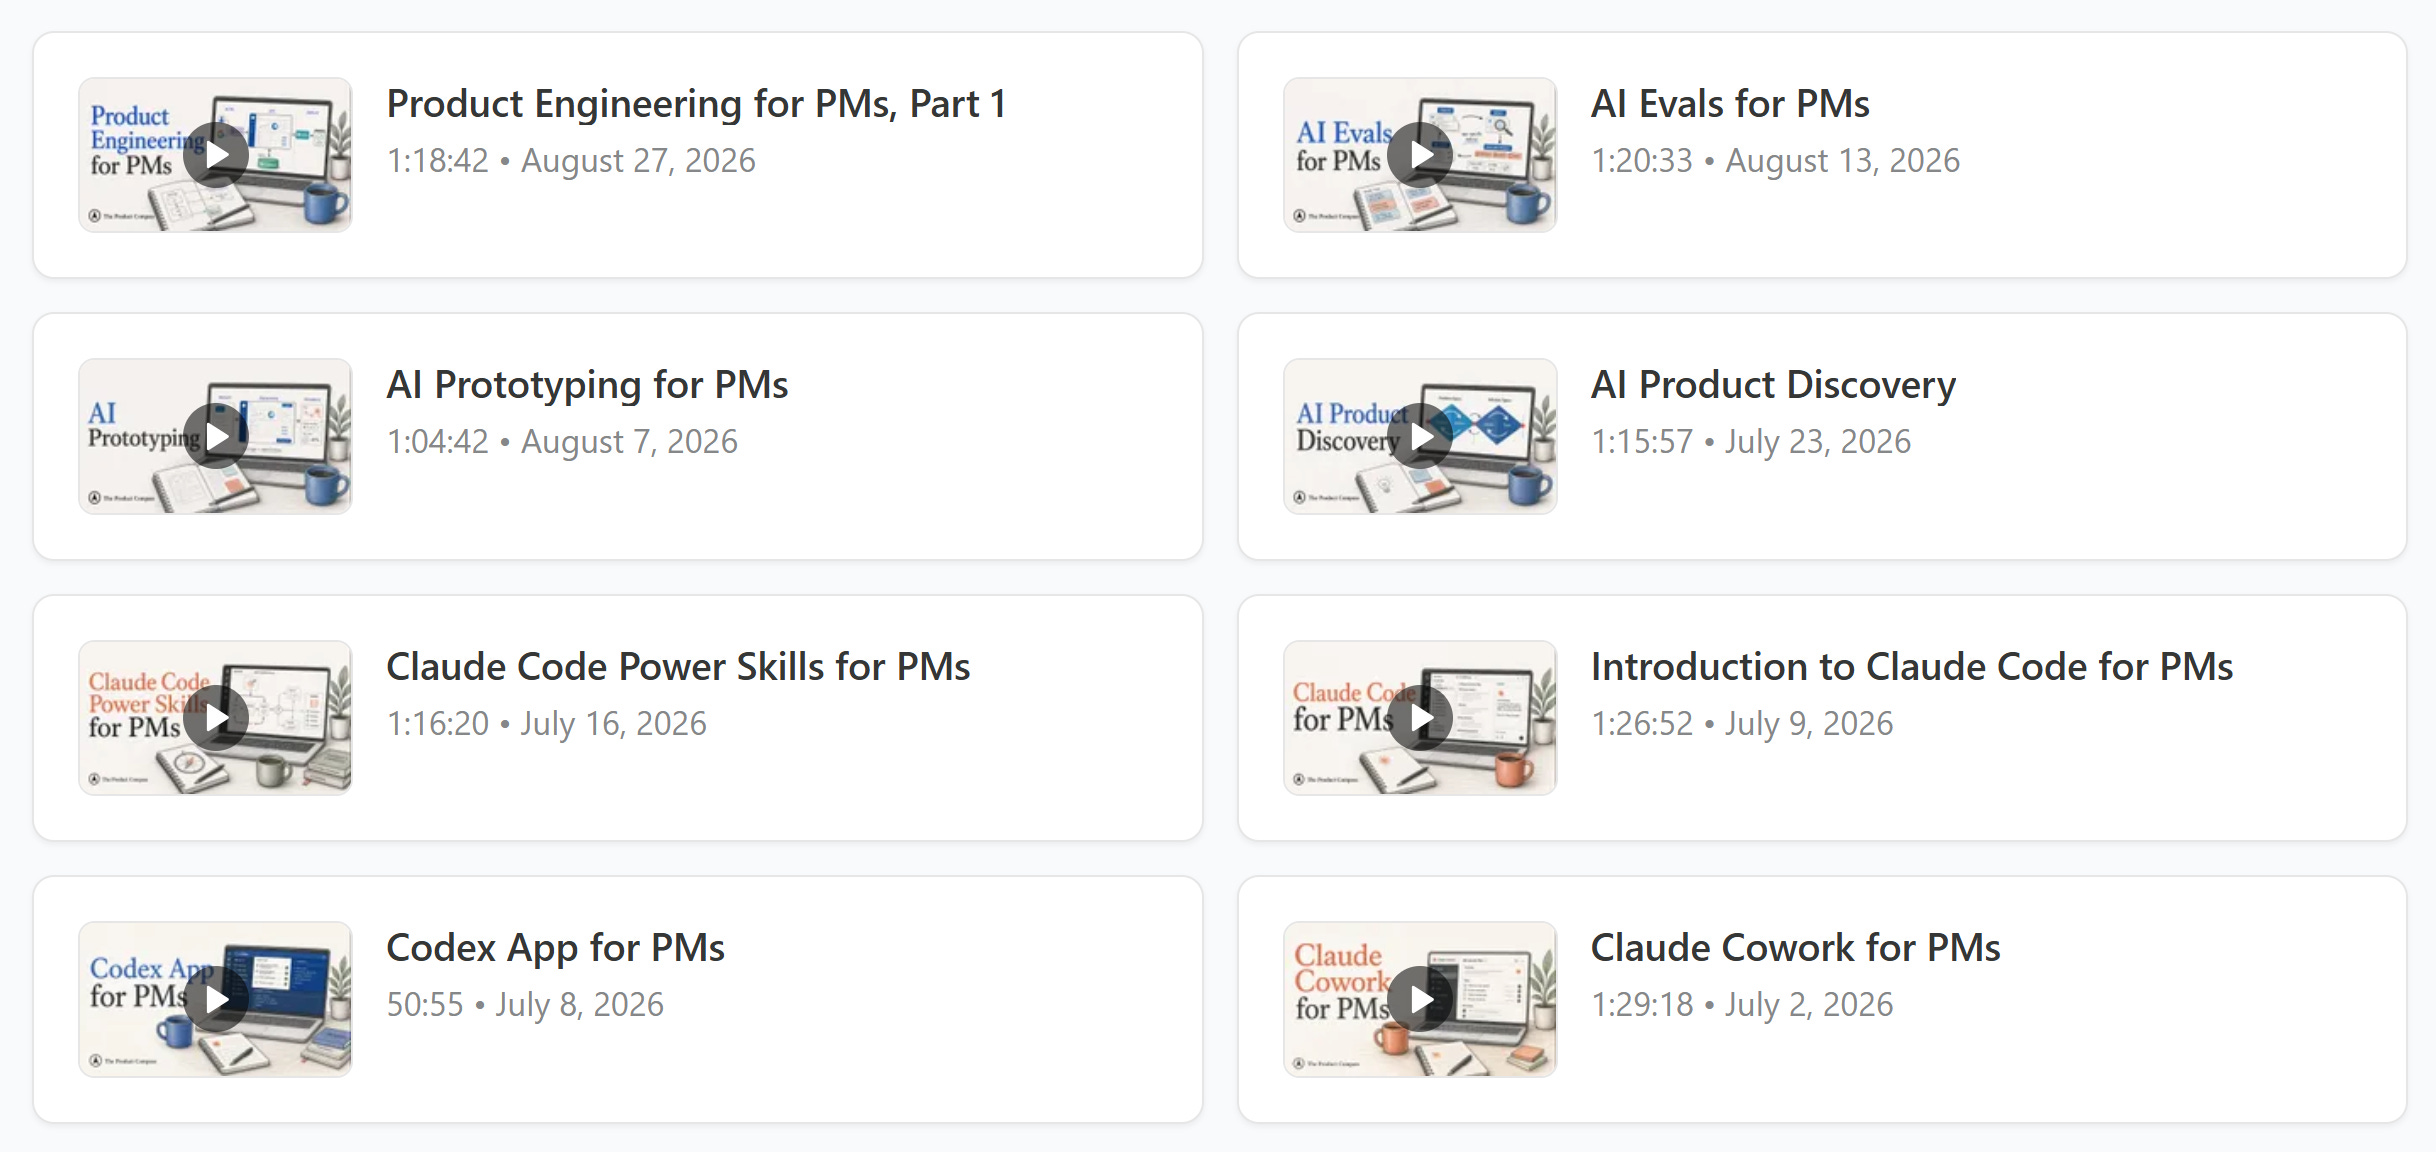
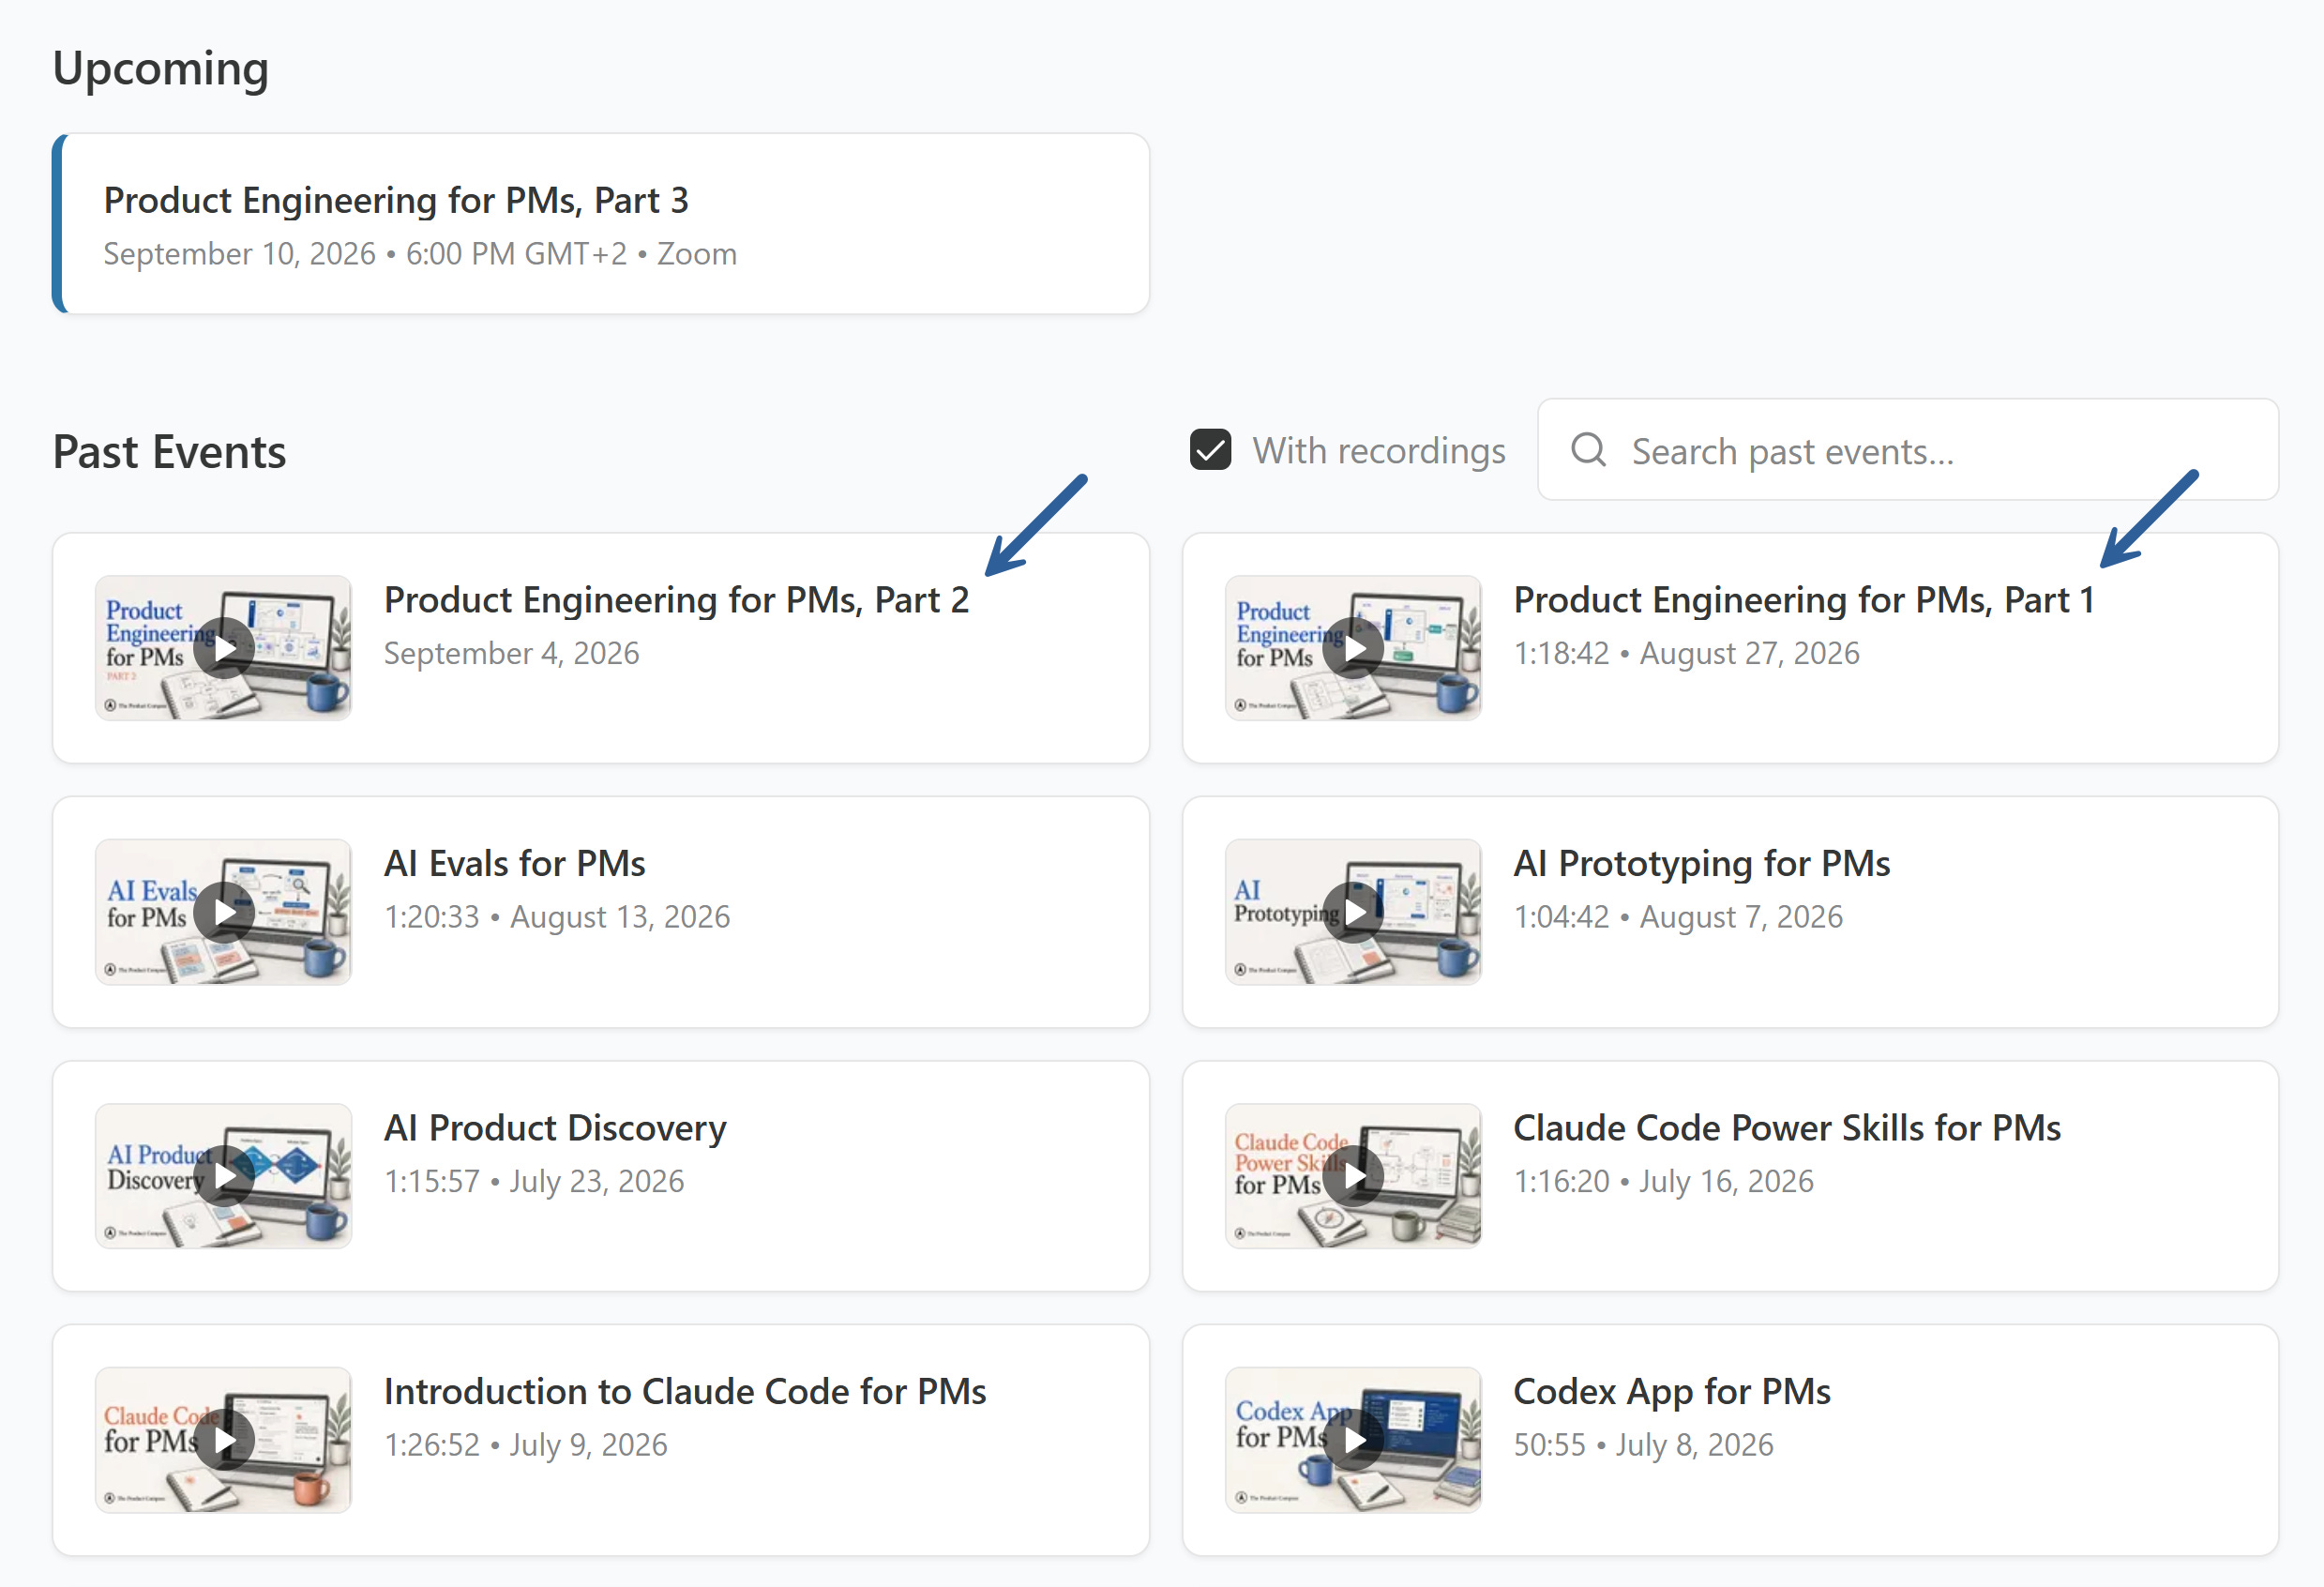
Plus, 20+ recordings available for our premium members here: https://go.productcompass.pm/events
Consider subscribing and updating your account for the full experience.
Today, we continue Product Engineering for PMs inspired by the Gartner report:
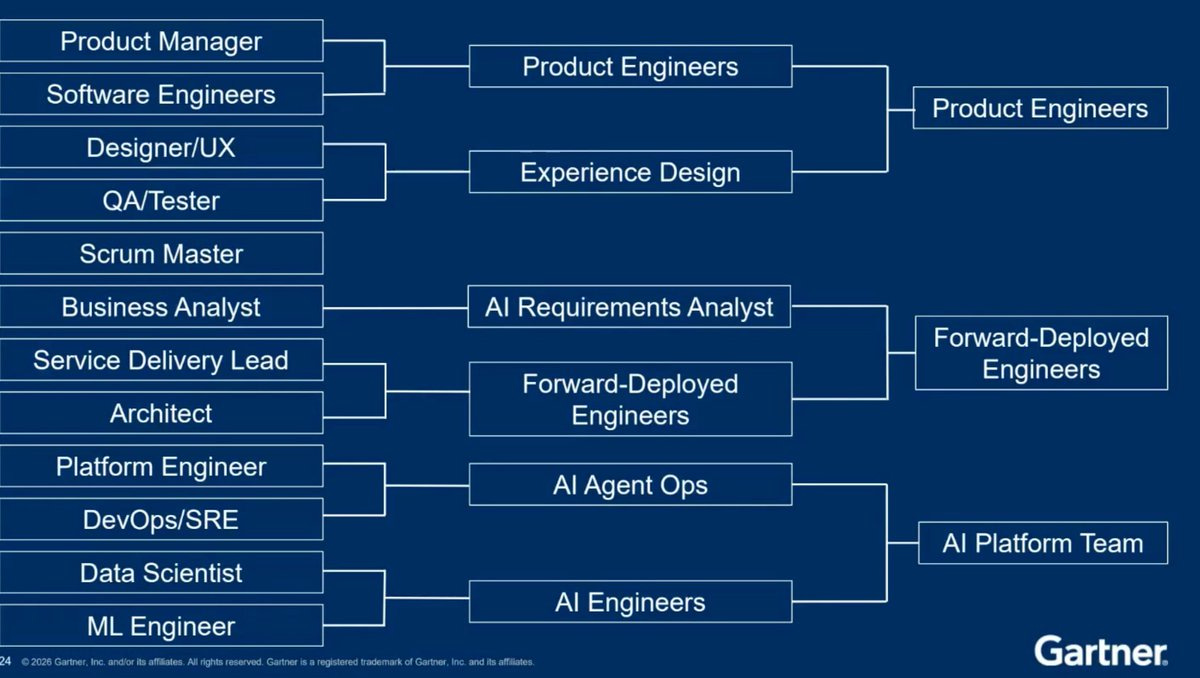
The roles are coming closer together.
My take: you don’t have to code, but as a PM you have a much stronger profile if you develop an understanding of engineering with AI.
In Part 1, we started building AskOne, an alternative to Slido (Q&A and polling platform). We implemented rooms, anonymous questions, Google authentication, Supabase storage, subscription plans, and a test payment gateway:
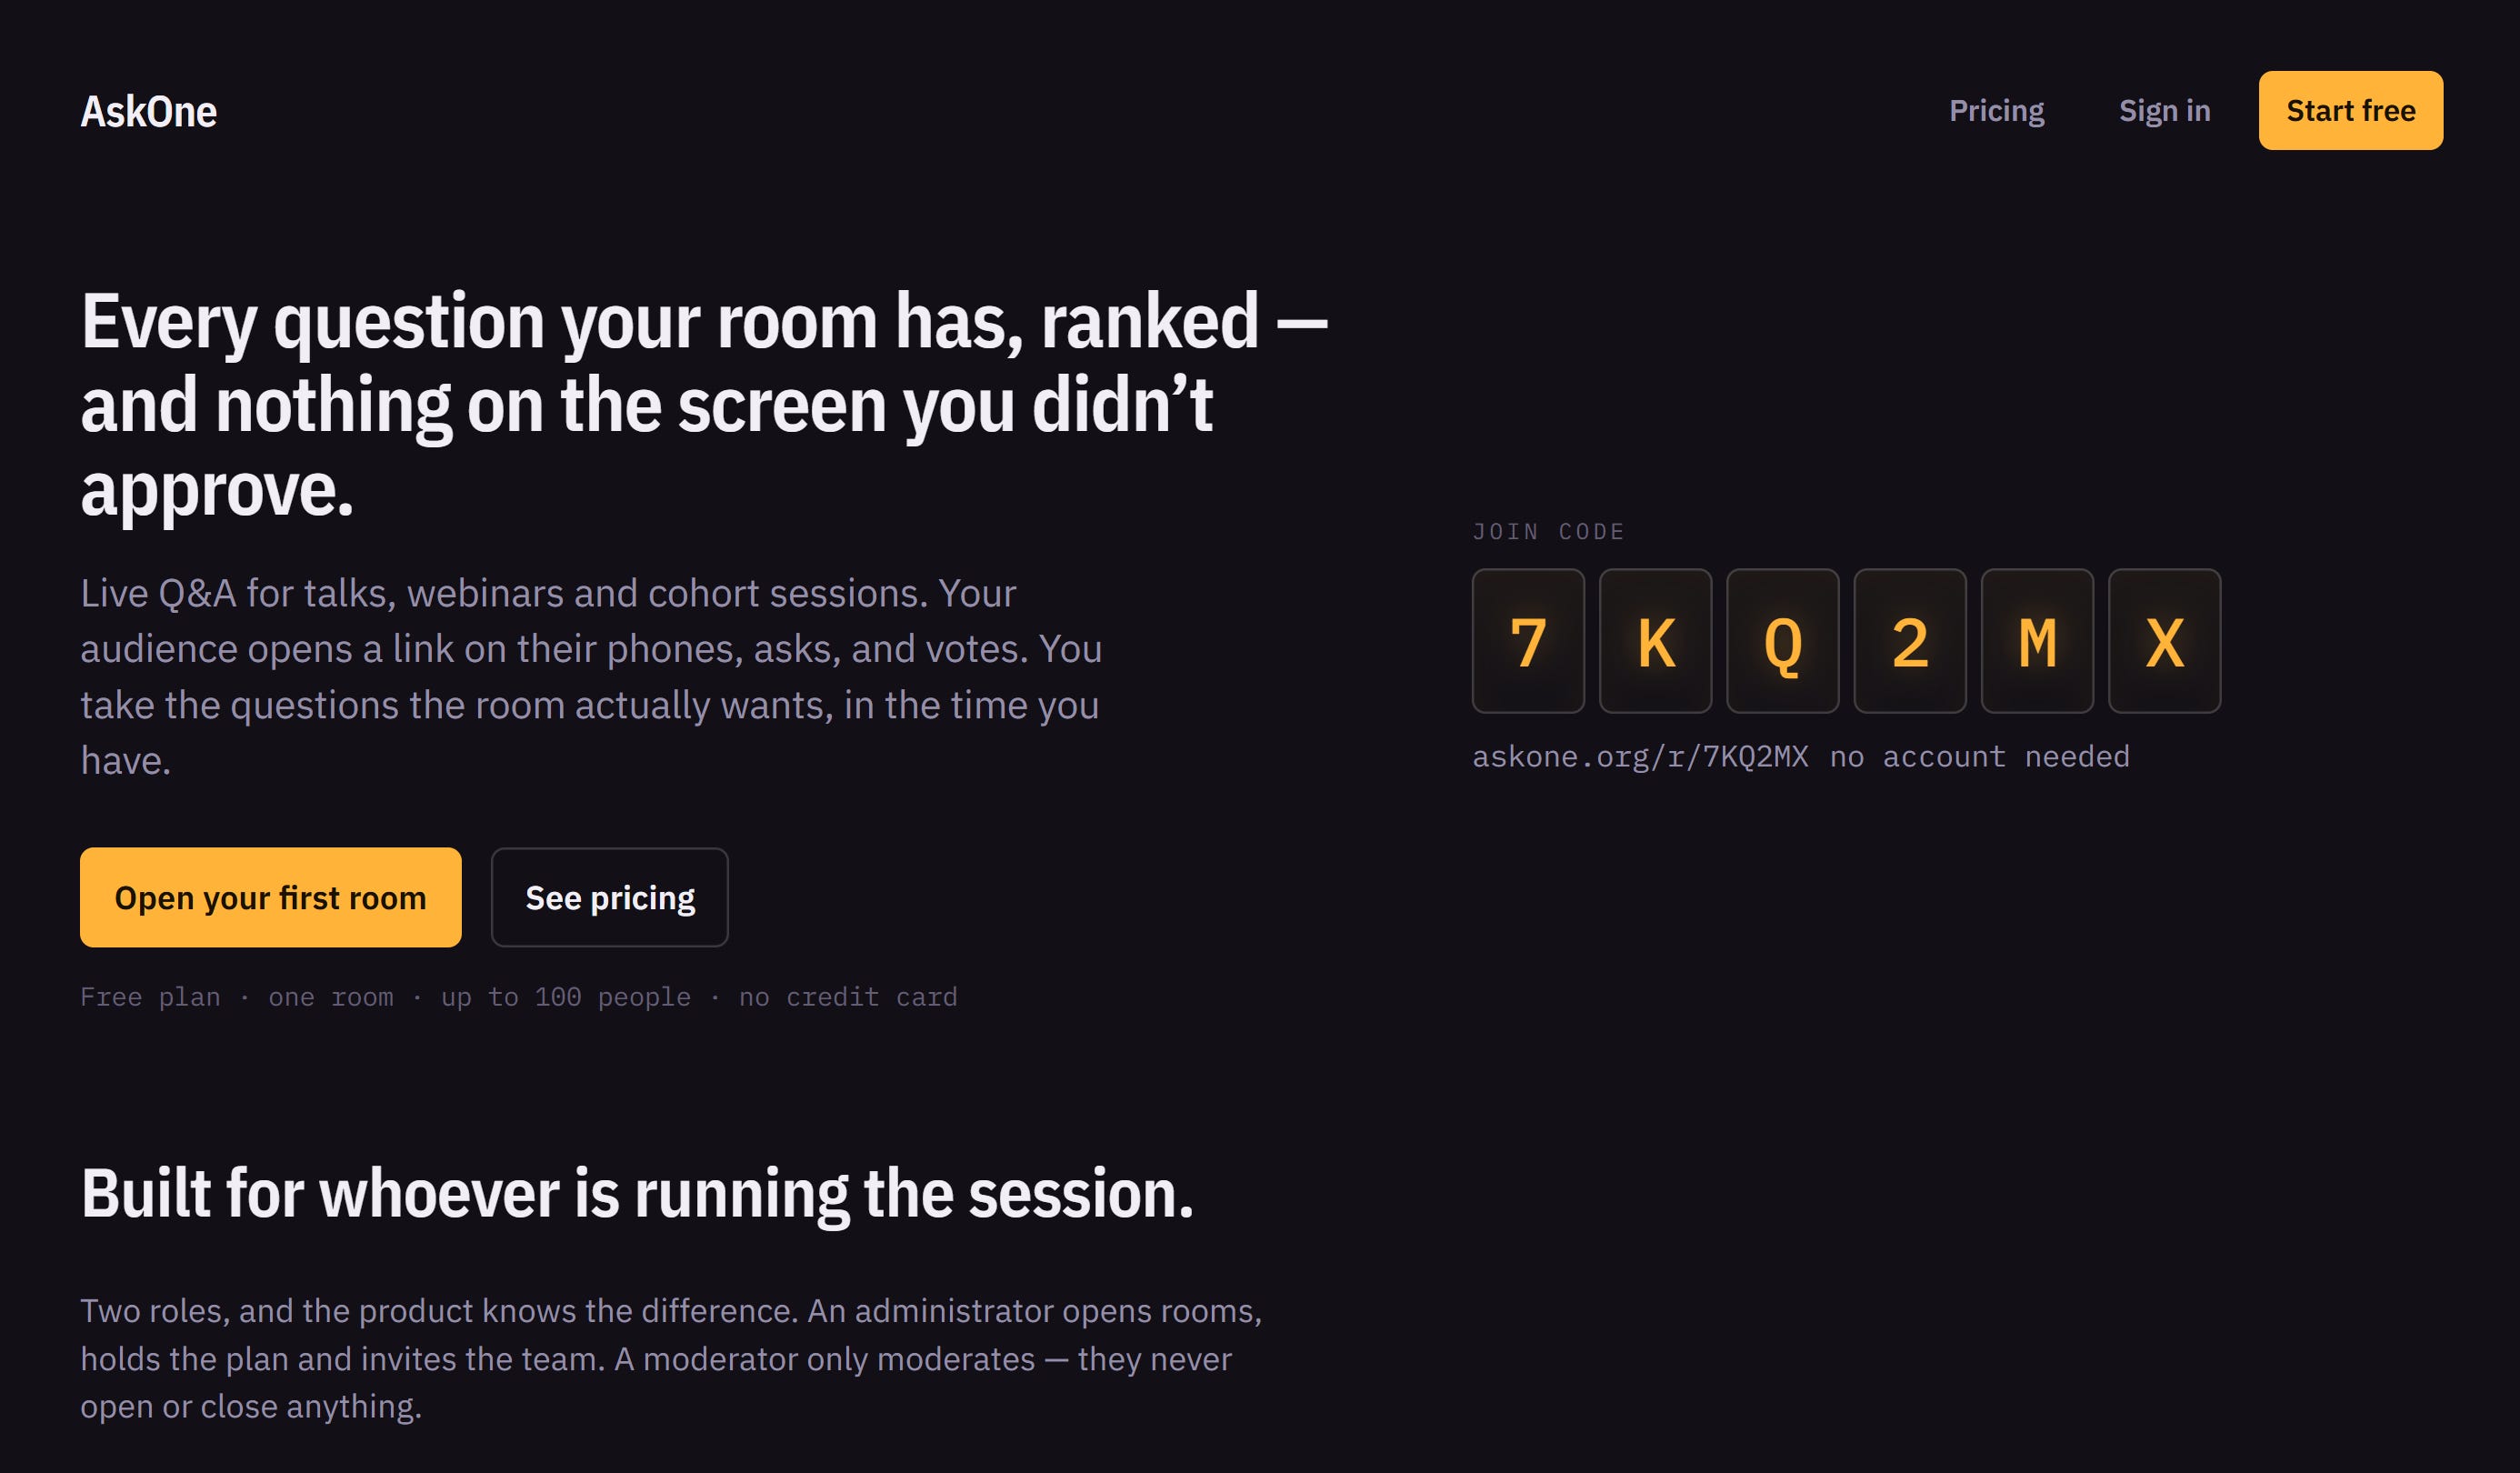
By popular request, I removed the paywall from that part. All detailed steps are available for everyone (the solution template is available for premium members):

Today, we discuss:
A Lightweight AI Software Lifecycle
AskOne: Let’s Add a Moderator Role
Create a Production GitHub Branch
Create a Production Supabase Project
Create a Production Netlify Site
Plug a Custom DNS Domain
Create a Production Clerk Instance
Add Product Analytics
Add Google Auth (For Real)
Conclusion
🔒 Live Session Recording, Part 2
Before we dive in, would you like me to cover the most important AI news each week?
We’ve got Fable 5.1 (Sep 1) and GPT-6 Astra (Sep 3). I also shared my new Bug Hunt Bench (official website), that’s becoming a standard the AI community on X was waiting for:


And today, I published a new AI Slop Bench:

I don’t feel like sending you a dedicated email every 1-2 days. So what do you want me to do? The first option below is a dedicated publication you can subscribe to/unsubscribe from:
1. A Lightweight AI Software Lifecycle
I realized I’ve been simplifying the software development lifecycle with AI. Some of the prompts in the template were not the first prompts I wrote. Instead, I brainstormed with AI, and turned my brainstorming into something I can share with you.
How can you implement that, too?
First, I do not recommend heavy software development processes with unnecessary ceremonies and artifacts such as The AI-Native SDLC playbook by Anthropic. Those processes are meant for enterprises that cannot be more agile.
Paradoxically, even Anthropic doesn’t work this way! Their planning shifted away from design docs toward PR discussions and prototypes. They don’t do much product review. Instead they prototype, share what they build in front of internal users, and act on feedback. Individual pods are explicitly allowed to choose their own planning rituals. See Running an AI-native engineering org by the same Anthropic.
Which brings us to how I recommend you work in a team:
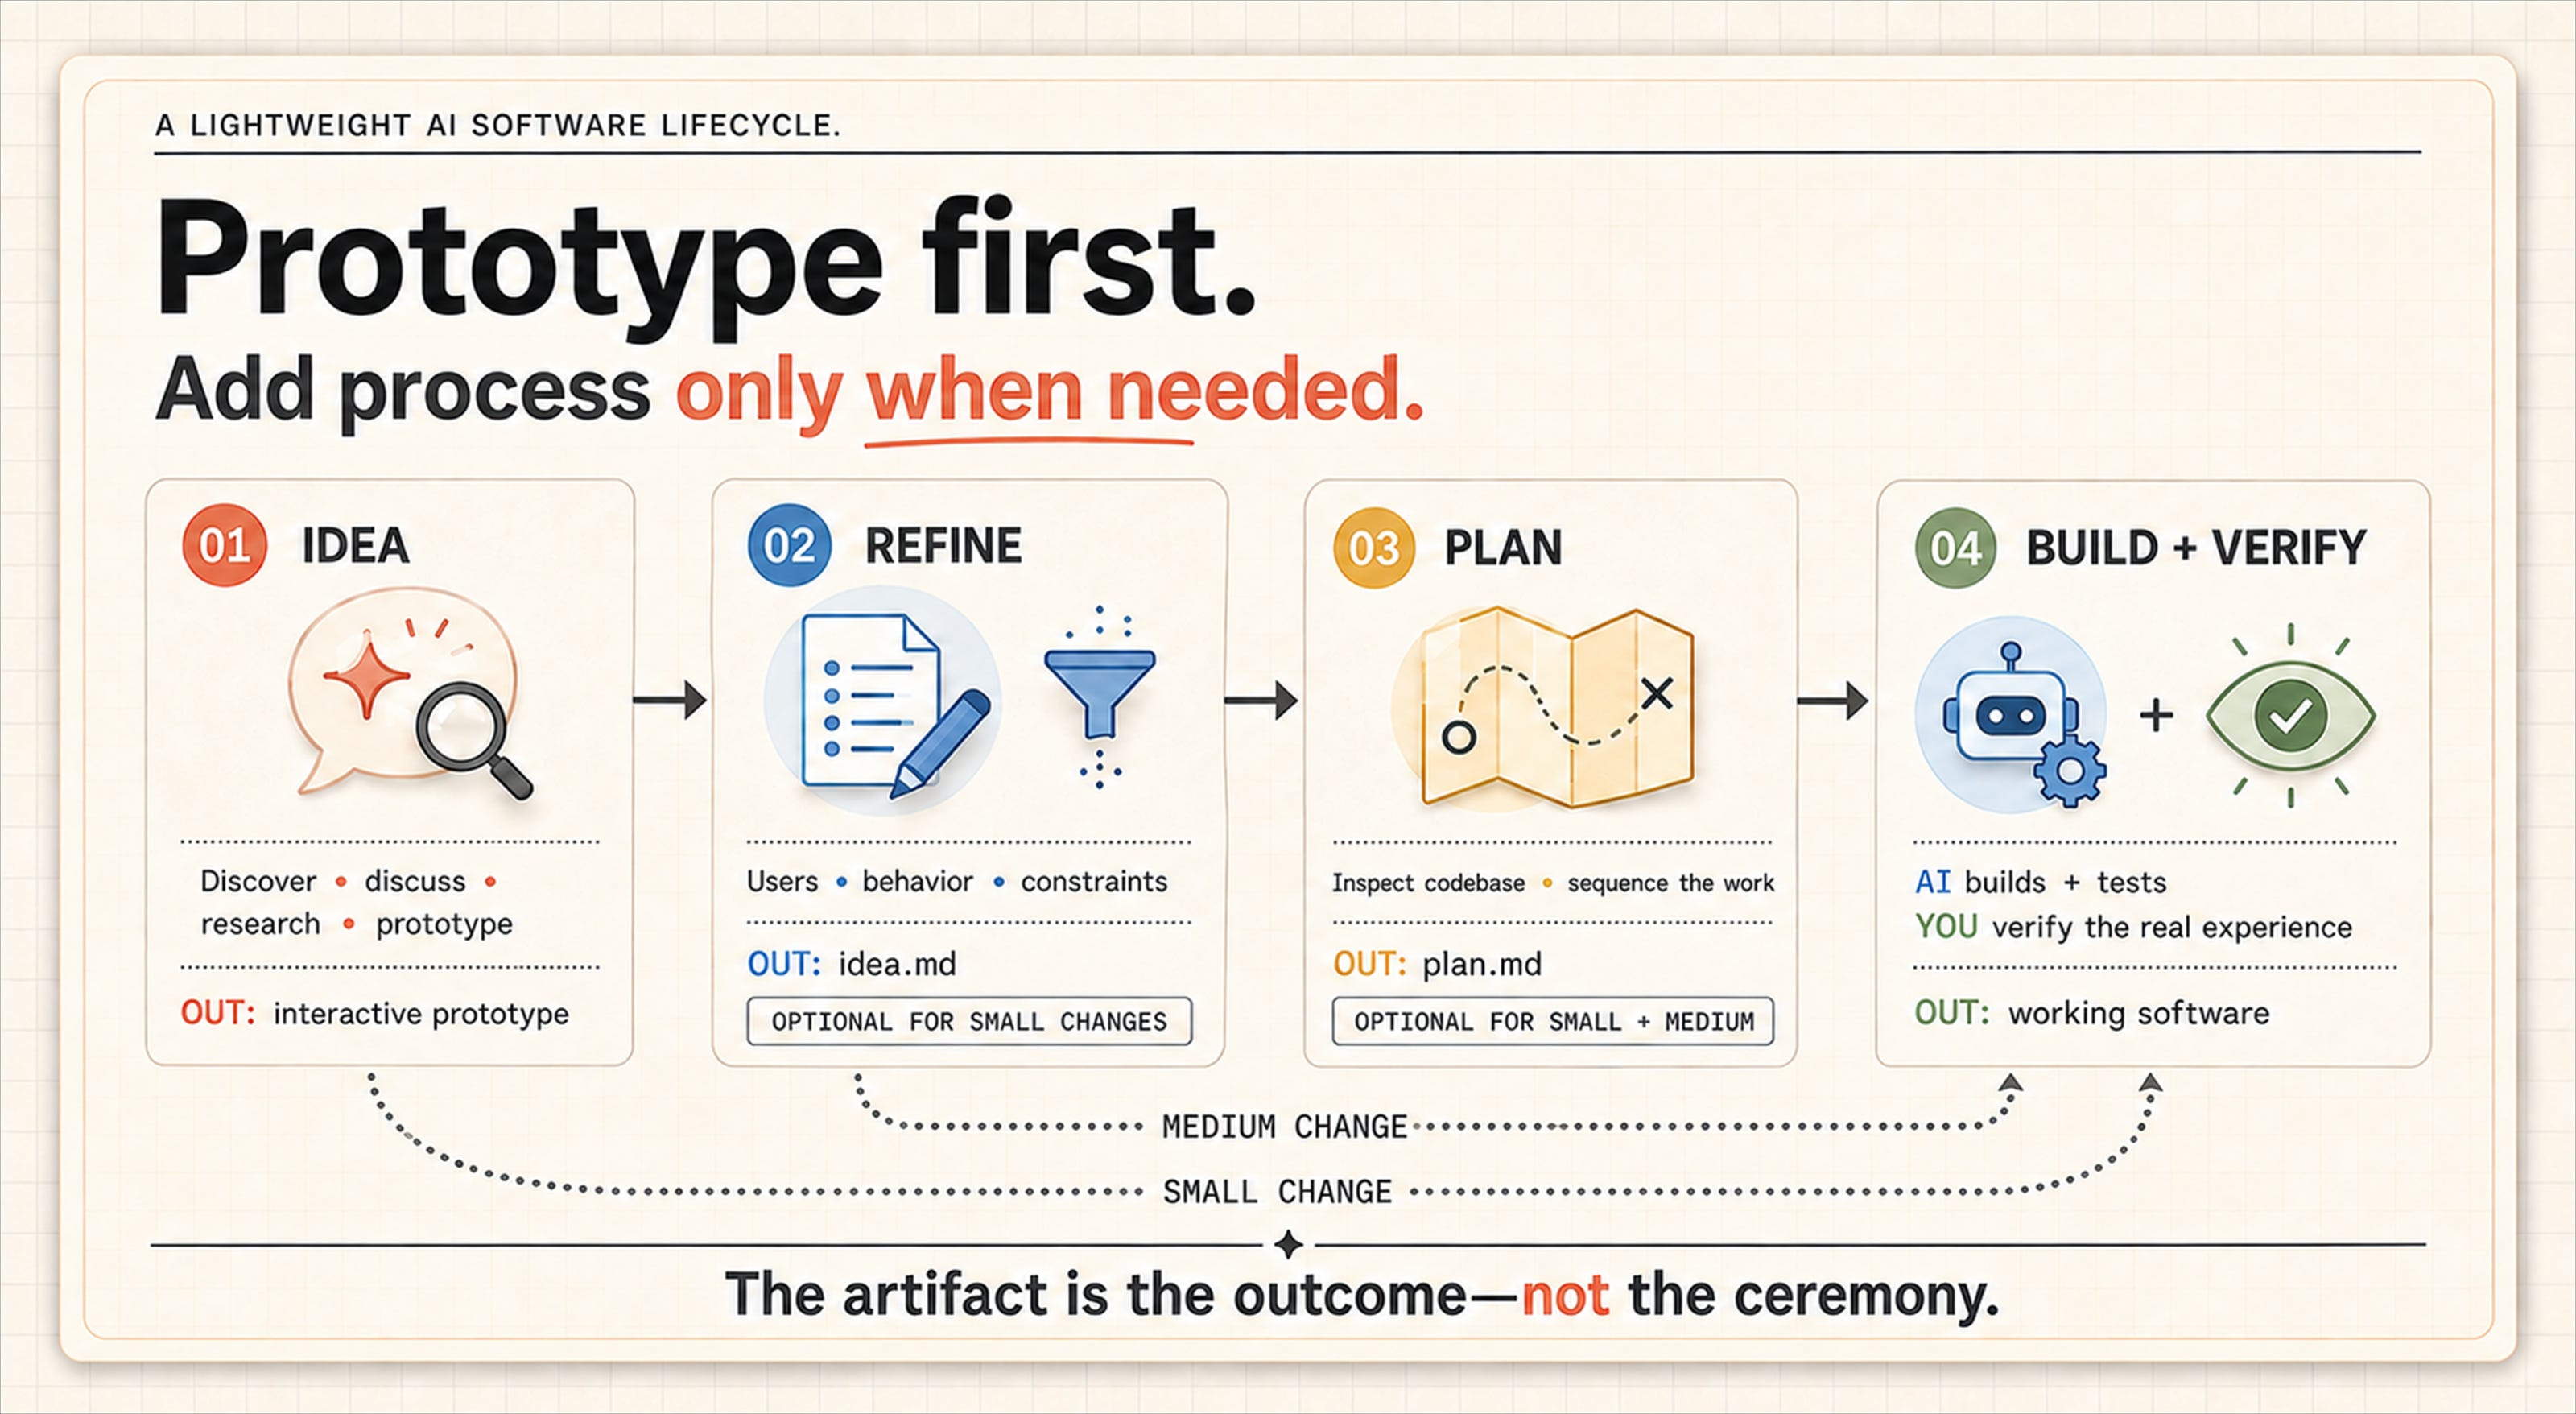
Step 1: Idea
Discover / discuss / research / prototype with Claude. Ask Claude: “ask me questions” or “present me 2-3 different directions with pros and cons.”
Outcome: An interactive prototype
Step 2: Refined idea
Problem/jobs to be done, users, desired behavior, important scenarios, constraints, UX decisions vs. design system. Here, your agent may decide to run spikes (probes) to confirm what’s technically possible. Let it do it.
Can be skipped for: Small changes
Outcome: A markdown file (.md)
Step 3: Plan
This is where the agent will inspect the codebase and create a specific implementation plan. It knows what to document, don’t tell it (architecture, files to change, implementation sequence, tests, risks).
You can use the plan mode for that, though models like Opus 5, Fable 5.1, or GPT-6 Astra don’t really need that and can jump from a refined idea to implementation.
Can be skipped for: Small or medium changes
Outcome: A markdown file (often plan.md)
Step 4: Build
AI will build the feature/product and run its unit tests. Still, even with browser automation it can’t reliably assess dynamic mechanisms (e.g., what’s visible before the page fully loads) or micro interactions.
Walk through the main scenarios and verify them with your eyes.
📌 The prompts I share contain refined ideas (Step 2), not always my first messages. For example, for moderators, I have one prompt in the template (Section 2). It came out of a discussion with Claude.
2. AskOne: Let’s Add a Moderator Role
In Part 1, I enabled billing for users, because I didn’t want to combine users and organizations. With users, it’s simpler.
But you cannot add more users to a user 😅 You can add more users to an organization. If we want moderators, we need organizations. I should have predicted that.
So, right now, we will only have billing for organizations. Here’s how to do that:
Step 2.1: Switch to organization billing
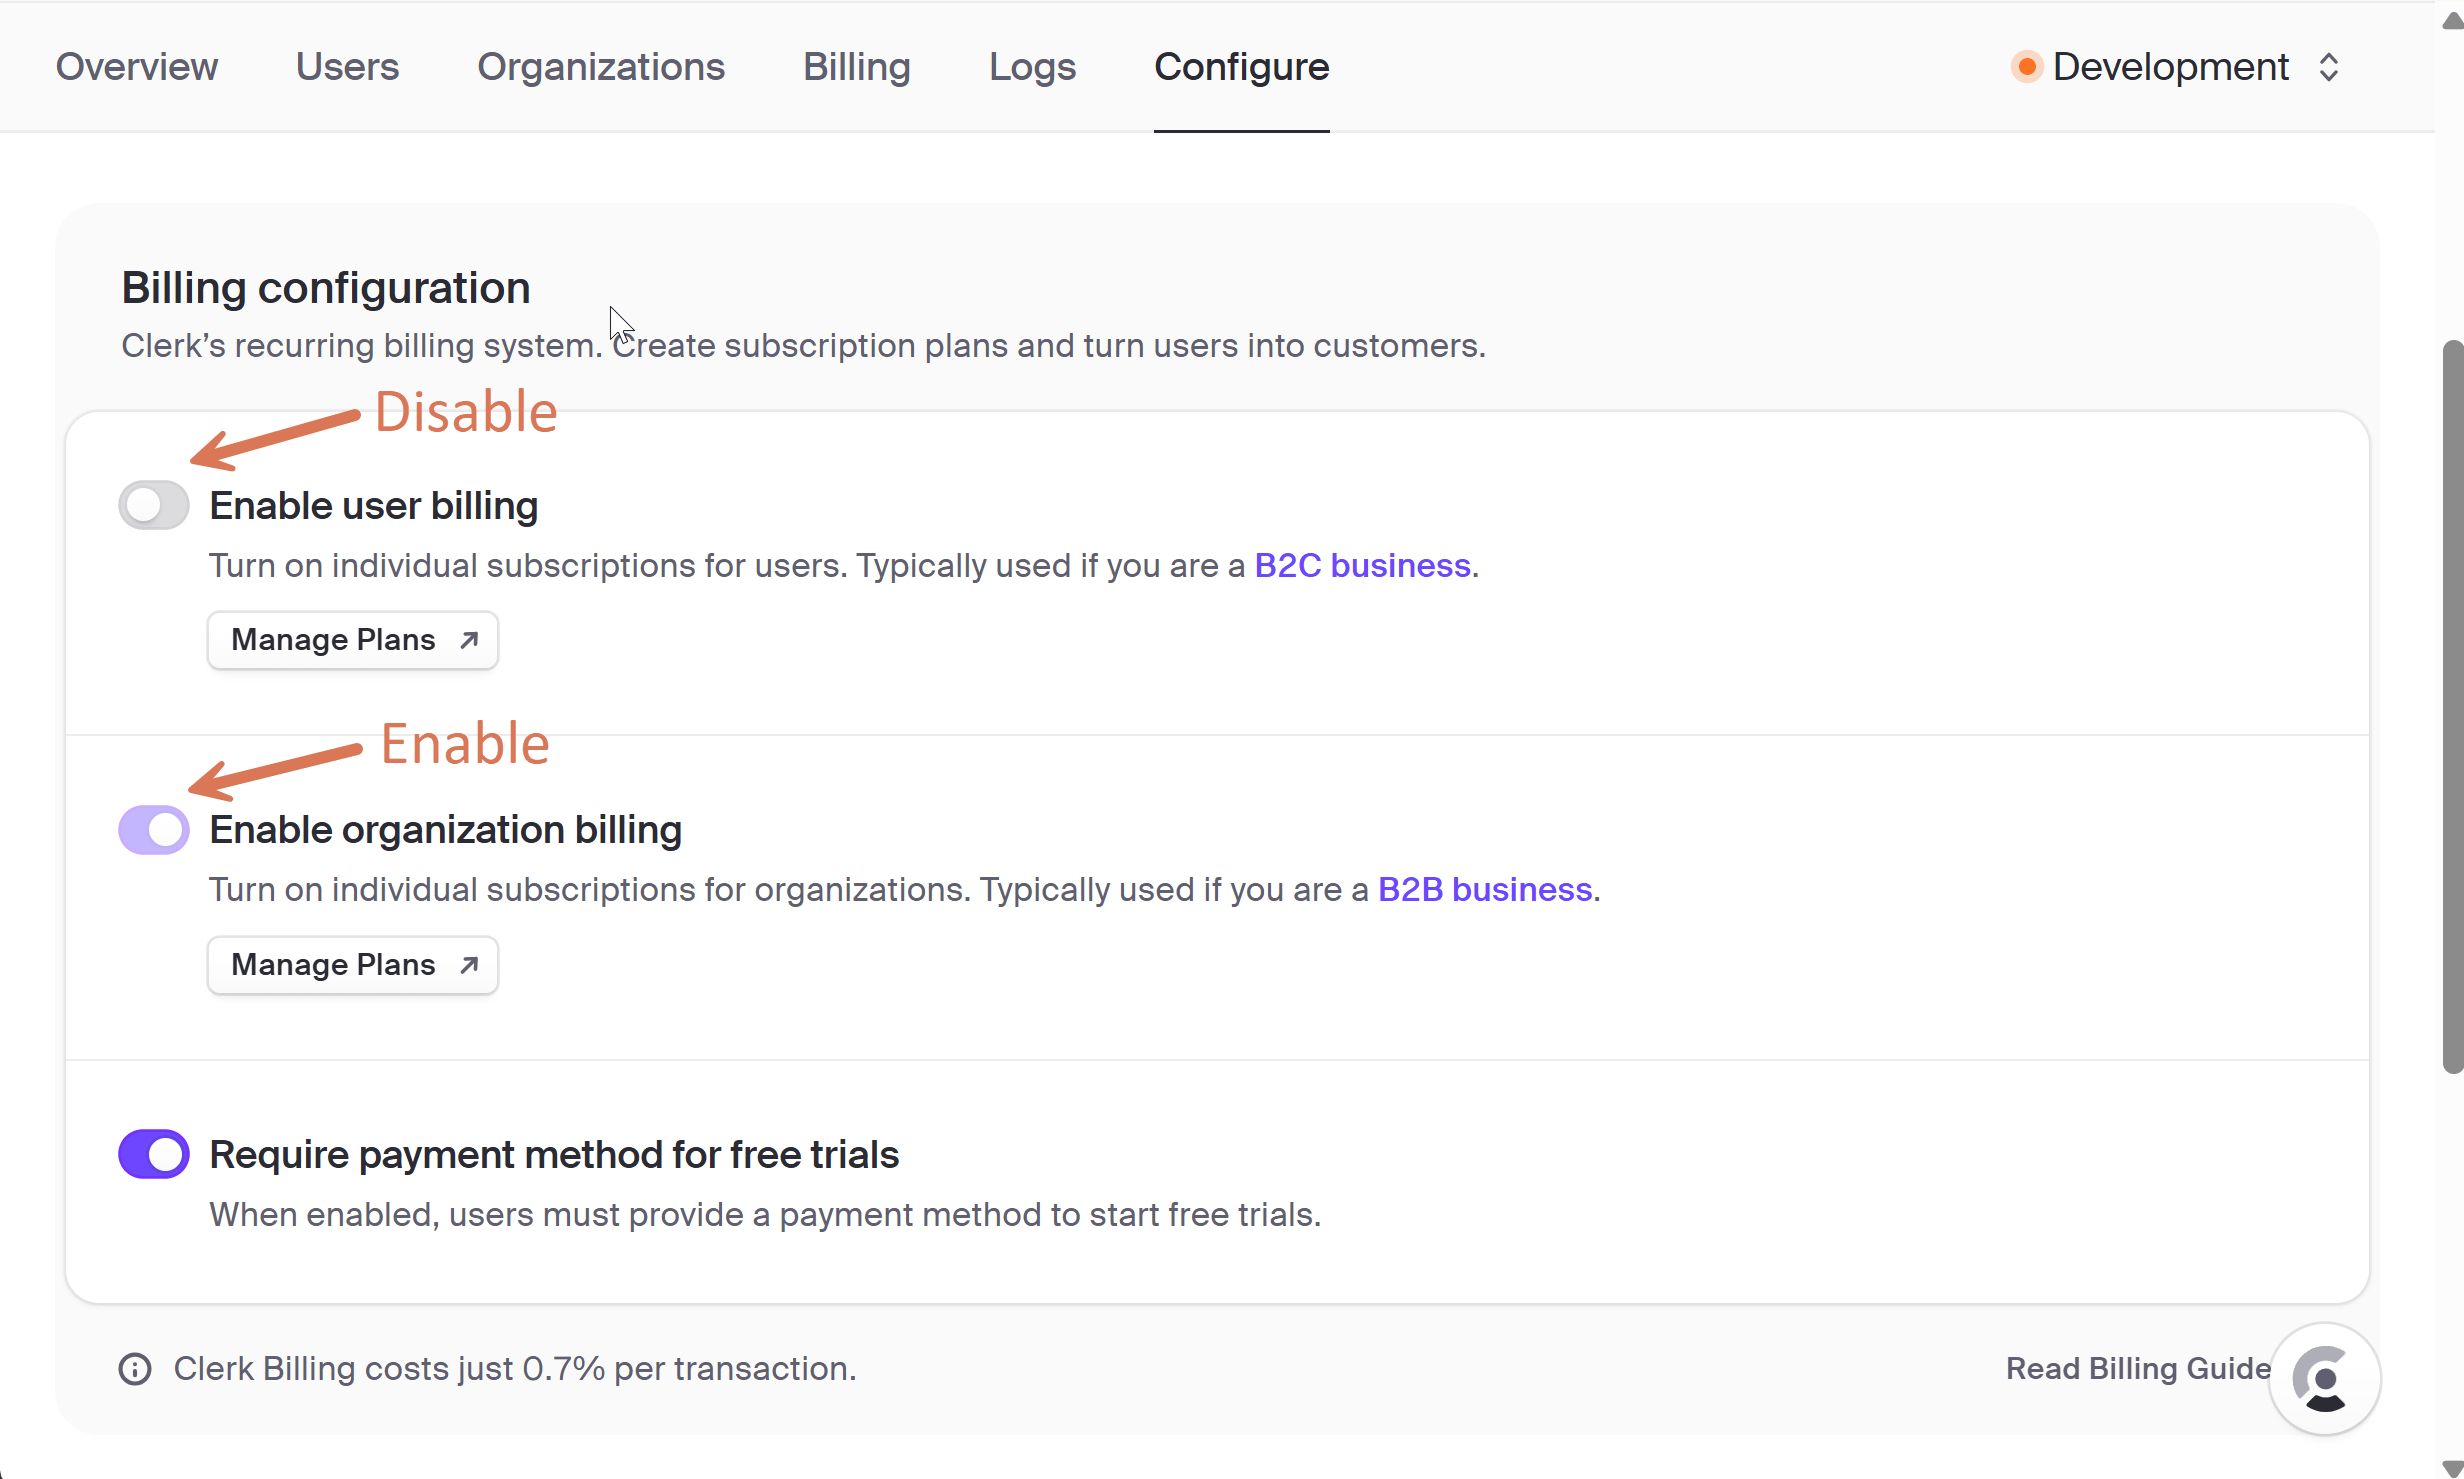
Go to Clerk Dashboard > Configure > Billing. It is impossible to disable user billing if you have active subscriptions. I had to find my user (Users > my user > Subscriptions) and cancel the subscription. Only then was I able to disable user billing and, instead, enable billing for organizations:
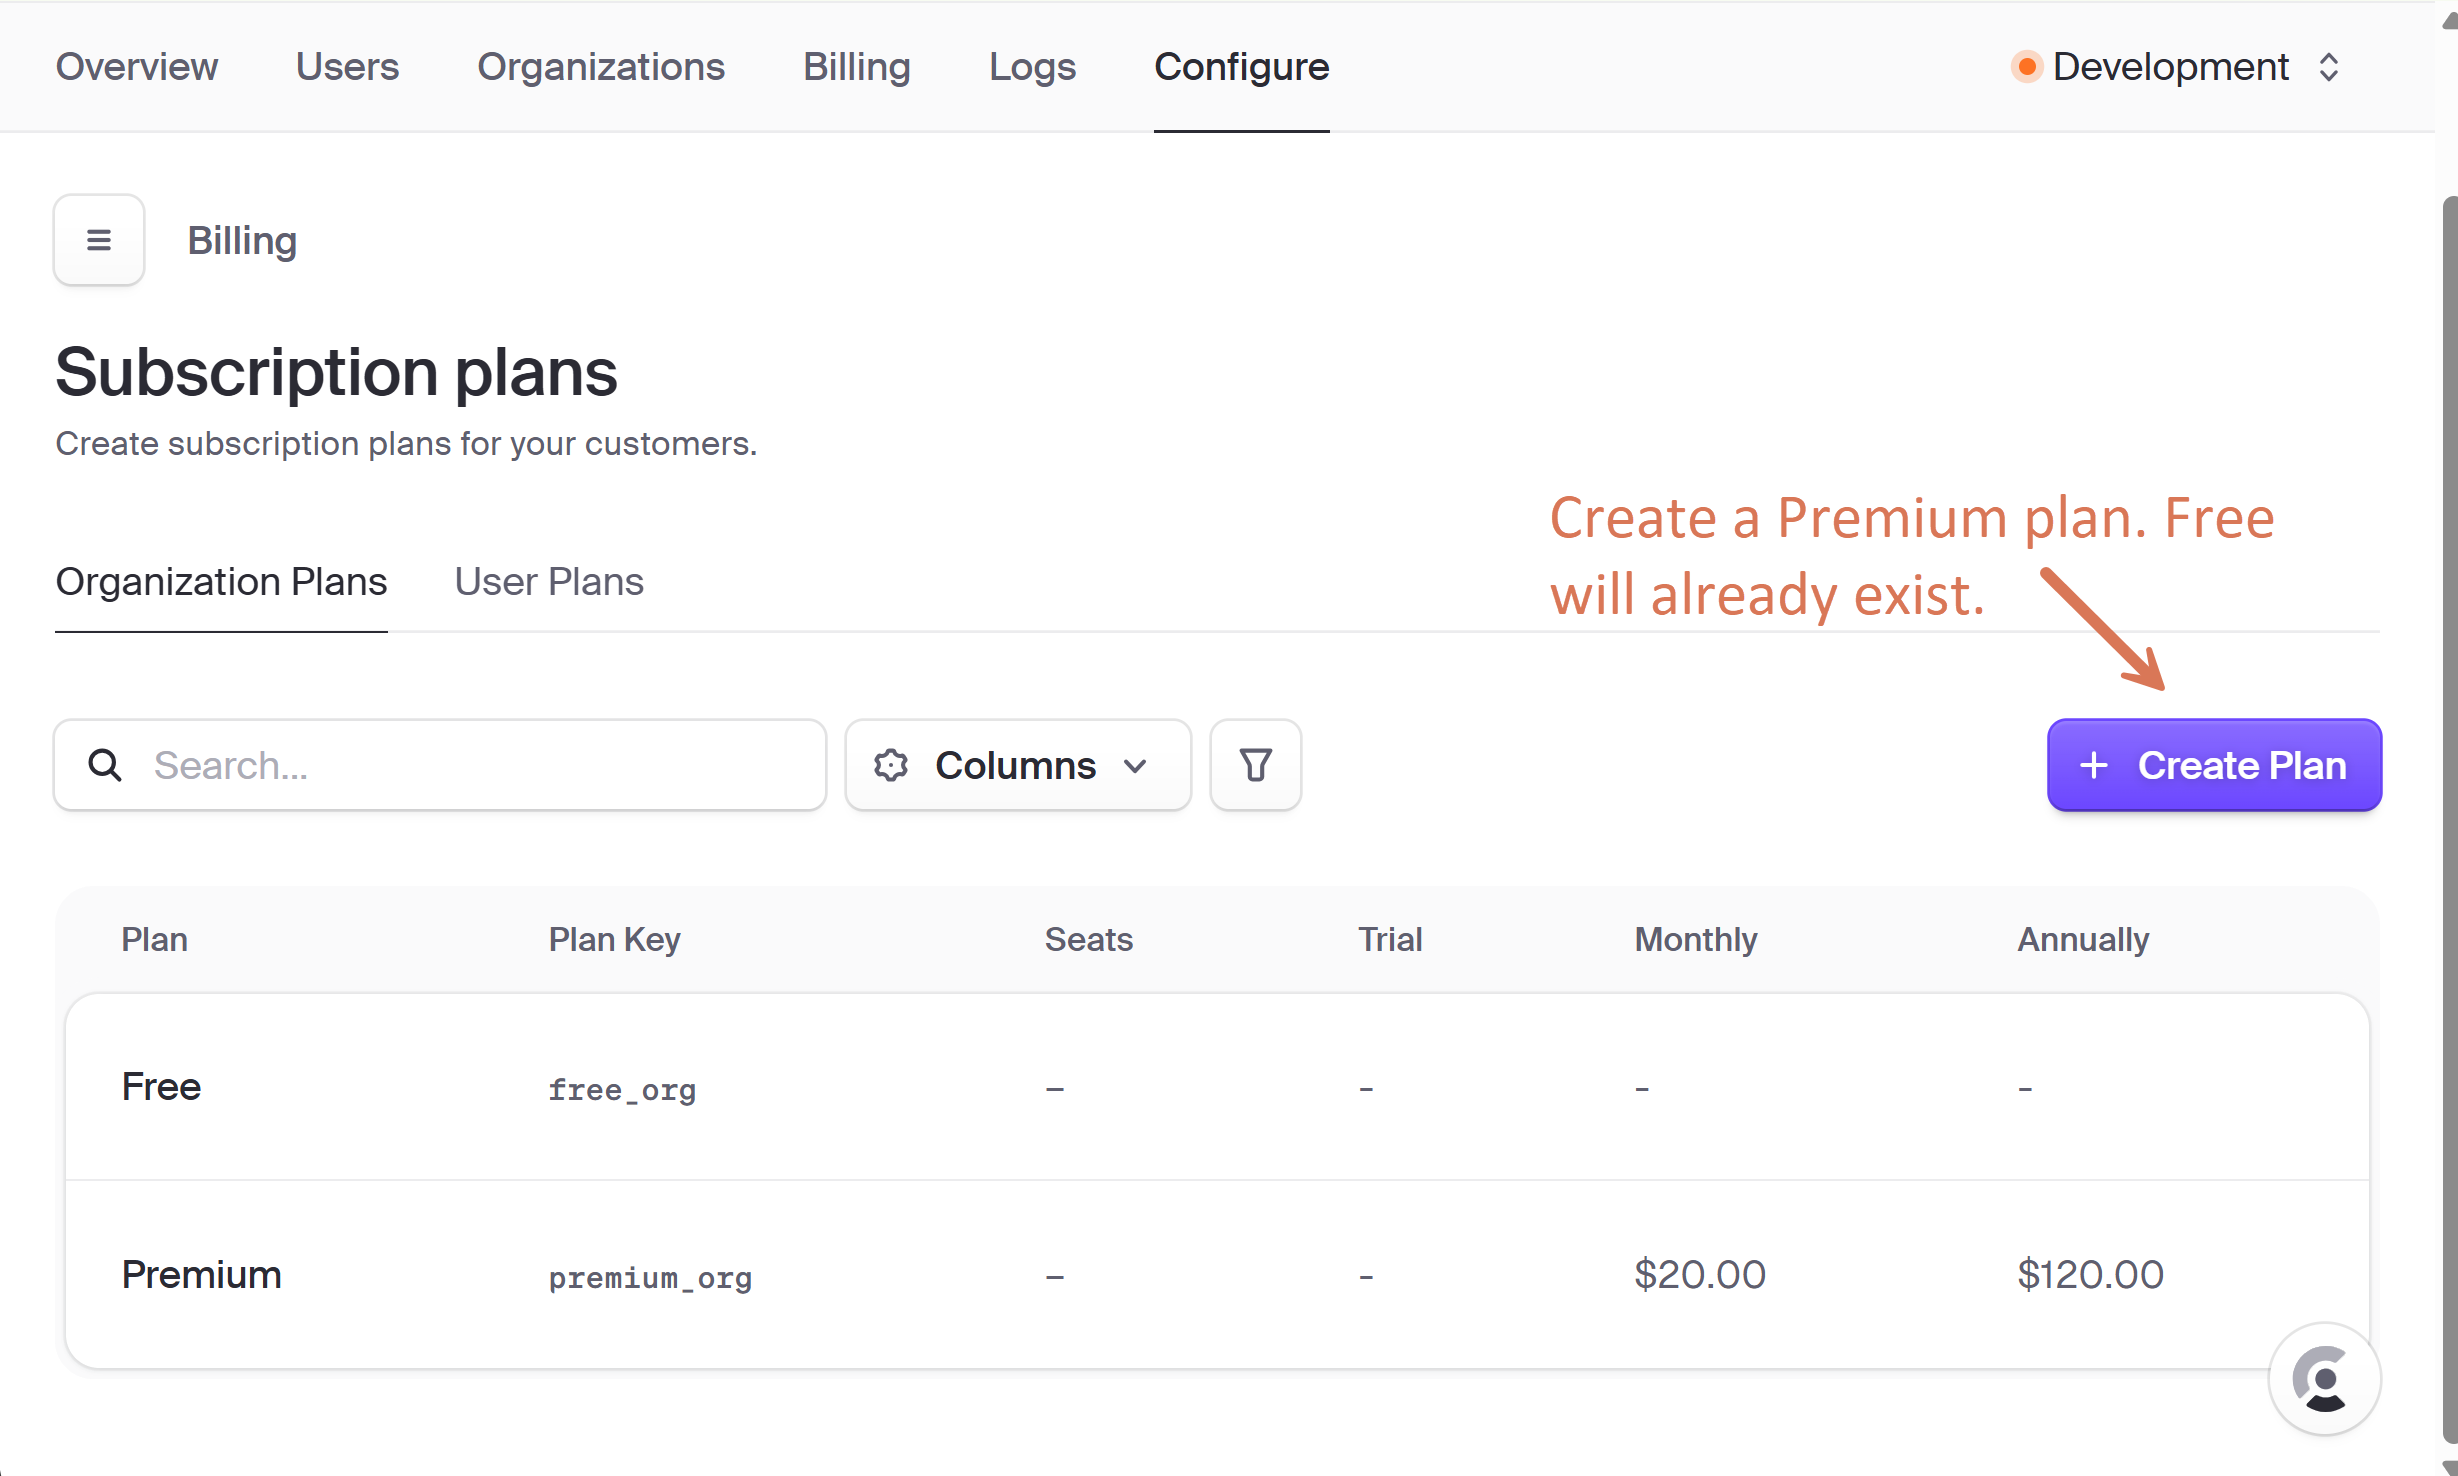
Step 2.2: Define organization plans
Next, go to Configure > Billing > Organization Plans. The Free plan is created automatically. I edited it and added the features that already existed: 1 active room and up to 100 participants per room.
Then I clicked “Create Plan” and defined Premium: up to 10 active rooms and up to 1,000 participants per room, with monthly and annual billing:
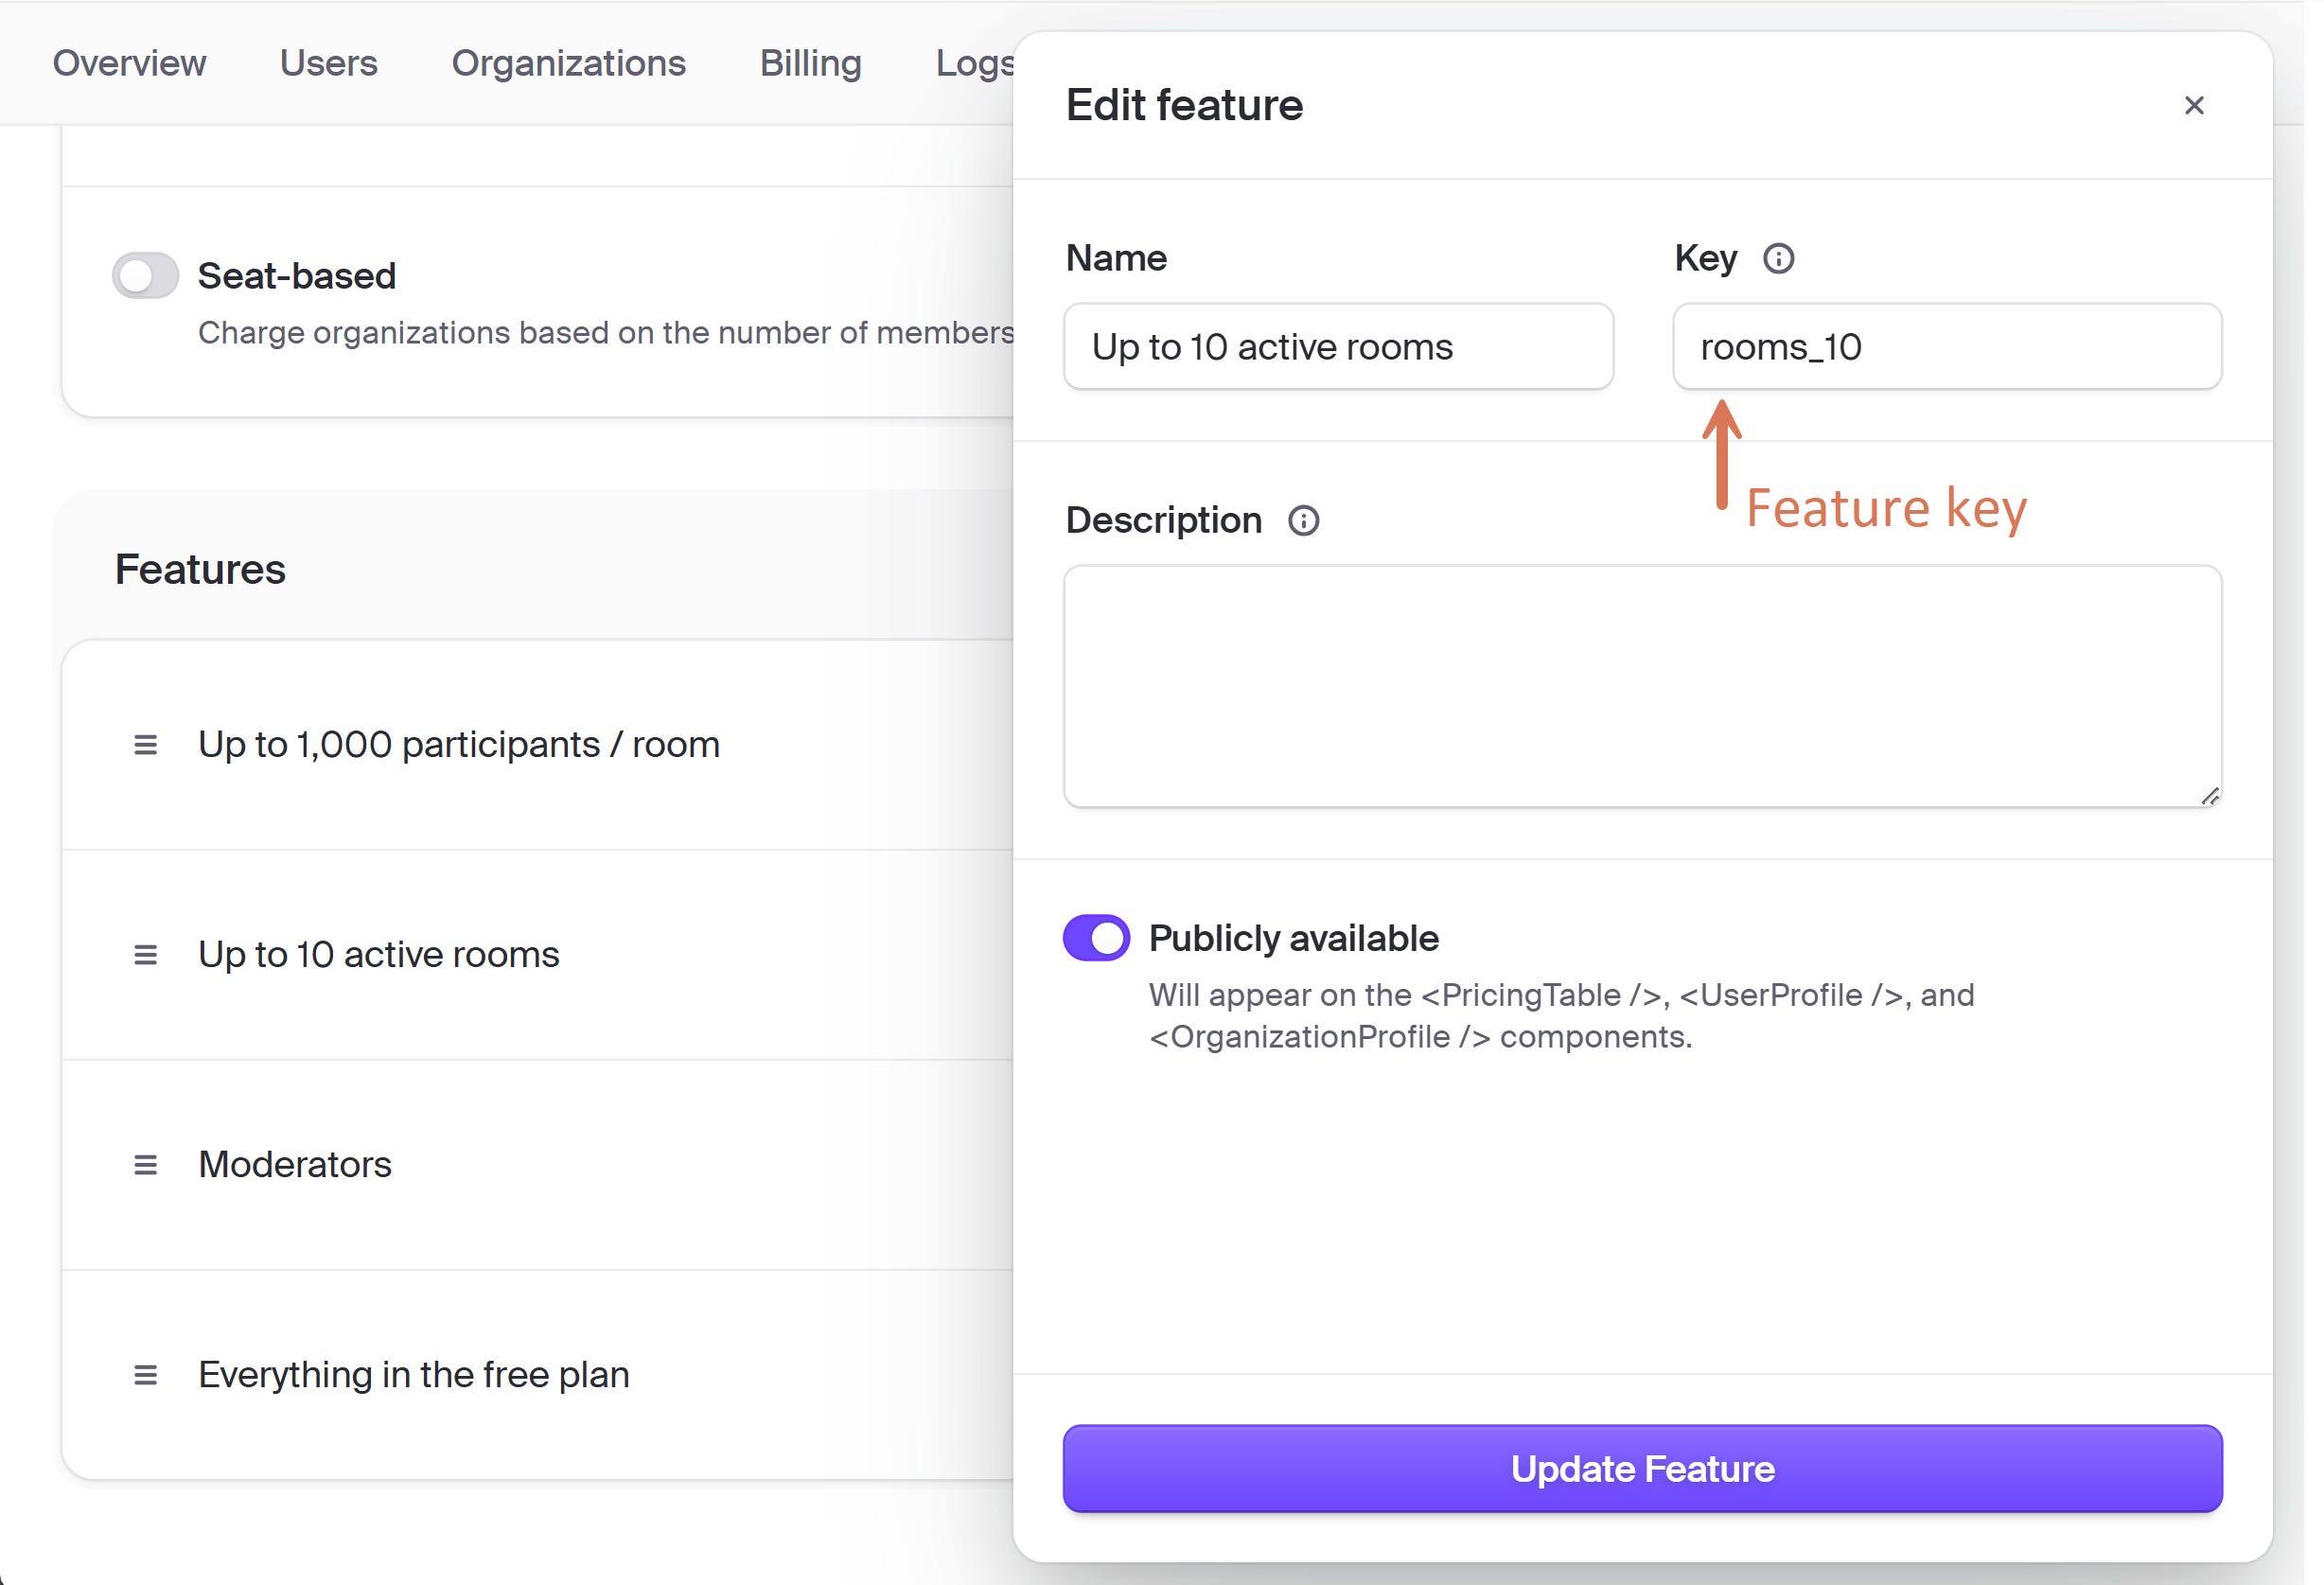
An important configuration element is the feature key. After adding a feature, I edited its key: rooms_10 and participants_1000. This is important later in the prompt:
Rather than hard-coding subscription plans in the app, we defined features that gate capabilities. Now, we can create a new plan anytime and choose, for example, up to 10 active rooms, but without 1,000 participants per room:
What you can do in an organization depends on its plan features
What specific users in that organization can do depends on their role
Step 2.3: Rename Member to Moderator
Go to Configure > Organizations > Roles & Permissions. By default, you have two roles: Admin and Member. I opened Member, renamed it to Moderator, and changed the key to org:moderator. I didn’t change its permissions:
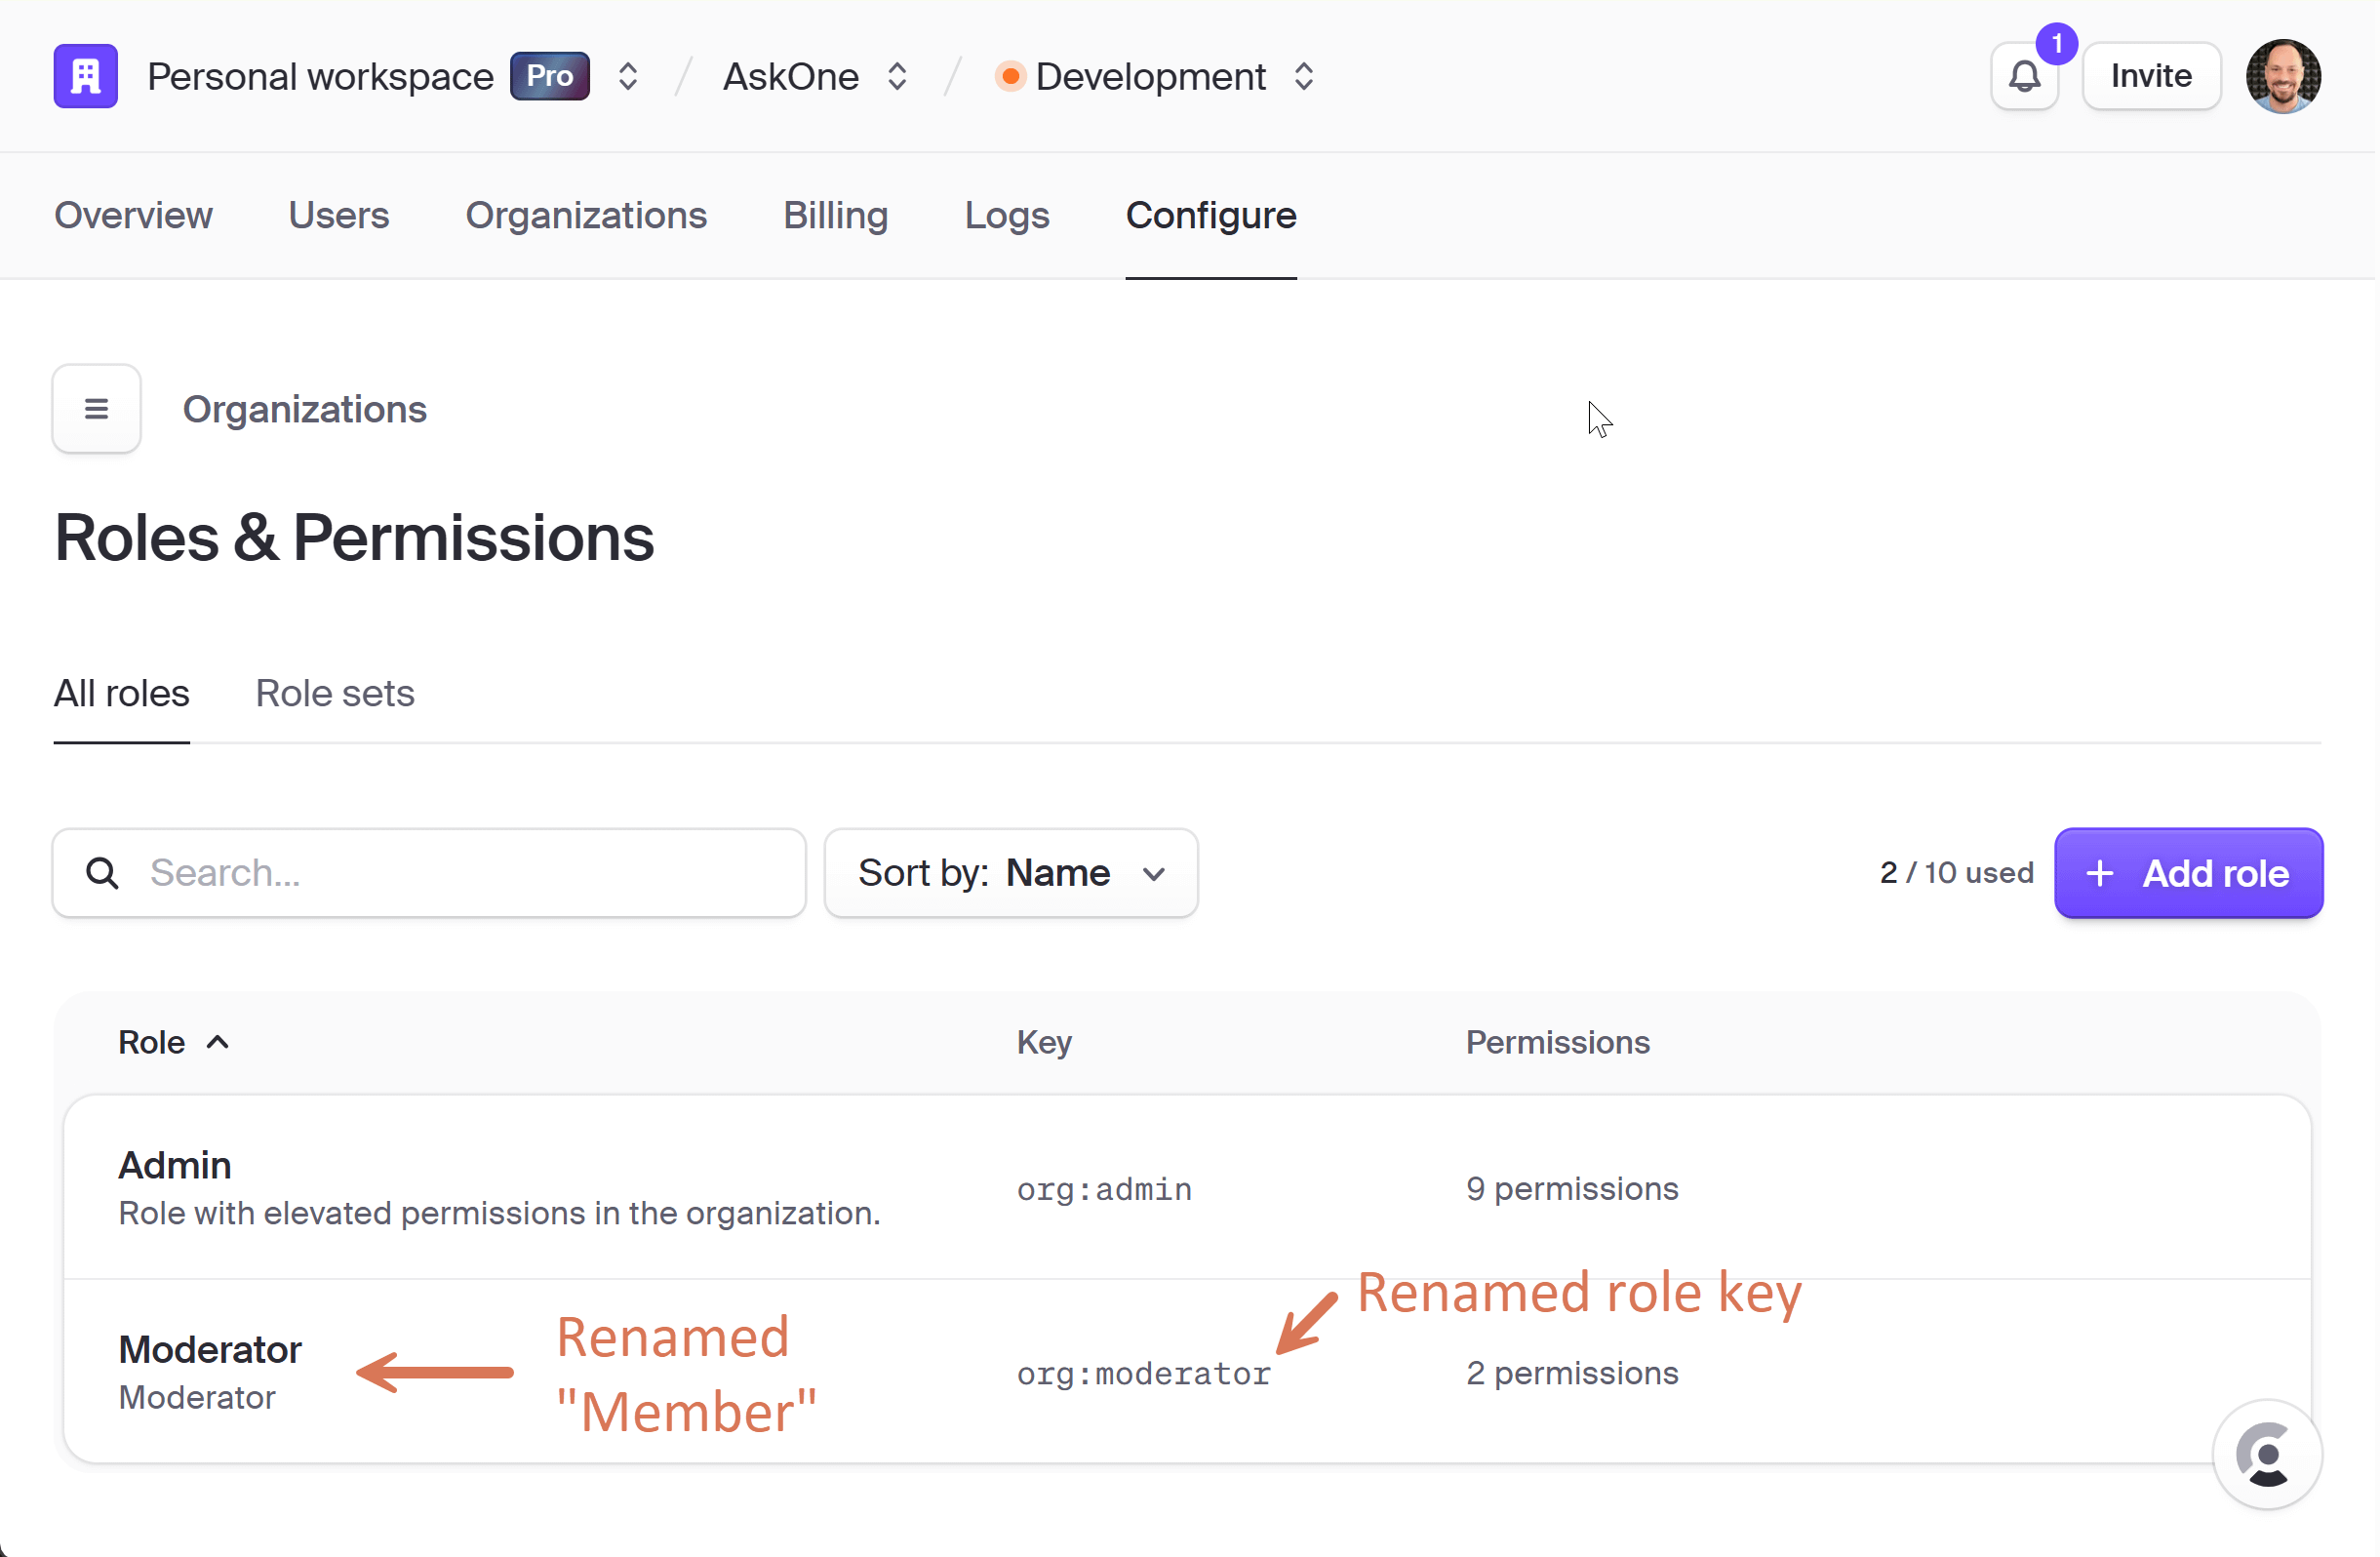
📌 After enabling those plans, we don’t have to change anything in the app. Again, there is no prompt. The app is integrated with Clerk. I tested it on the Free plan: I had two open rooms, and the button to open a new one got disabled.
Step 2.4: Ask the agent
The prompt is in the template: prompts/007-organizations-moderation-and-billing.md. Replace the company details with yours and paste it into Claude Code (or Codex, see Section 3).
In the prompt, I explained that there is a role, org:moderator, that can view open and archived rooms only in its organization. If you are an admin, you can do everything in this organization. I also explained the plans, and that we do not rely on plan names, but on those two features.
Just to make this prompt comprehensive, I also asked it to build a landing page:
research competitors (without naming them)
show Clerk’s pricing table
suggest legal documents
add public metadata (so that when you share the website, it is visible with a preview)
mention Microsoft Clarity without cookies in the policies (more in Section 8)
update all the documentation
📌 Claude asked me: what if there is a single user and there is no moderator? We decided that by default, rooms should be moderated, but there is a special flag you can disable in the interface. That’s the discussion from Section 1. The prompt is its outcome.
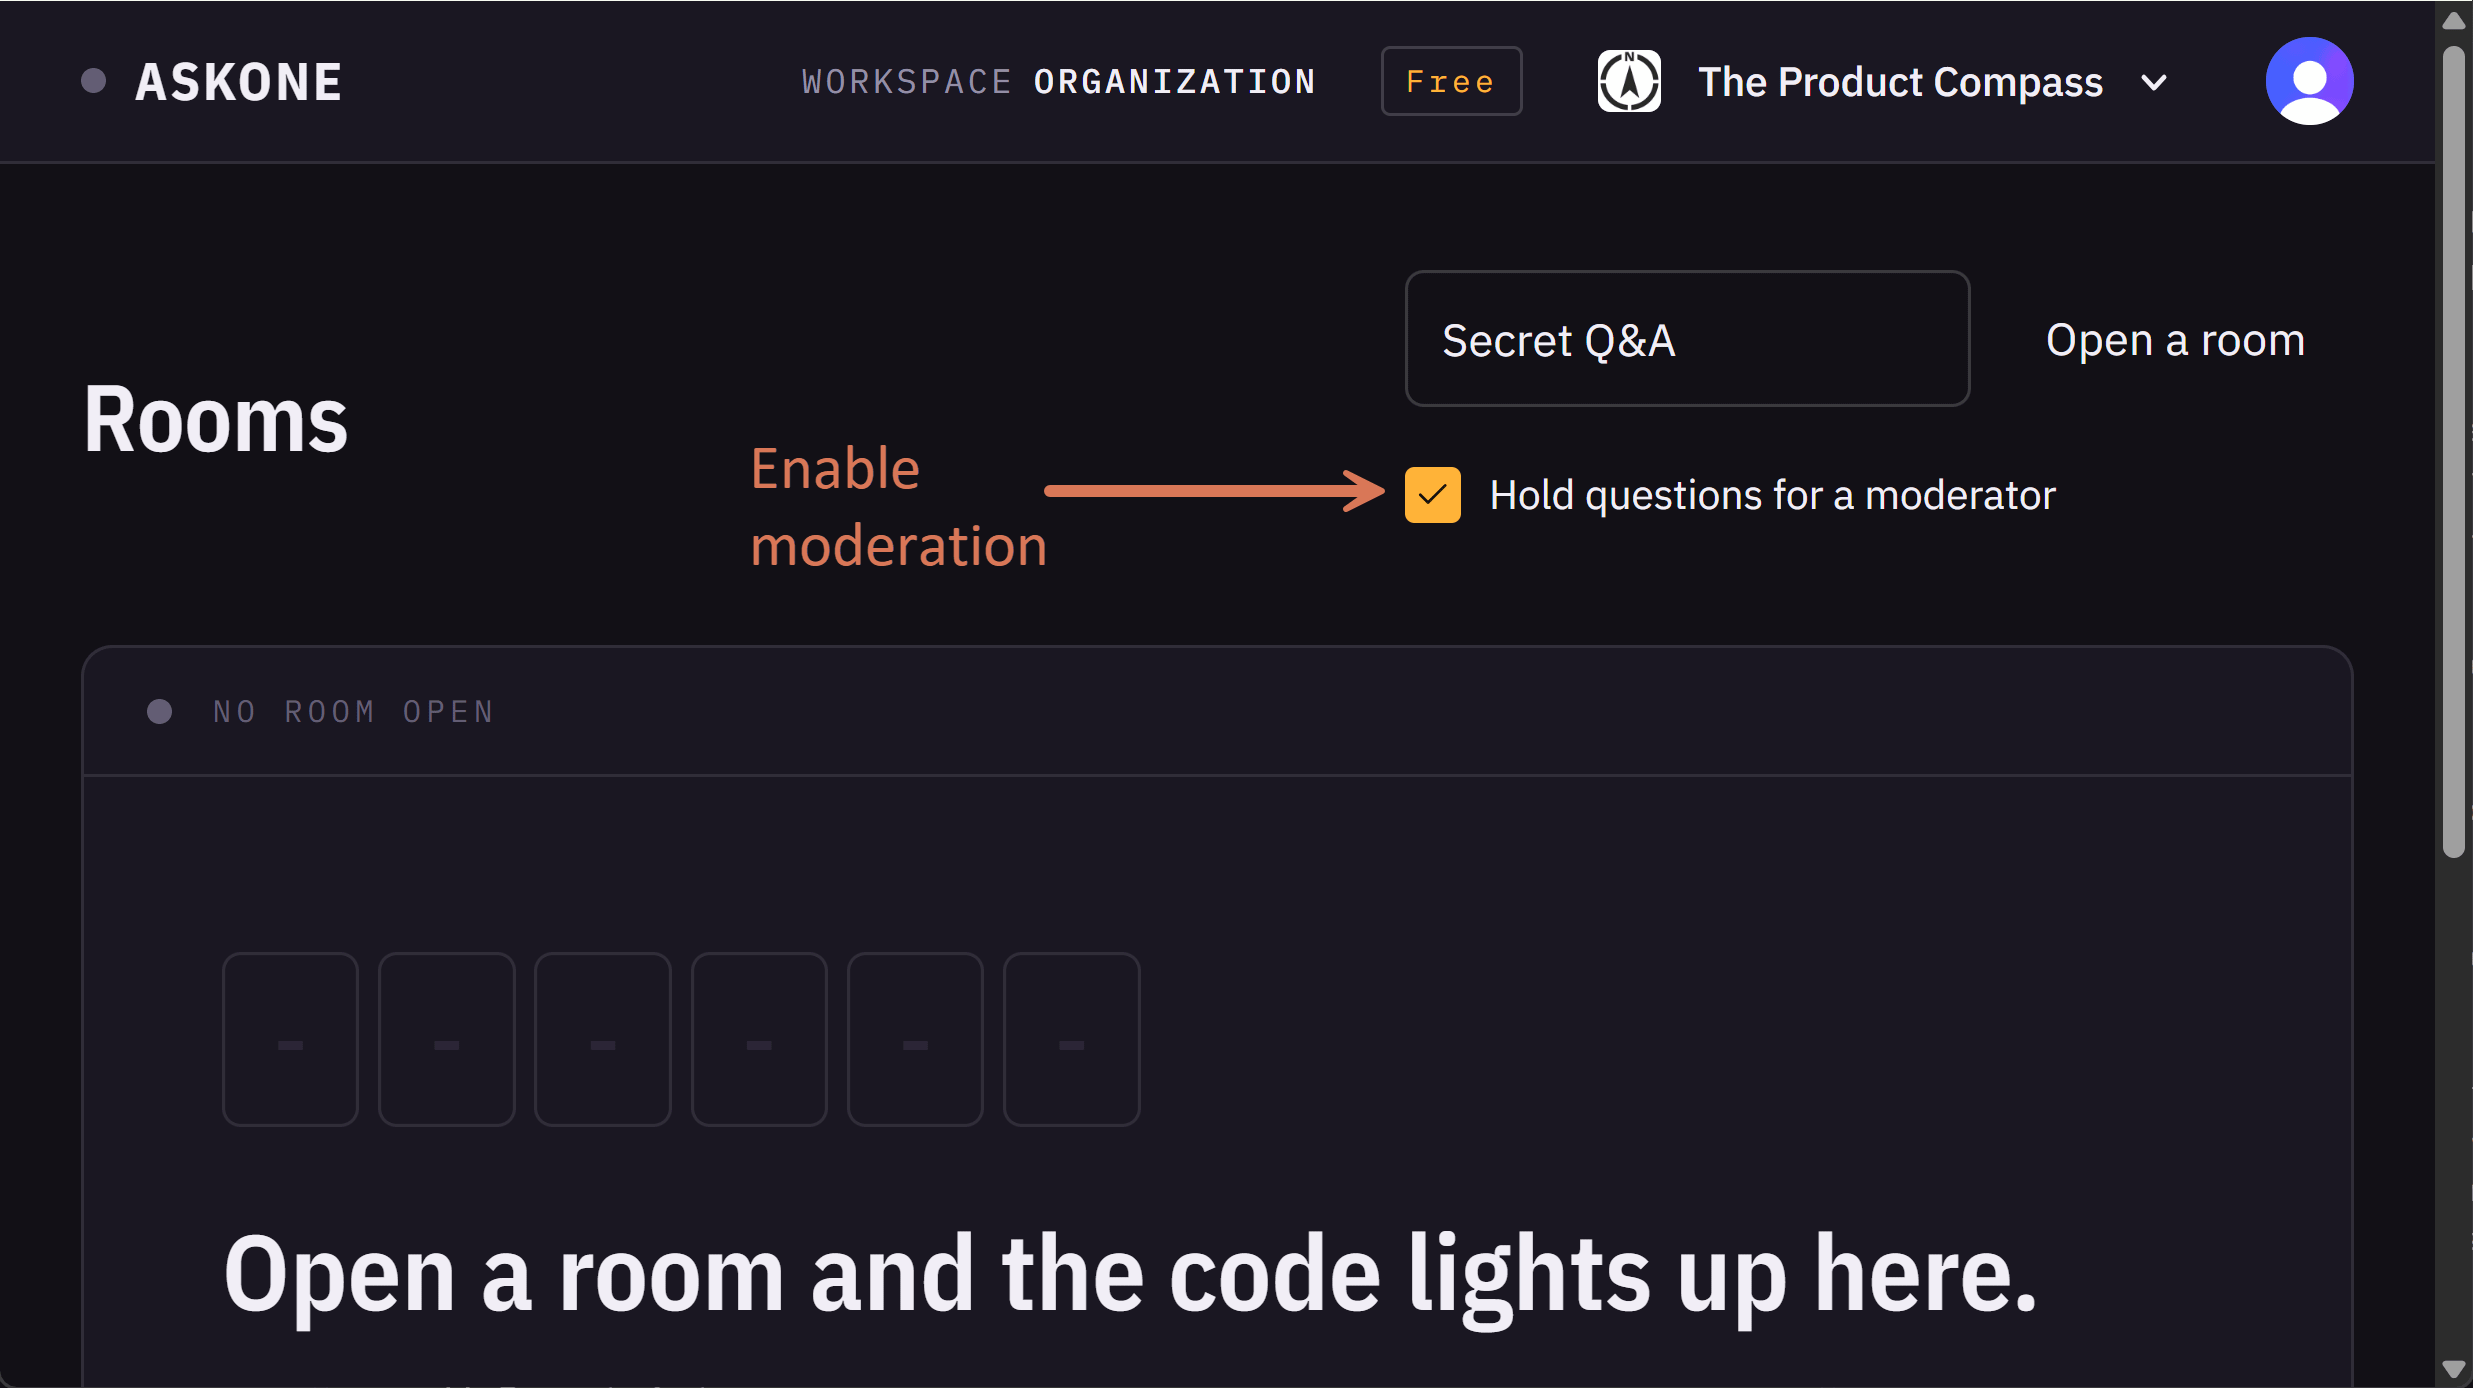
You will get a moderated room. When opening a room, there is a special checkbox: whether the room should be moderated:
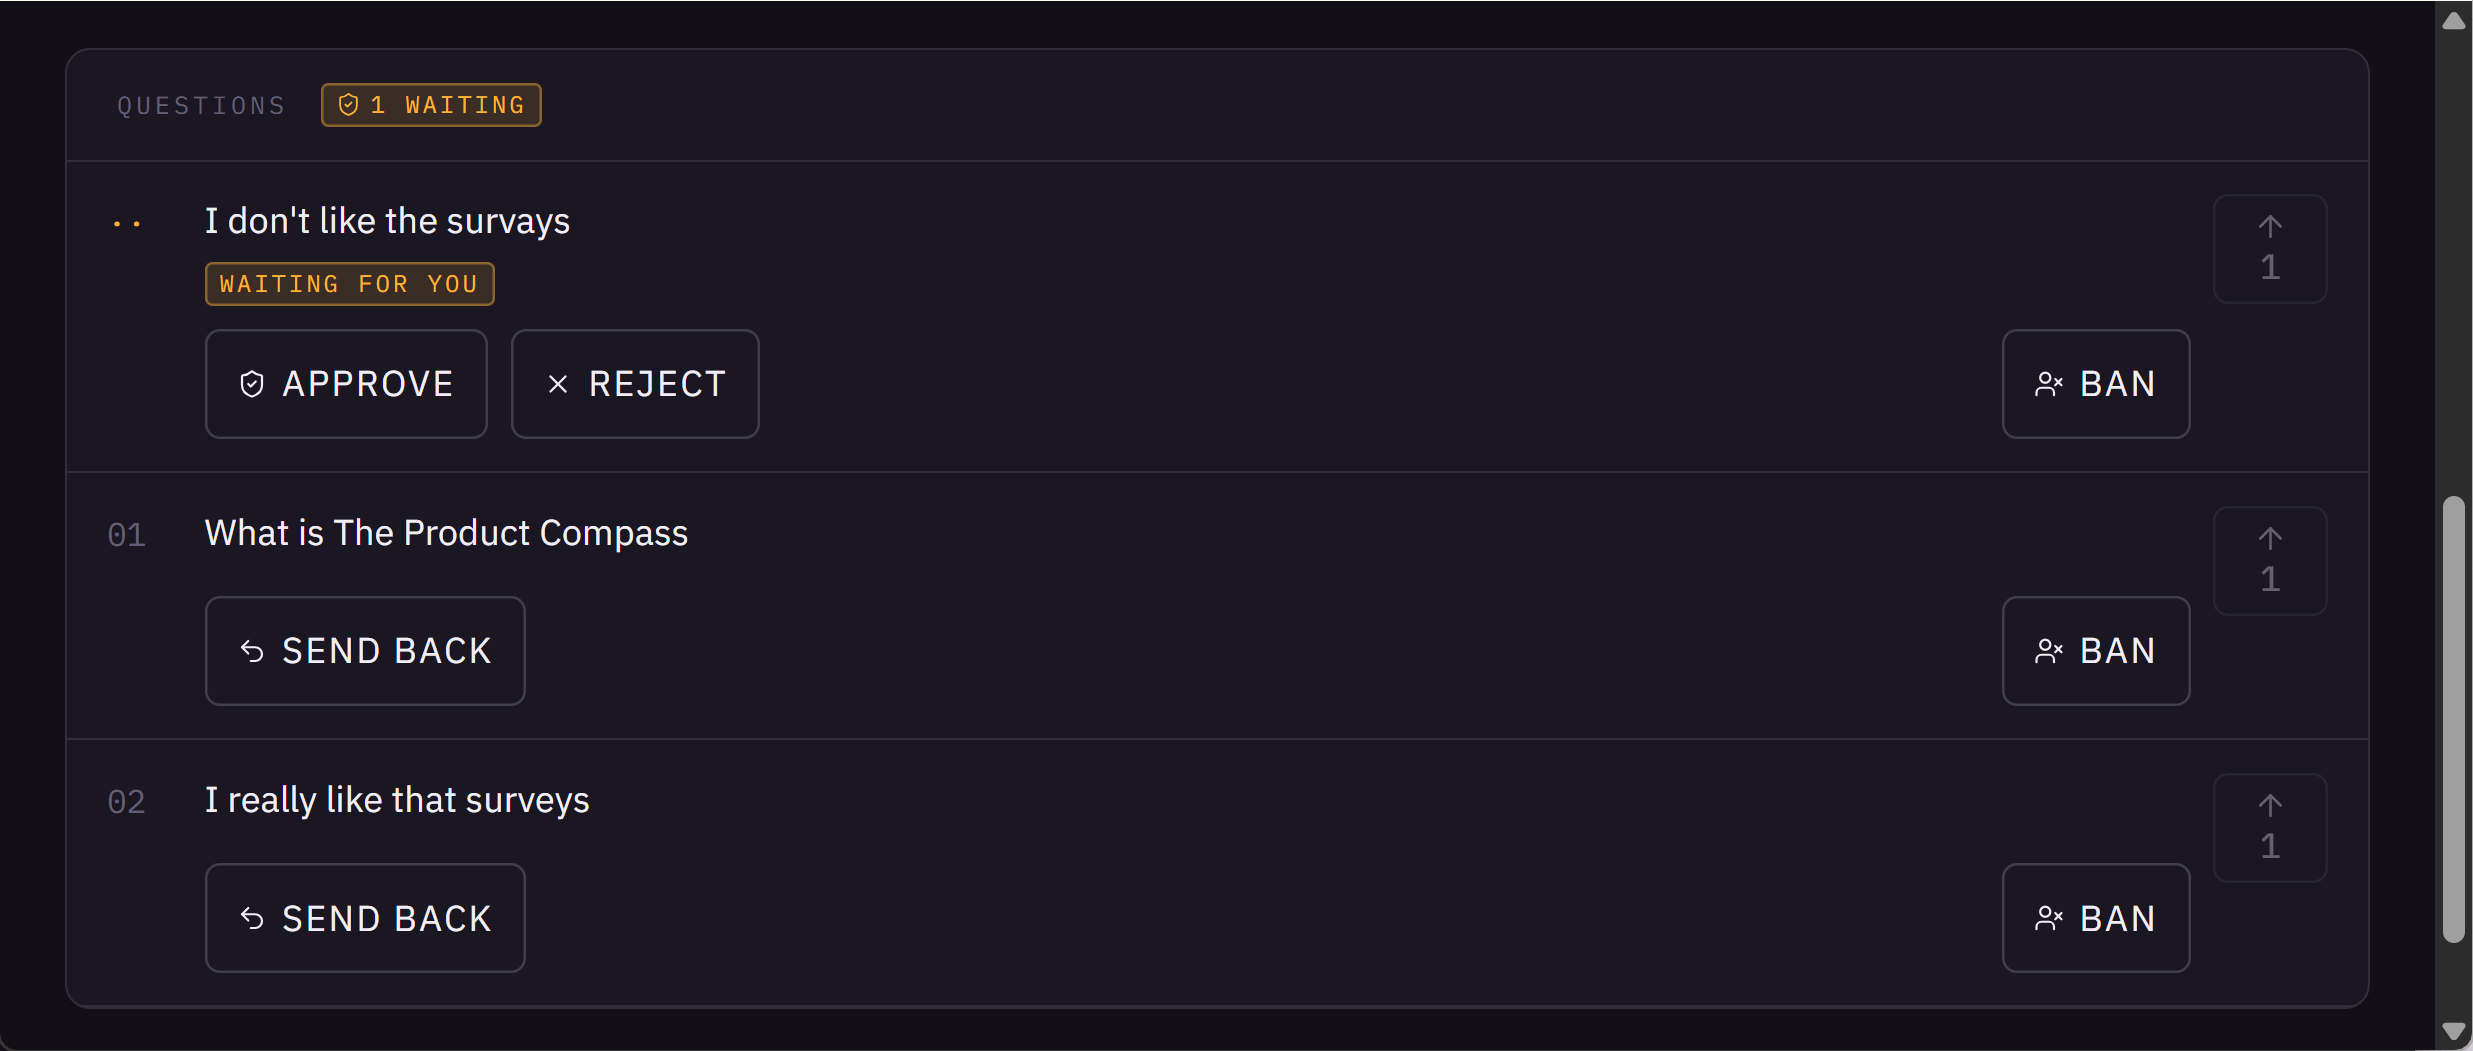
If a participant asks a question, it is waiting for the host. As a host, I see all those questions, and I can approve, reject, or ban the user. Even though the user is anonymous, they will be blocked by the cookie. If they have disabled cookies, they cannot ask questions.
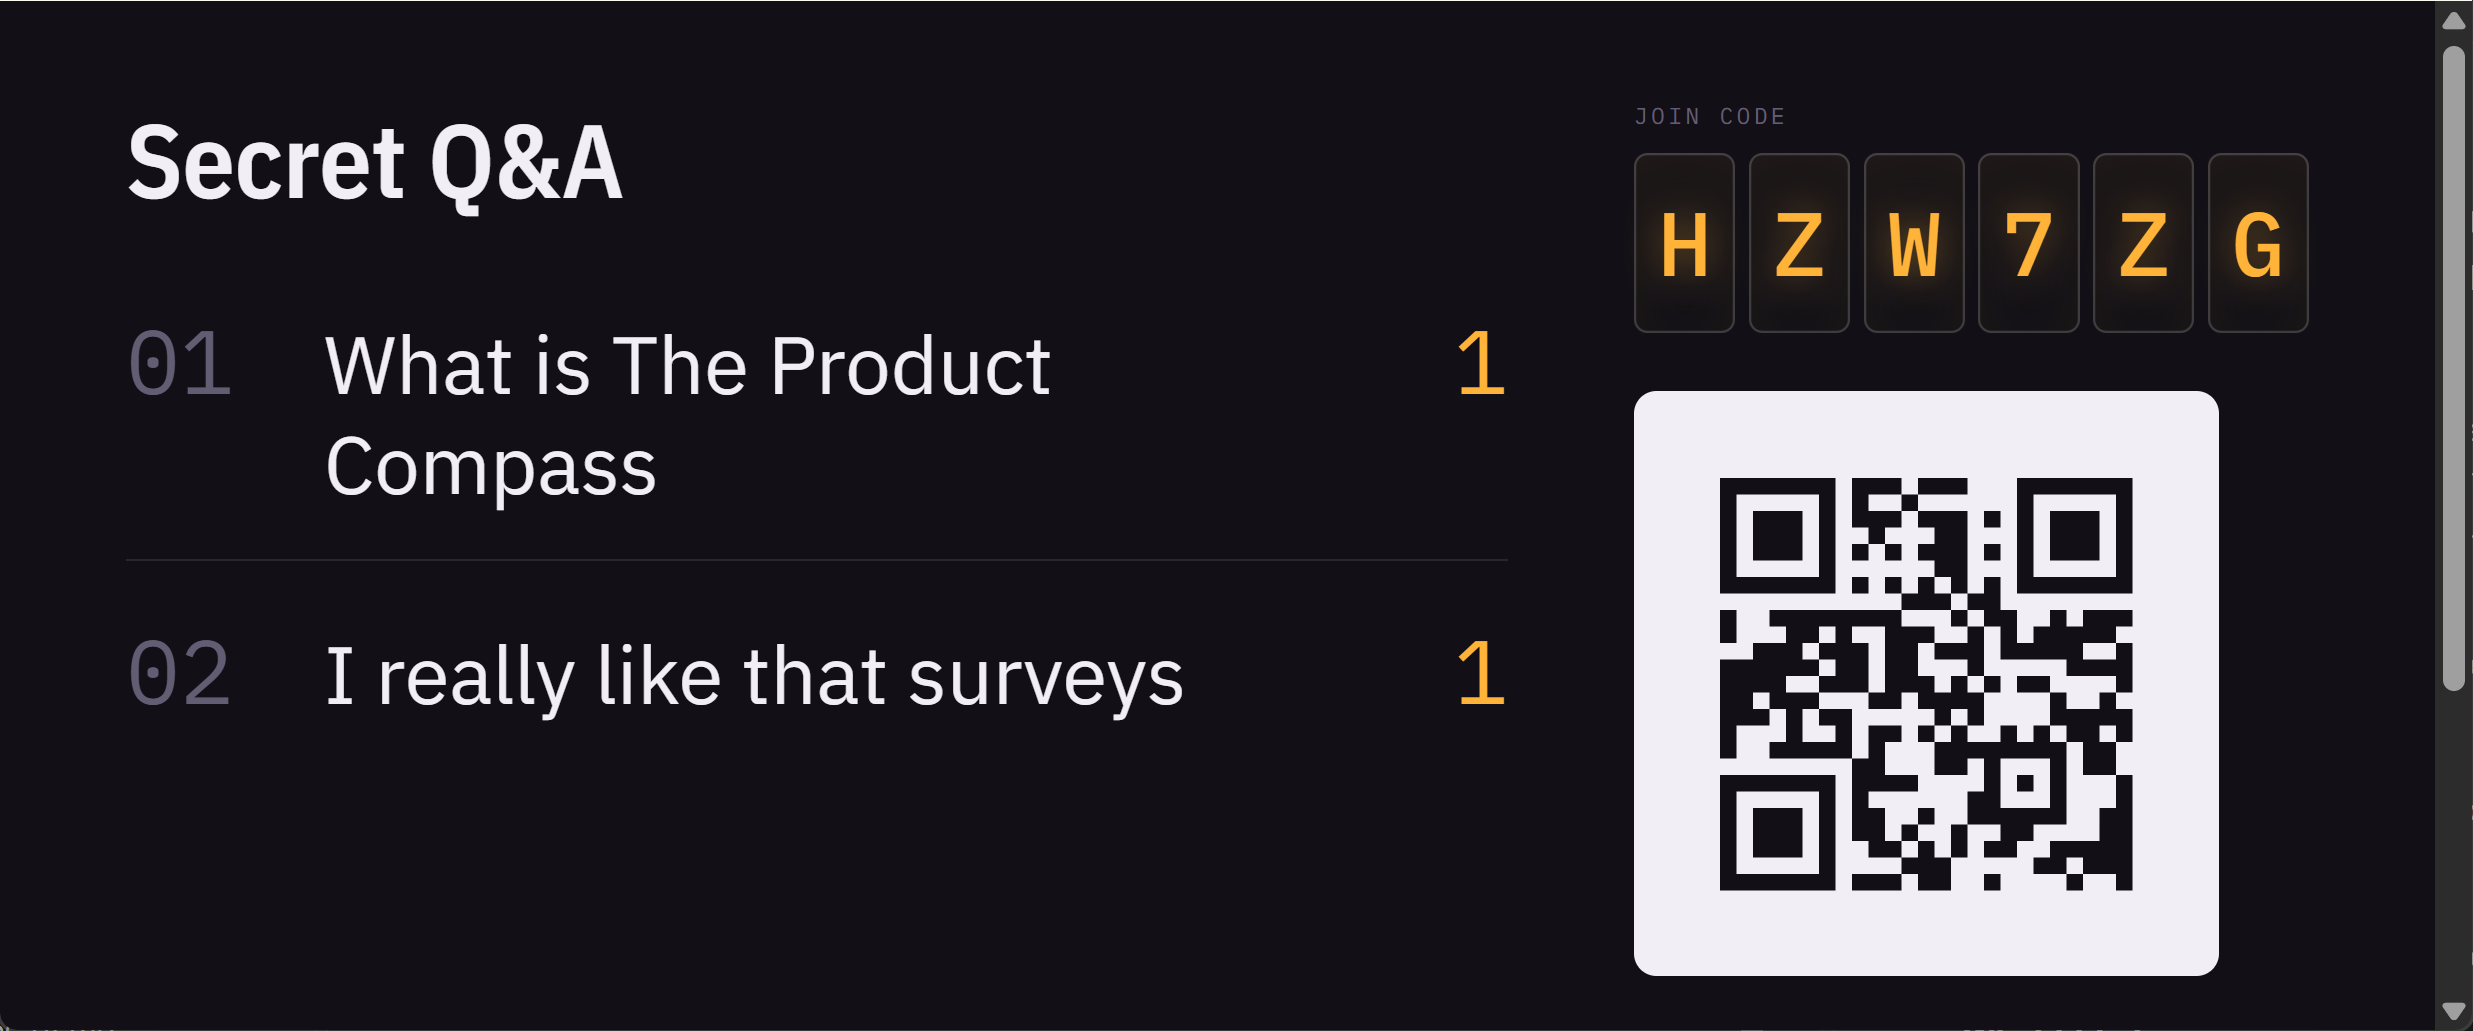
After the moderator approves, the question becomes visible for everyone. We can open the projector view - this is what the host would present on the screen:
On the landing page, people who are not signed up see basic information about the product: the value proposition, how it is different, and the legal documents:
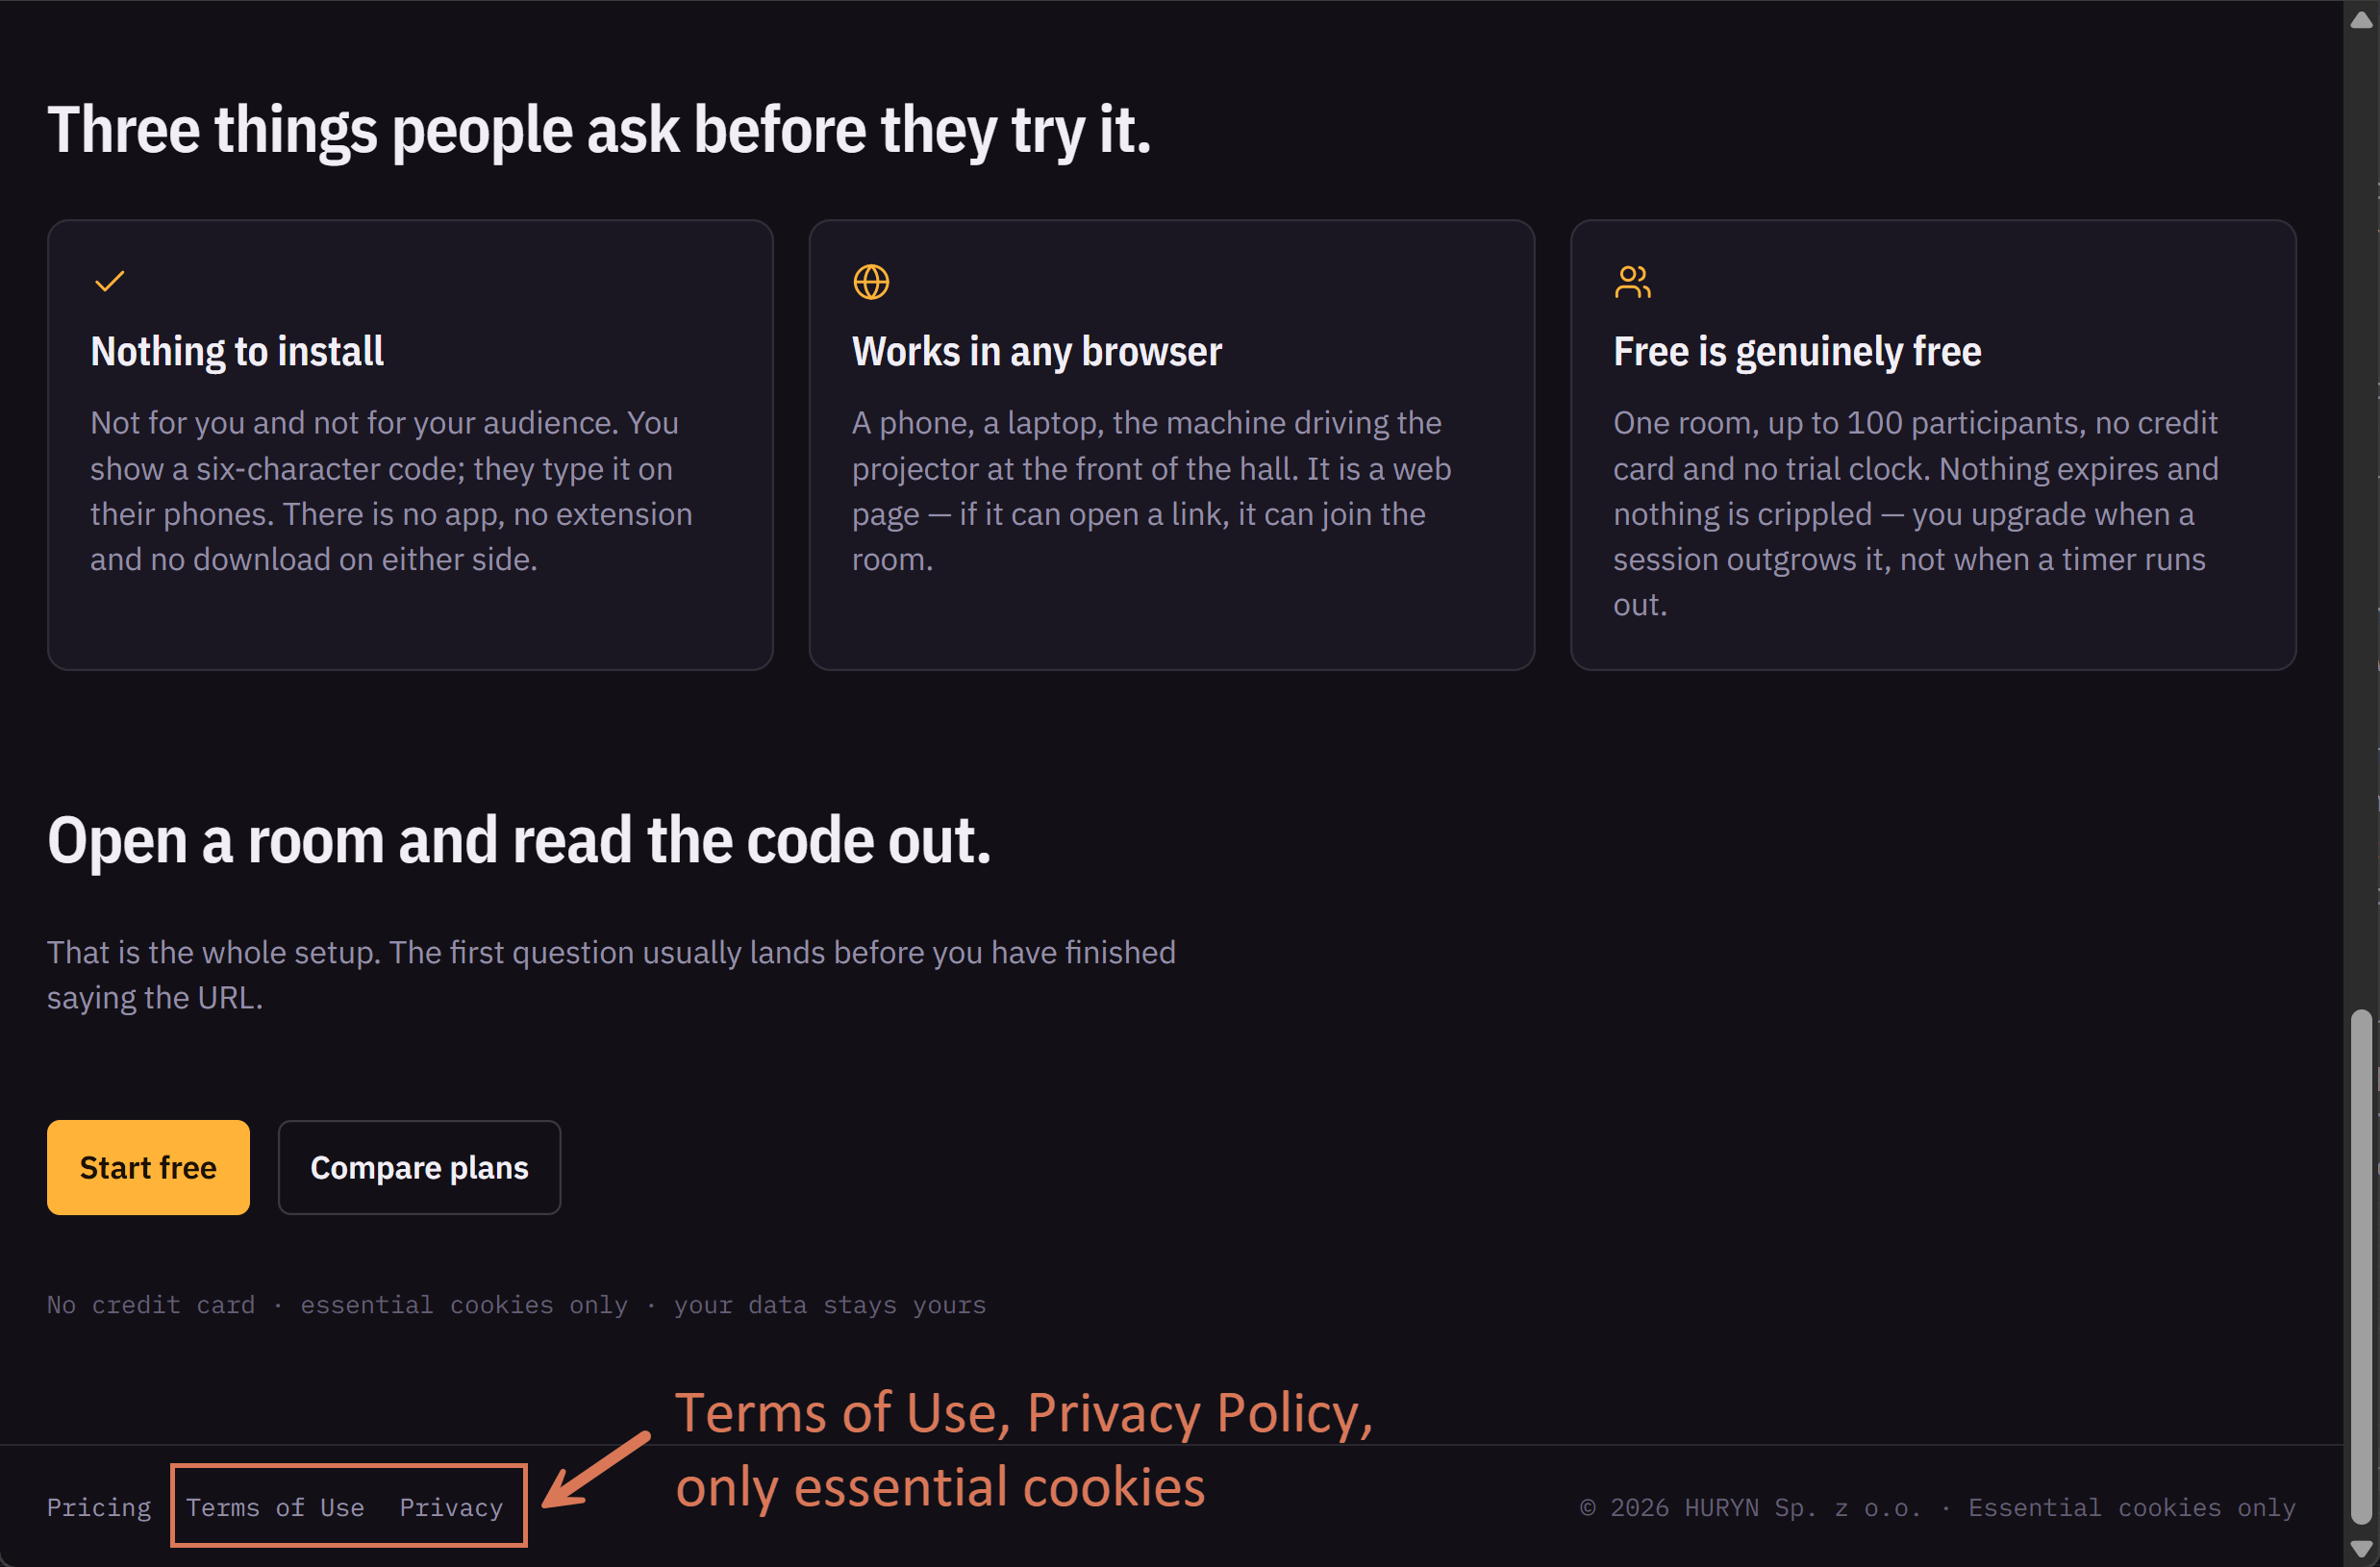
3. Create a Production GitHub Branch
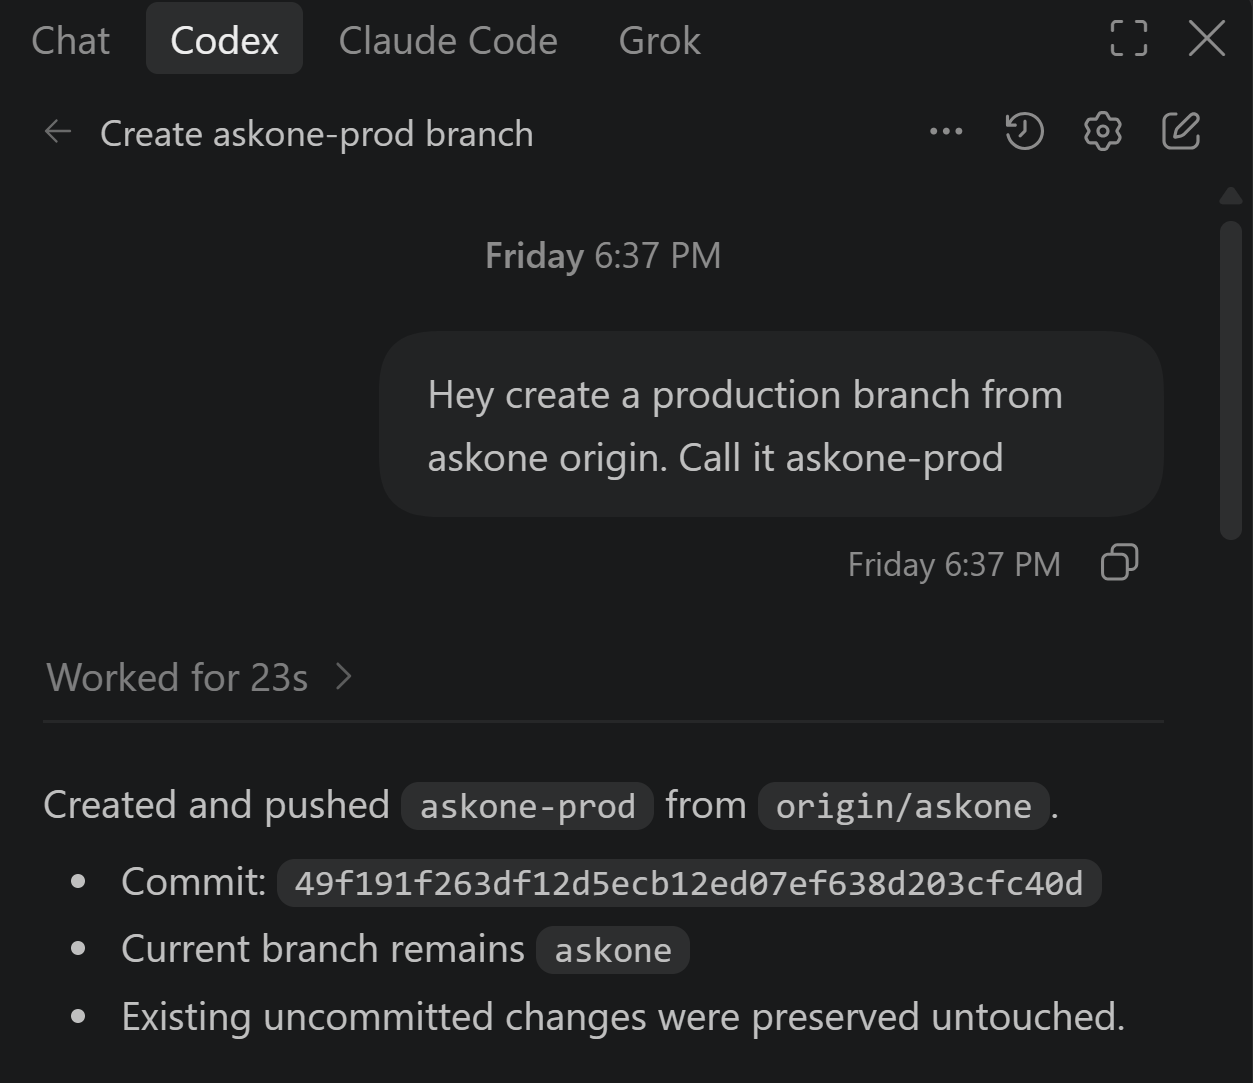
So far, every change we push to GitHub appears on Netlify immediately. For a production environment, we need a separate branch. Ask the agent:
Create a production branch from origin/askone. Call it askone-prod. Ignore my local modifications, they are work in progress.“Origin” means what is right now on GitHub, not my local modifications. LLMs understand it.
📌 Normally, you keep main as your development environment and create a separate branch for production. Mine is the starter template I shared with you, so that’s why I have two extra branches: askone (dev) and askone-prod (production).
People asked me on Slack how to use other coding agents. The solution template I shared in the previous and the current article is ready for it.
I ran this step with Codex. All the agents, whether it is Grok, Codex, or Claude Code, read AGENTS.md and the Clerk and Supabase skills. The only thing I had to fix was authenticating the Supabase MCP server, because Codex needed a separate one. It helped me do it. Other than that, out of the box, Codex works:
You can learn more about GitHub branches here: How Git Works by ByteByteGo
4. Create a Production Supabase Project
Just like on GitHub, we can have multiple variants of the database. Supabase calls them branches. But this requires a paid subscription, and you can’t create a branch and make it the production one. I don’t want you to fight it.
Instead, create a new project and sync it with the production branch on GitHub. It’s clean, and it’s free.
Step 4.1: Create a new project
Go to Supabase and create a new project, just like in Part 1 (Step 3.1). Call it, for example, askone-prod. Then go to Project Settings > API, as in Part 1. Note:
SUPABASE_URLSUPABASE_SECRET_KEY
Step 4.2: Sync it with GitHub
Go to Supabase, select your project, click “Manage branches.” An example for a different project:
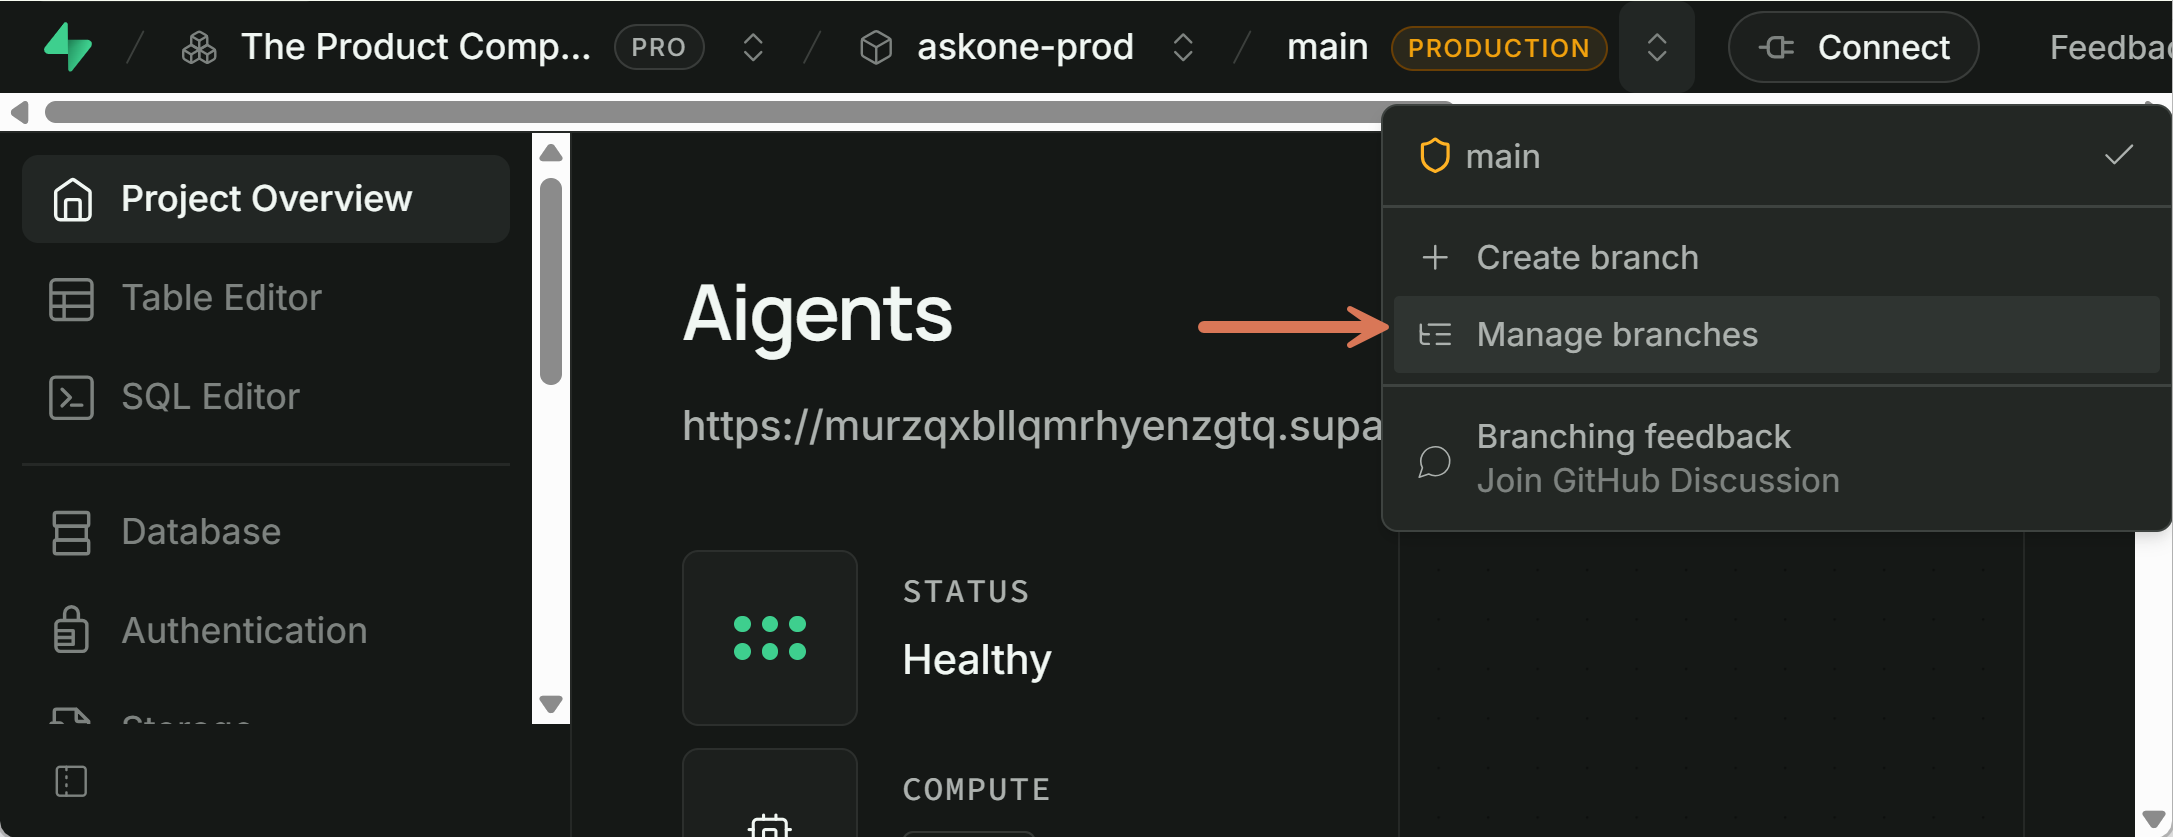
Then, under Configure, click “GitHub connection:”
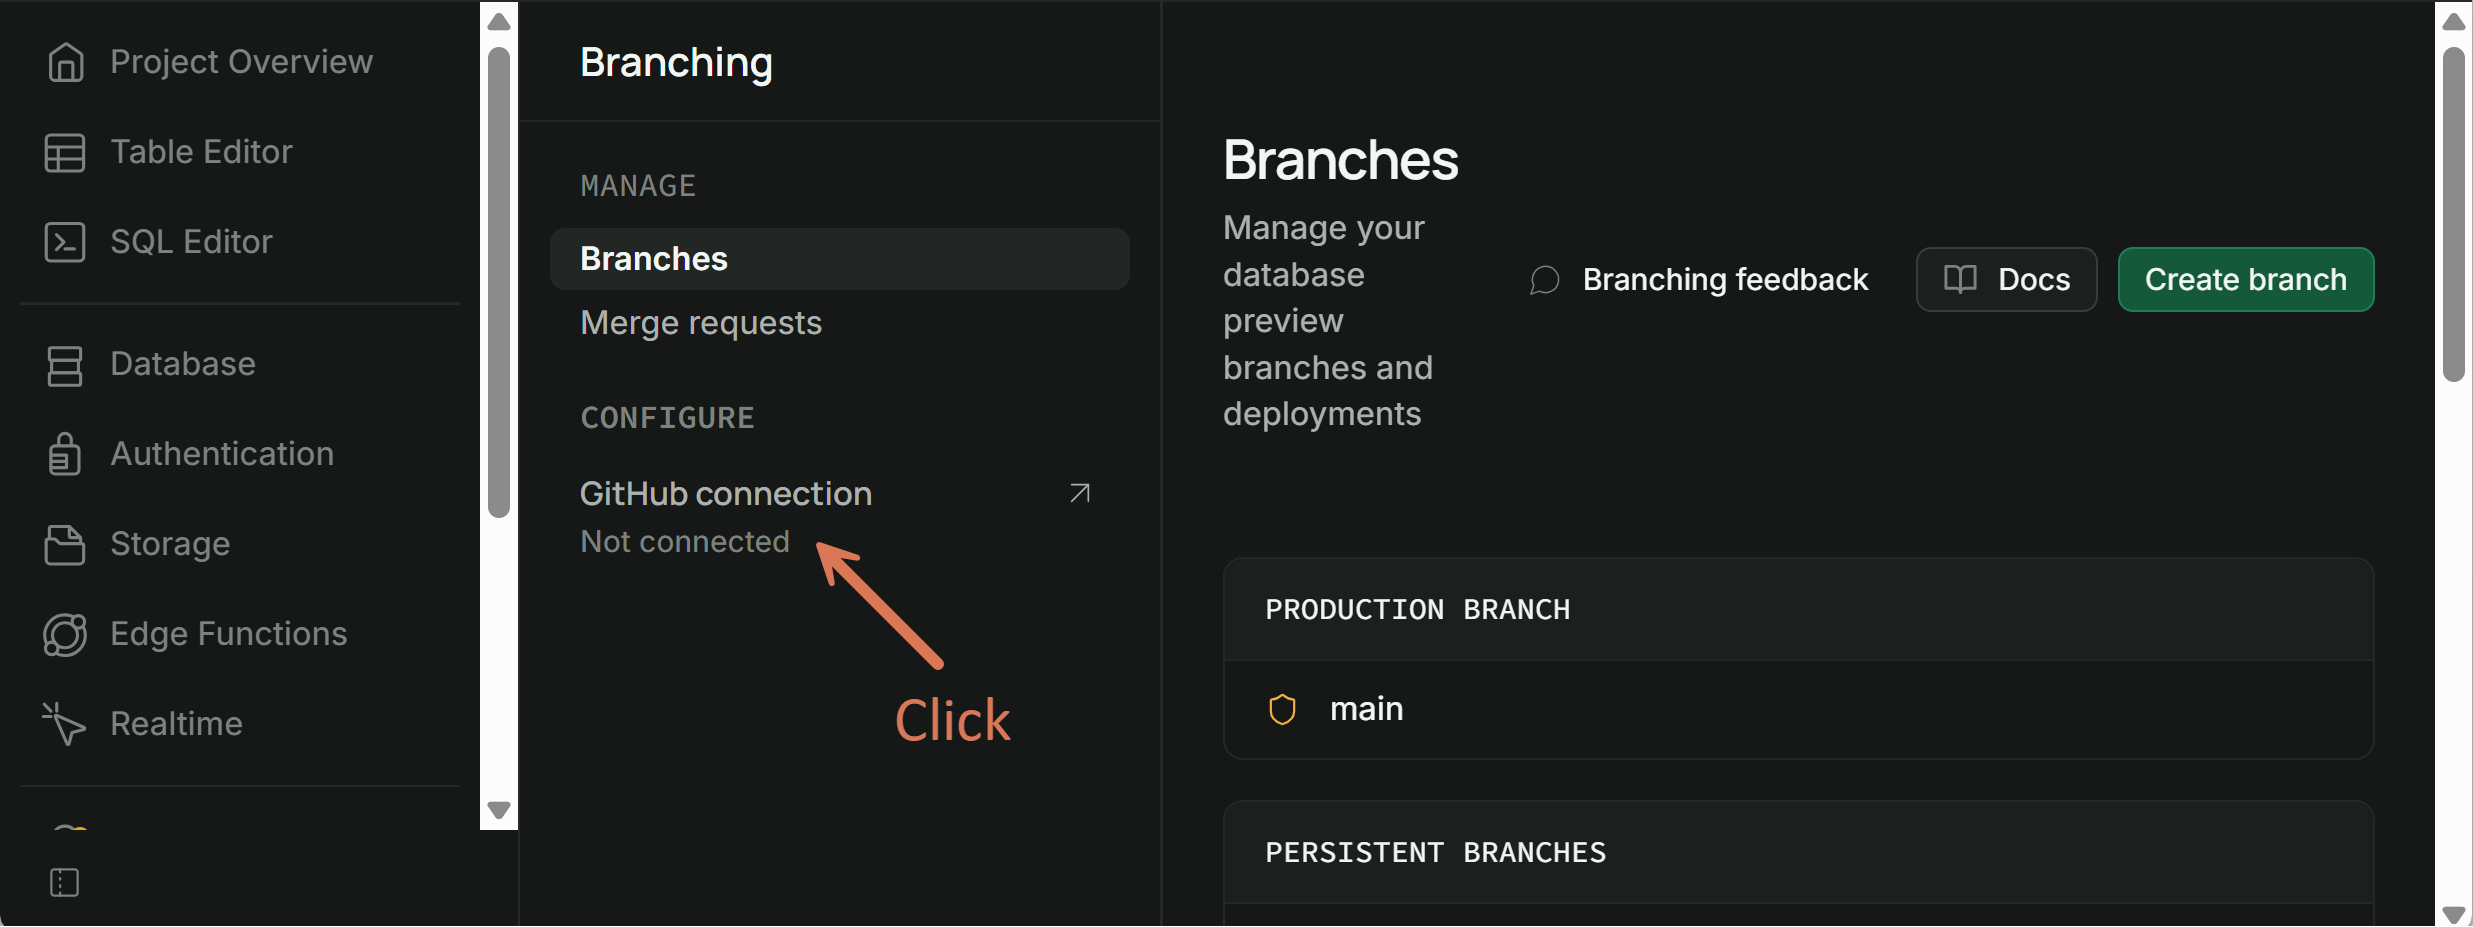
And select your GitHub repository and a production branch:
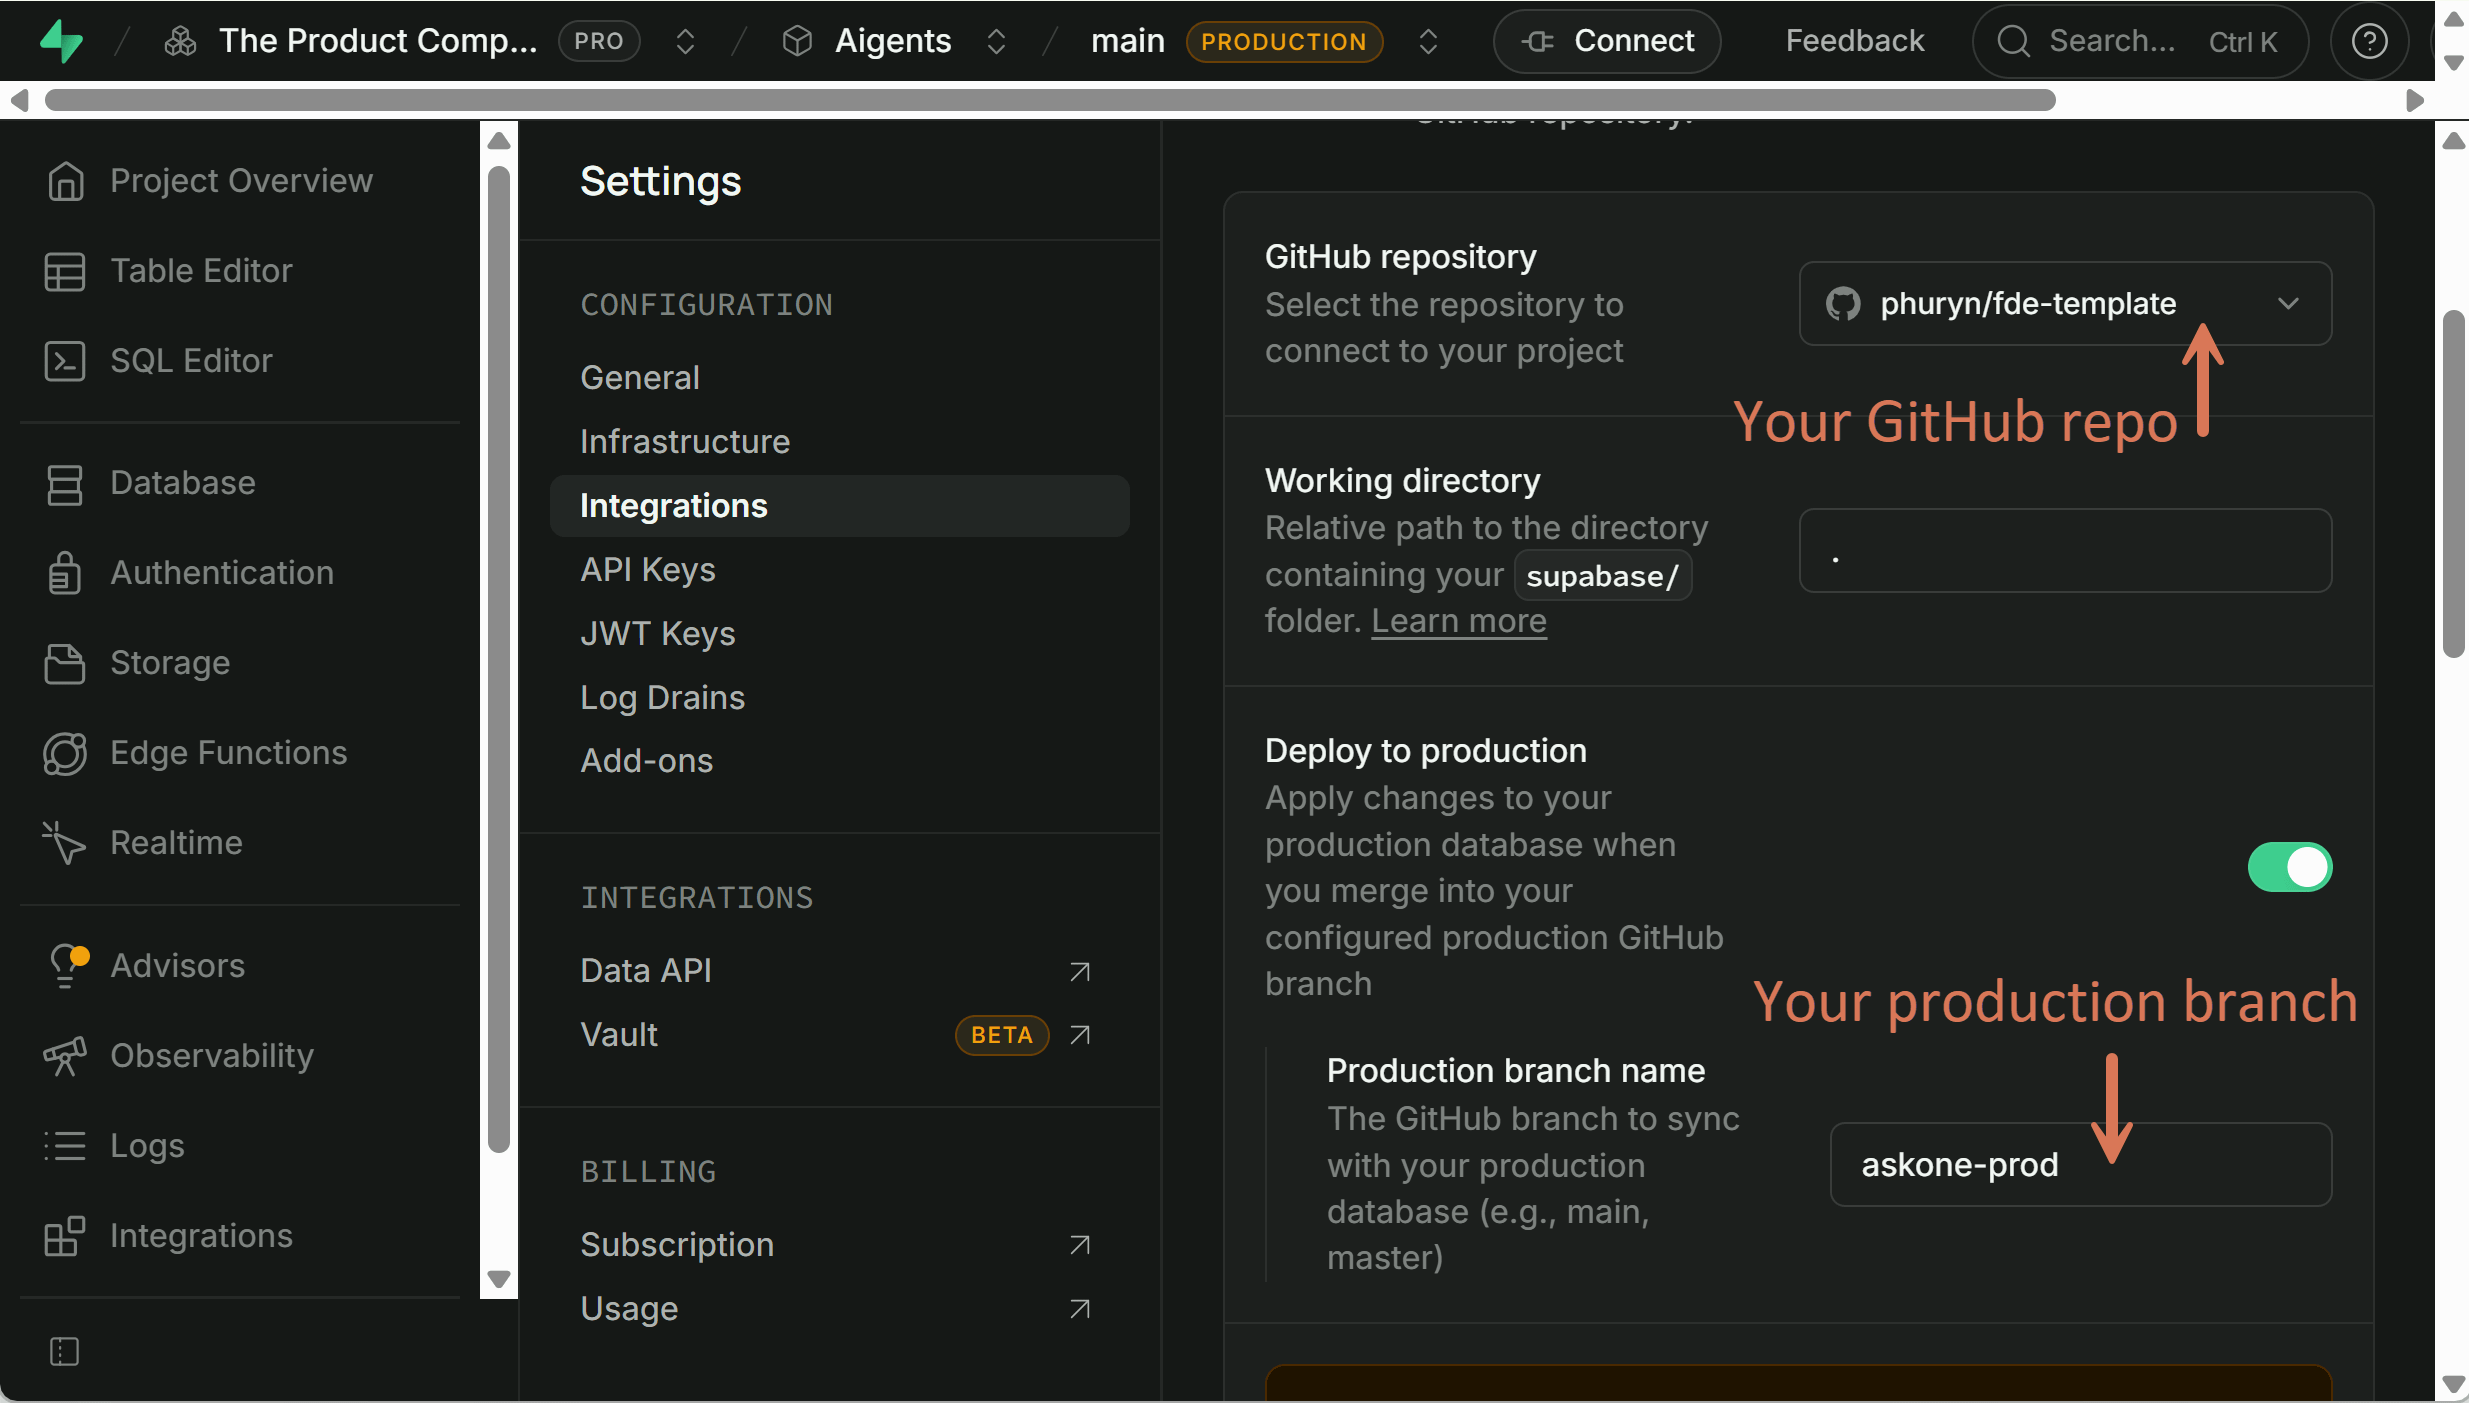
It will get updated every time you push changes to that branch. So, right now, when a user inserts some data on dev, or when I change the database structure, those changes will not propagate to production. That’s what we want.
Wait. What about the tables?
All the modifications in the database are written as migration scripts. This is also part of the template. Every time we add a new field or a new form in our product, there will be a migration script. It appears in GitHub, next to the code:
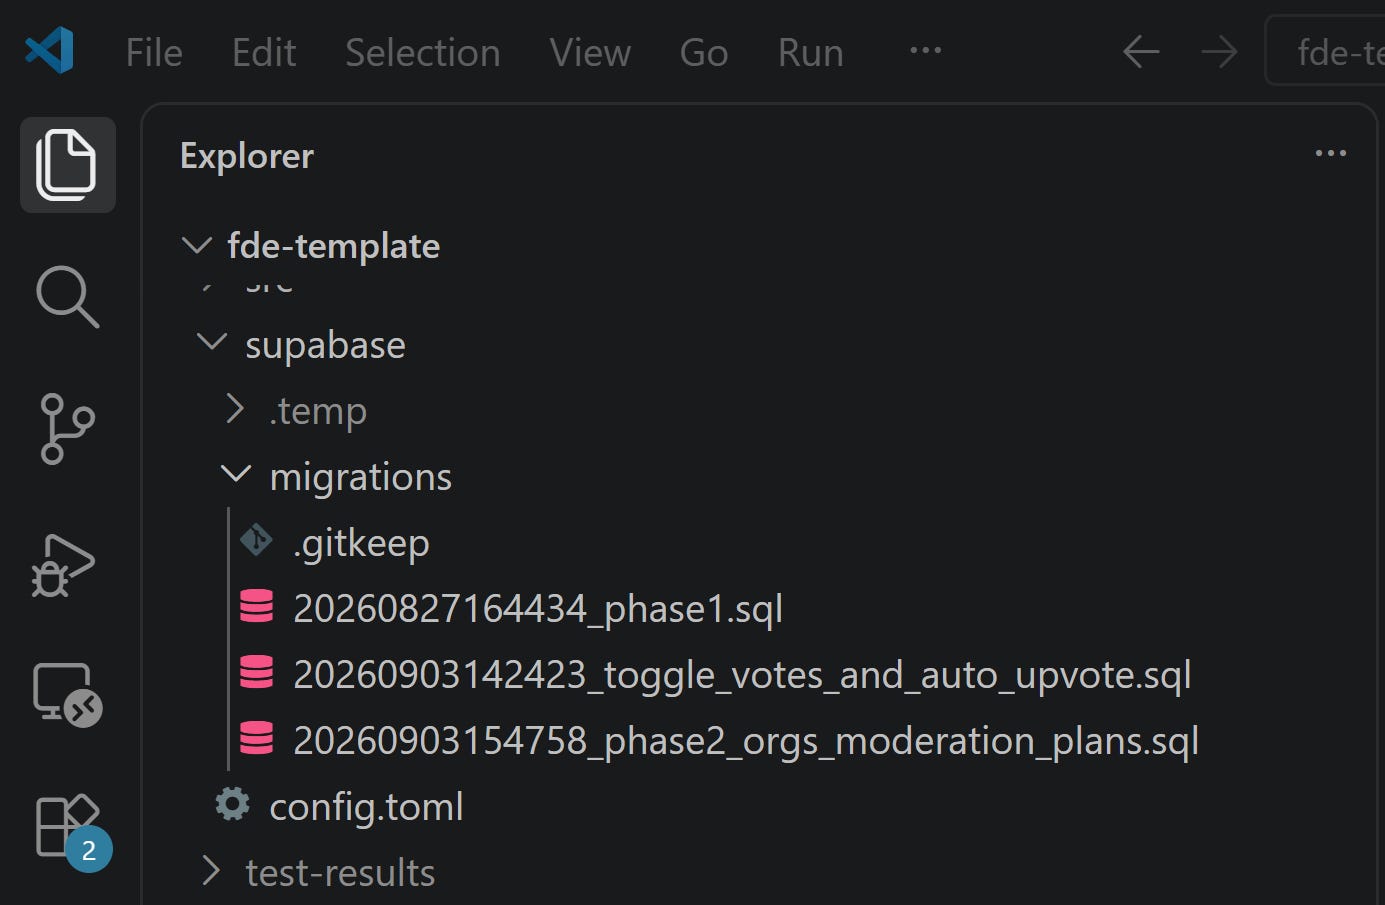
When you transfer your app version from dev to prod, the logic is transferred because you transfer the code. Database changes are transferred through those migration scripts, and Supabase executes them.
Code and database migrations move together. Not the data.
After the sync, I was curious if there is any data inside. Go to Table Editor: the tables are there, and there are no rows. The structure was copied, the data was not.
5. Create a Production Netlify Site
Normally, you would have multiple environments: dev for developers, test, preprod (a copy of production, often without personal information), and production. The release goes through all of them.
We will implement a simplified version. Instead of creating another Netlify project, I took the one from Part 1 and just made it production. Dev stays on my local machine. I don’t need it hosted on Netlify.
Step 5.1: Switch the production branch
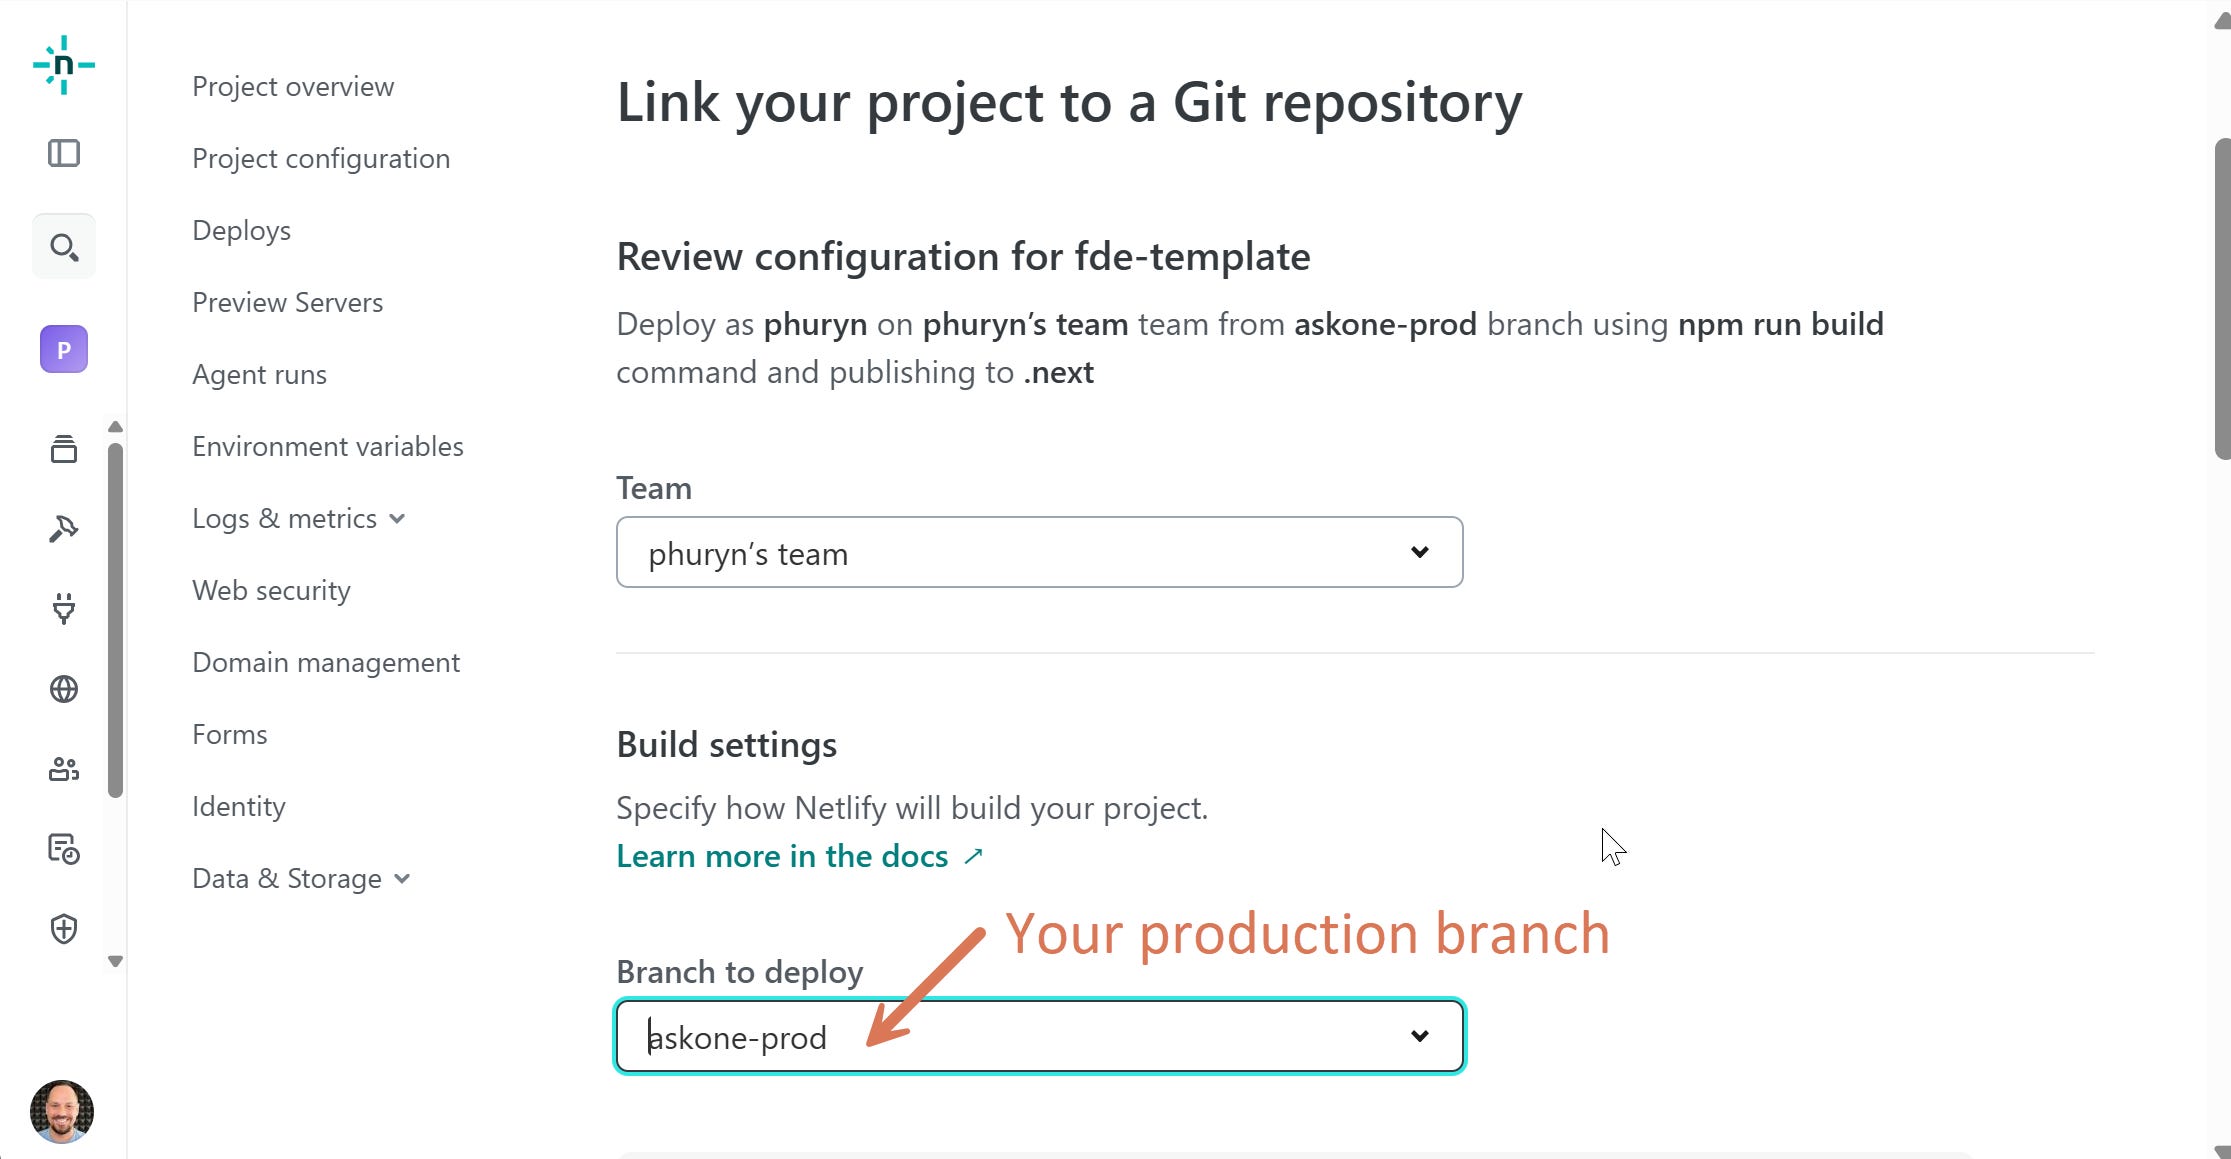
Go to Netlify > your project > Project configuration > Build & deploy > Manage repository > Link to a different repository > GitHub.
Select your repository (here, “fde-template”) and the production branch (here, “askone-prod”):
Step 5.2: Replace the Supabase keys
Go to Project configuration > Environment variables and edit two values:
SUPABASE_URL -> copy from Section 4
SUPABASE_SECRET_KEY -> copy from Section 4, mark as secret
I’m still using the development Clerk instance, just so that we don’t switch everything at once. We will switch it in Section 7.
Step 5.3: Deploy
New environment variables need a new deploy. Go to Deploys > Trigger deploy > Deploy project:
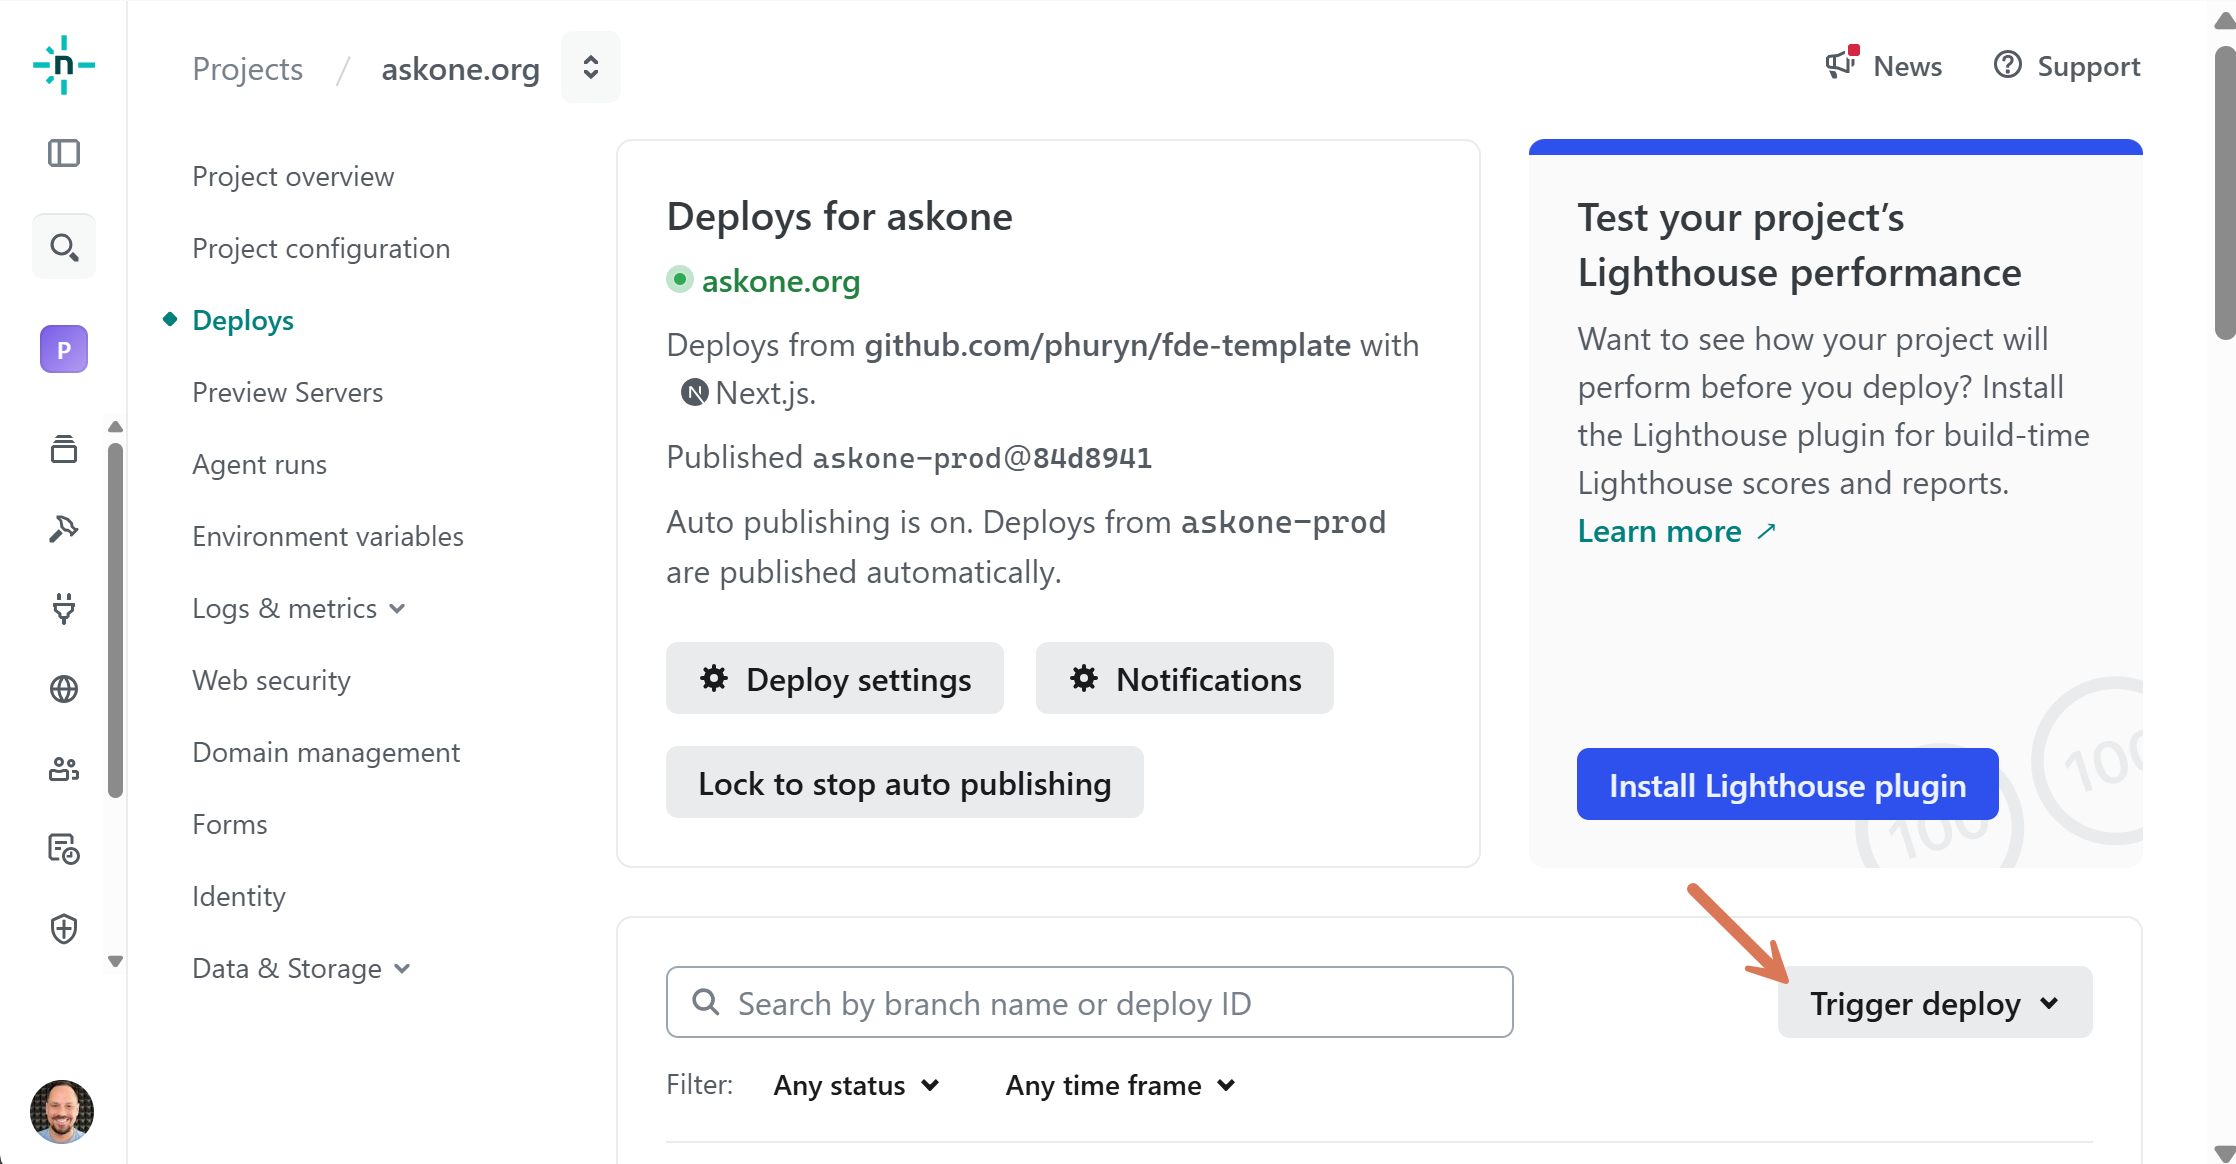
After those changes, you should see an empty app. I’m signed in, but my data disappeared, because right now we are using the new production database.
📌 The result: we can test anything on dev: add new features, implement new logic. The new app behavior lives on GitHub, in the askone branch. The test data lives in the askone Supabase project. Neither reaches production until we ask the agent to push.
6. Plug a Custom DNS Domain
We have a production app, but we don’t have the production URL. I purchased a cheap domain on GoDaddy: askone.org. In every provider, it is similar.
Step 6.1: Add the domain in Netlify
Go to Domain management > Add a domain. Netlify verifies that you own it and recommends Netlify DNS:
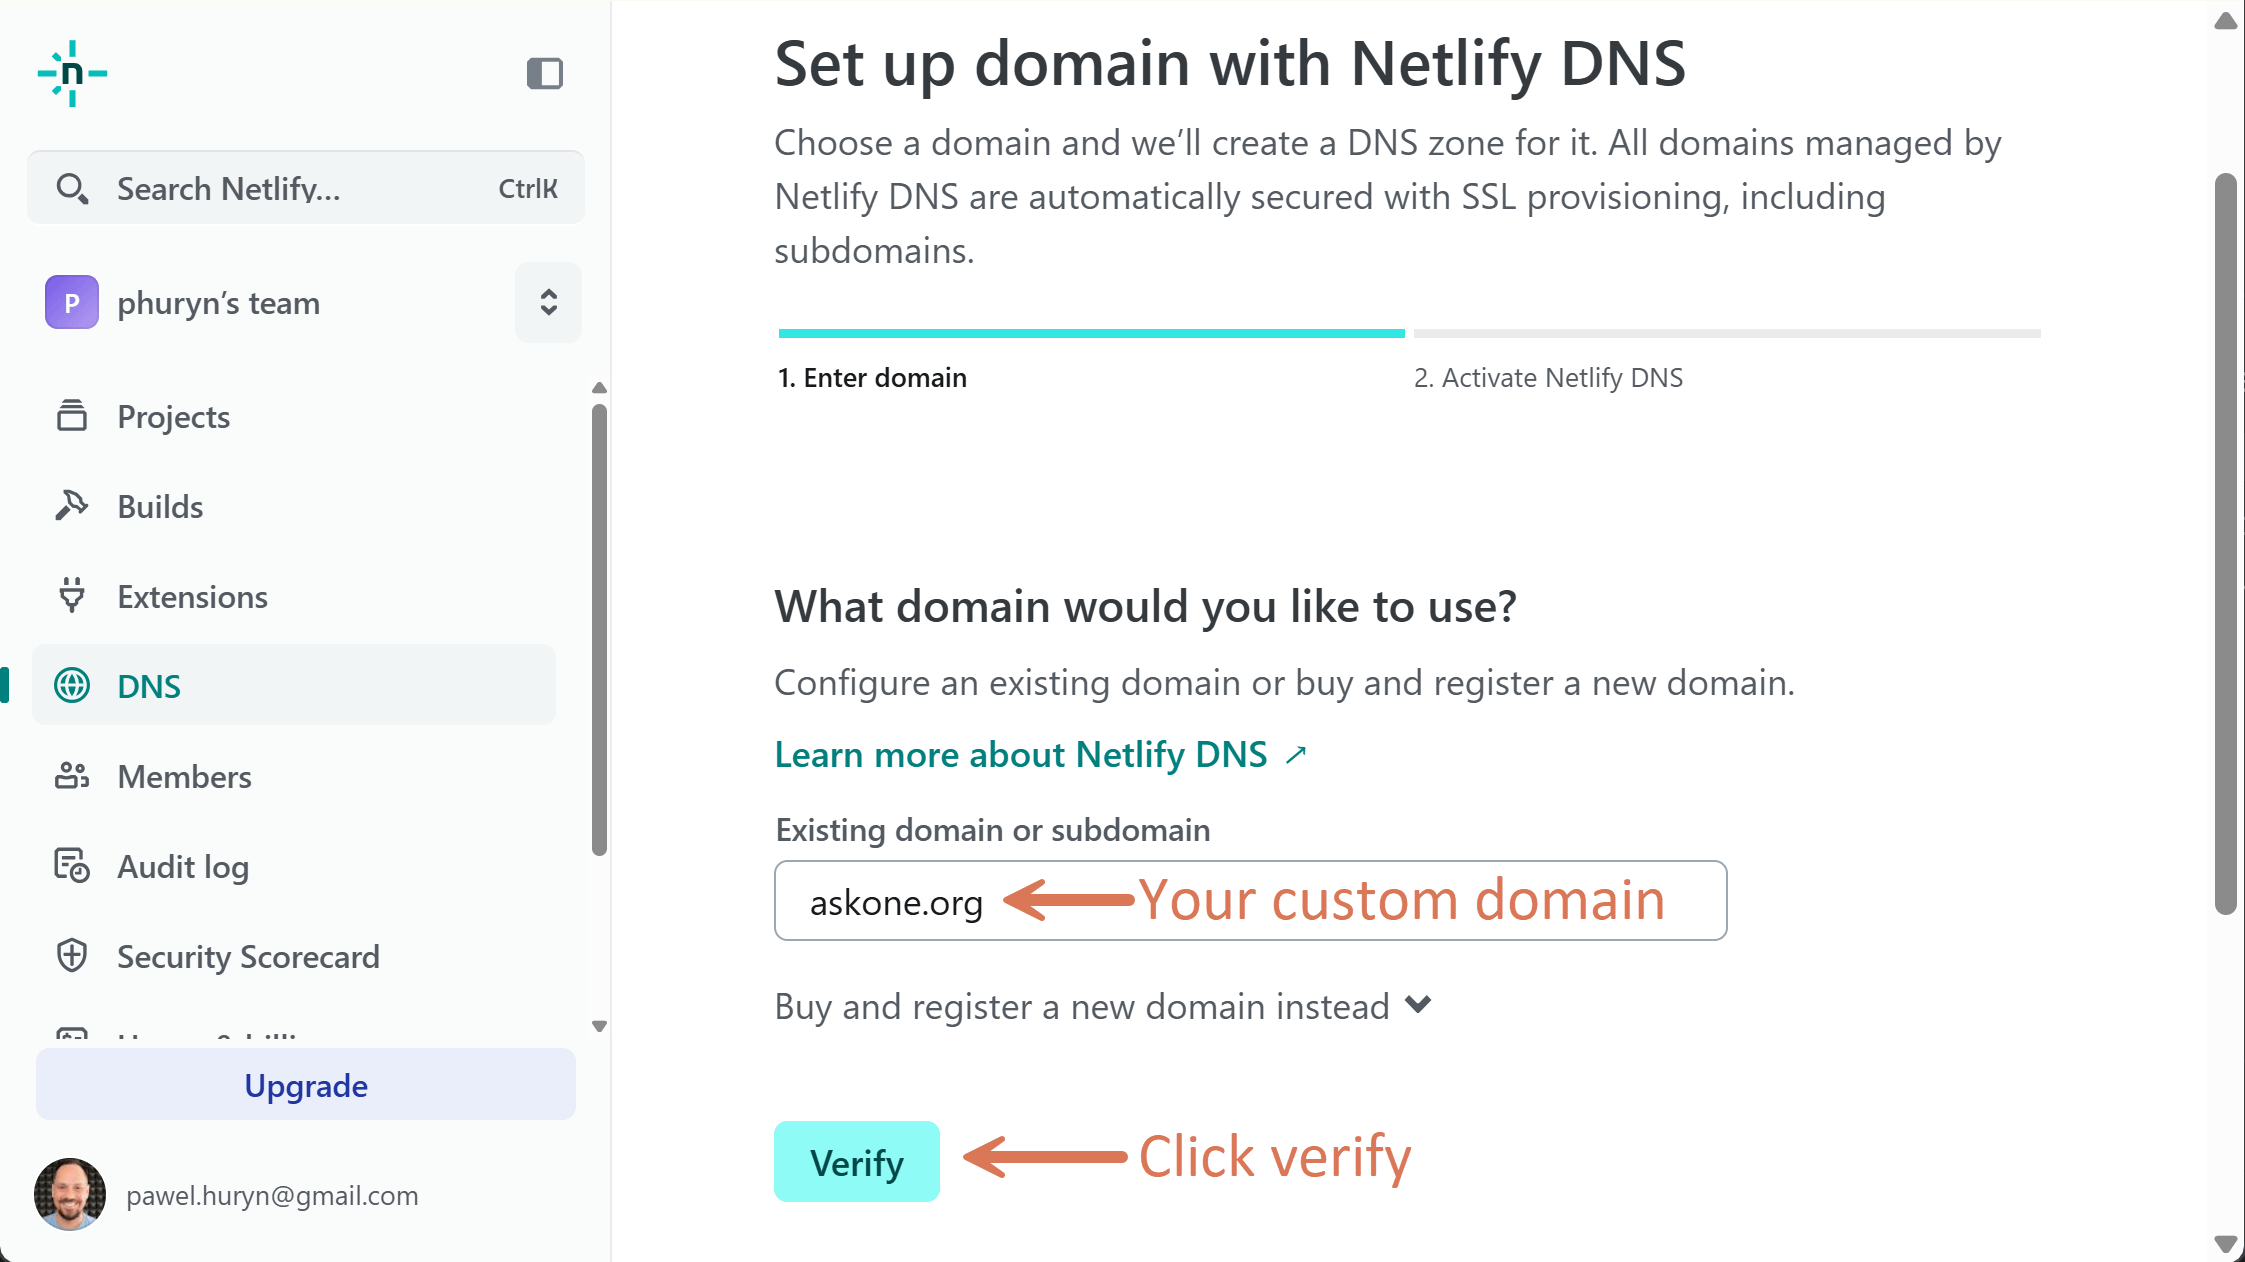
In the next step, I got a list of four Netlify DNS servers:
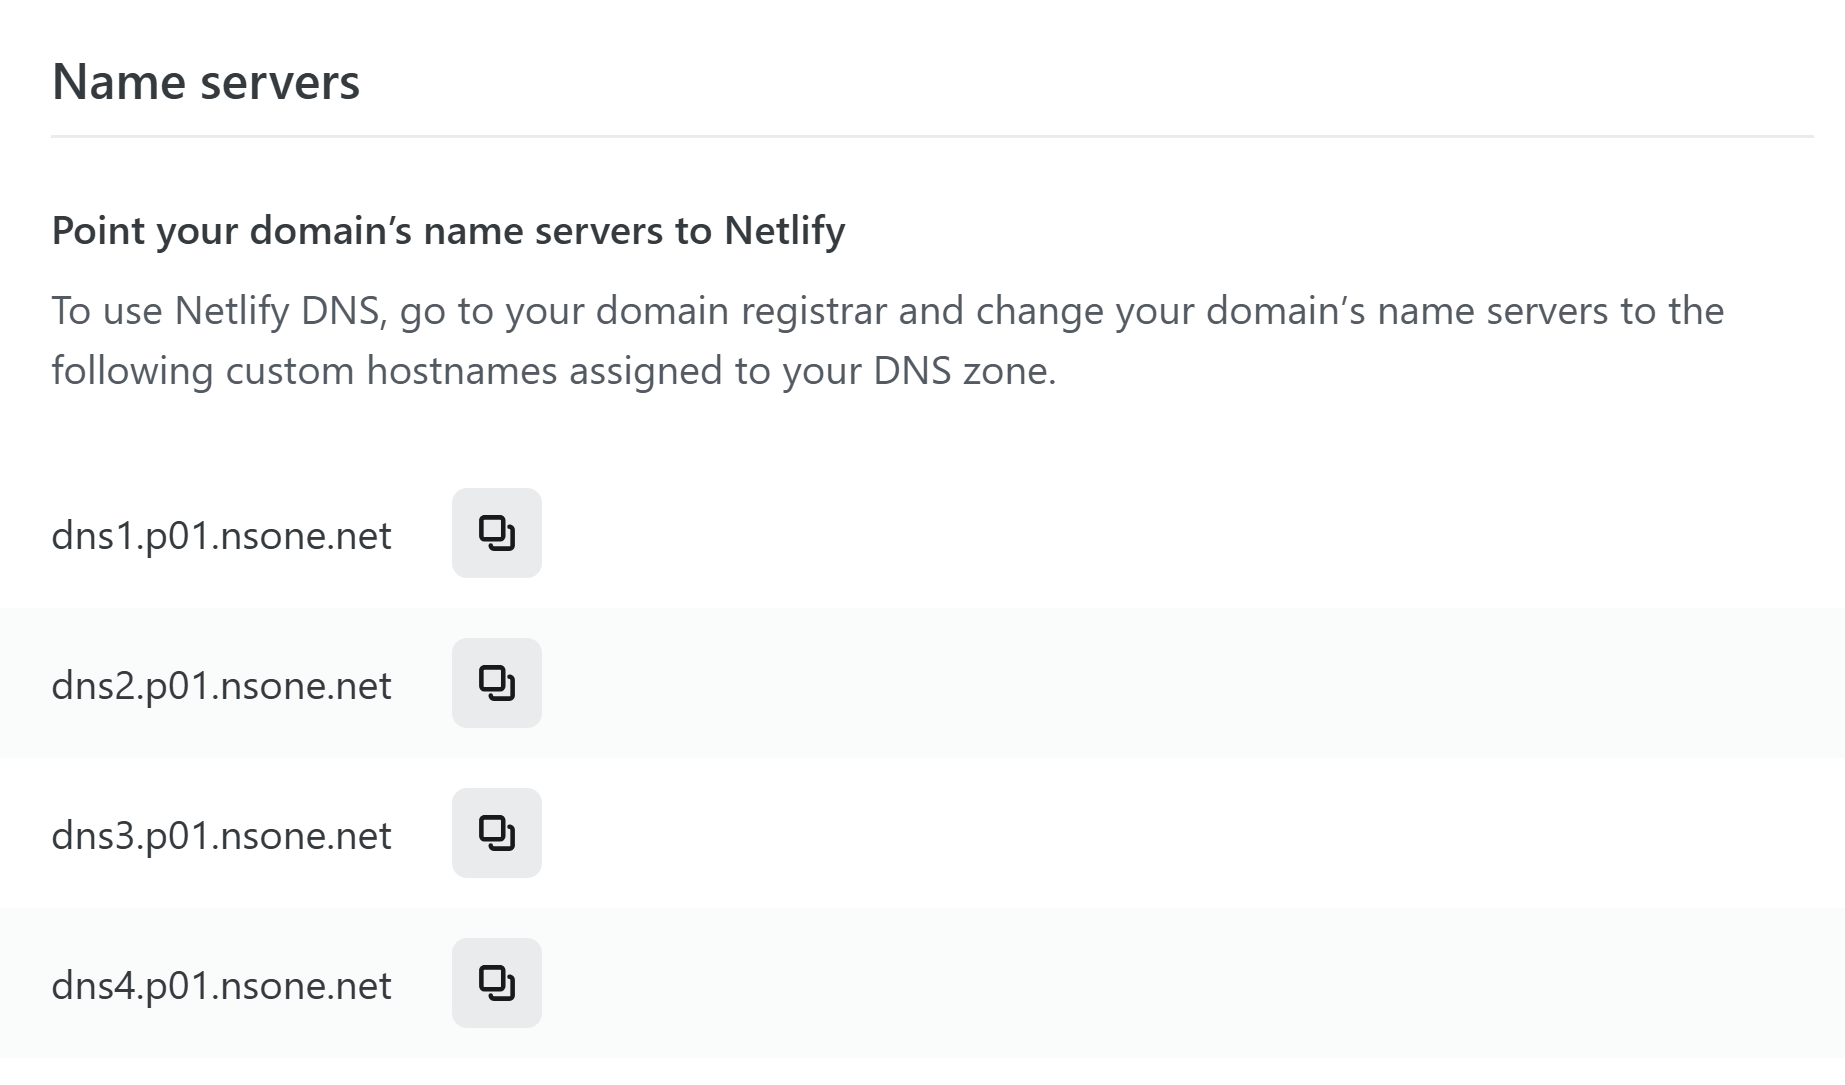
Step 6.2: Point GoDaddy to Netlify
In GoDaddy, go to your domain > DNS > Nameservers > Change, and paste the four Netlify name servers:
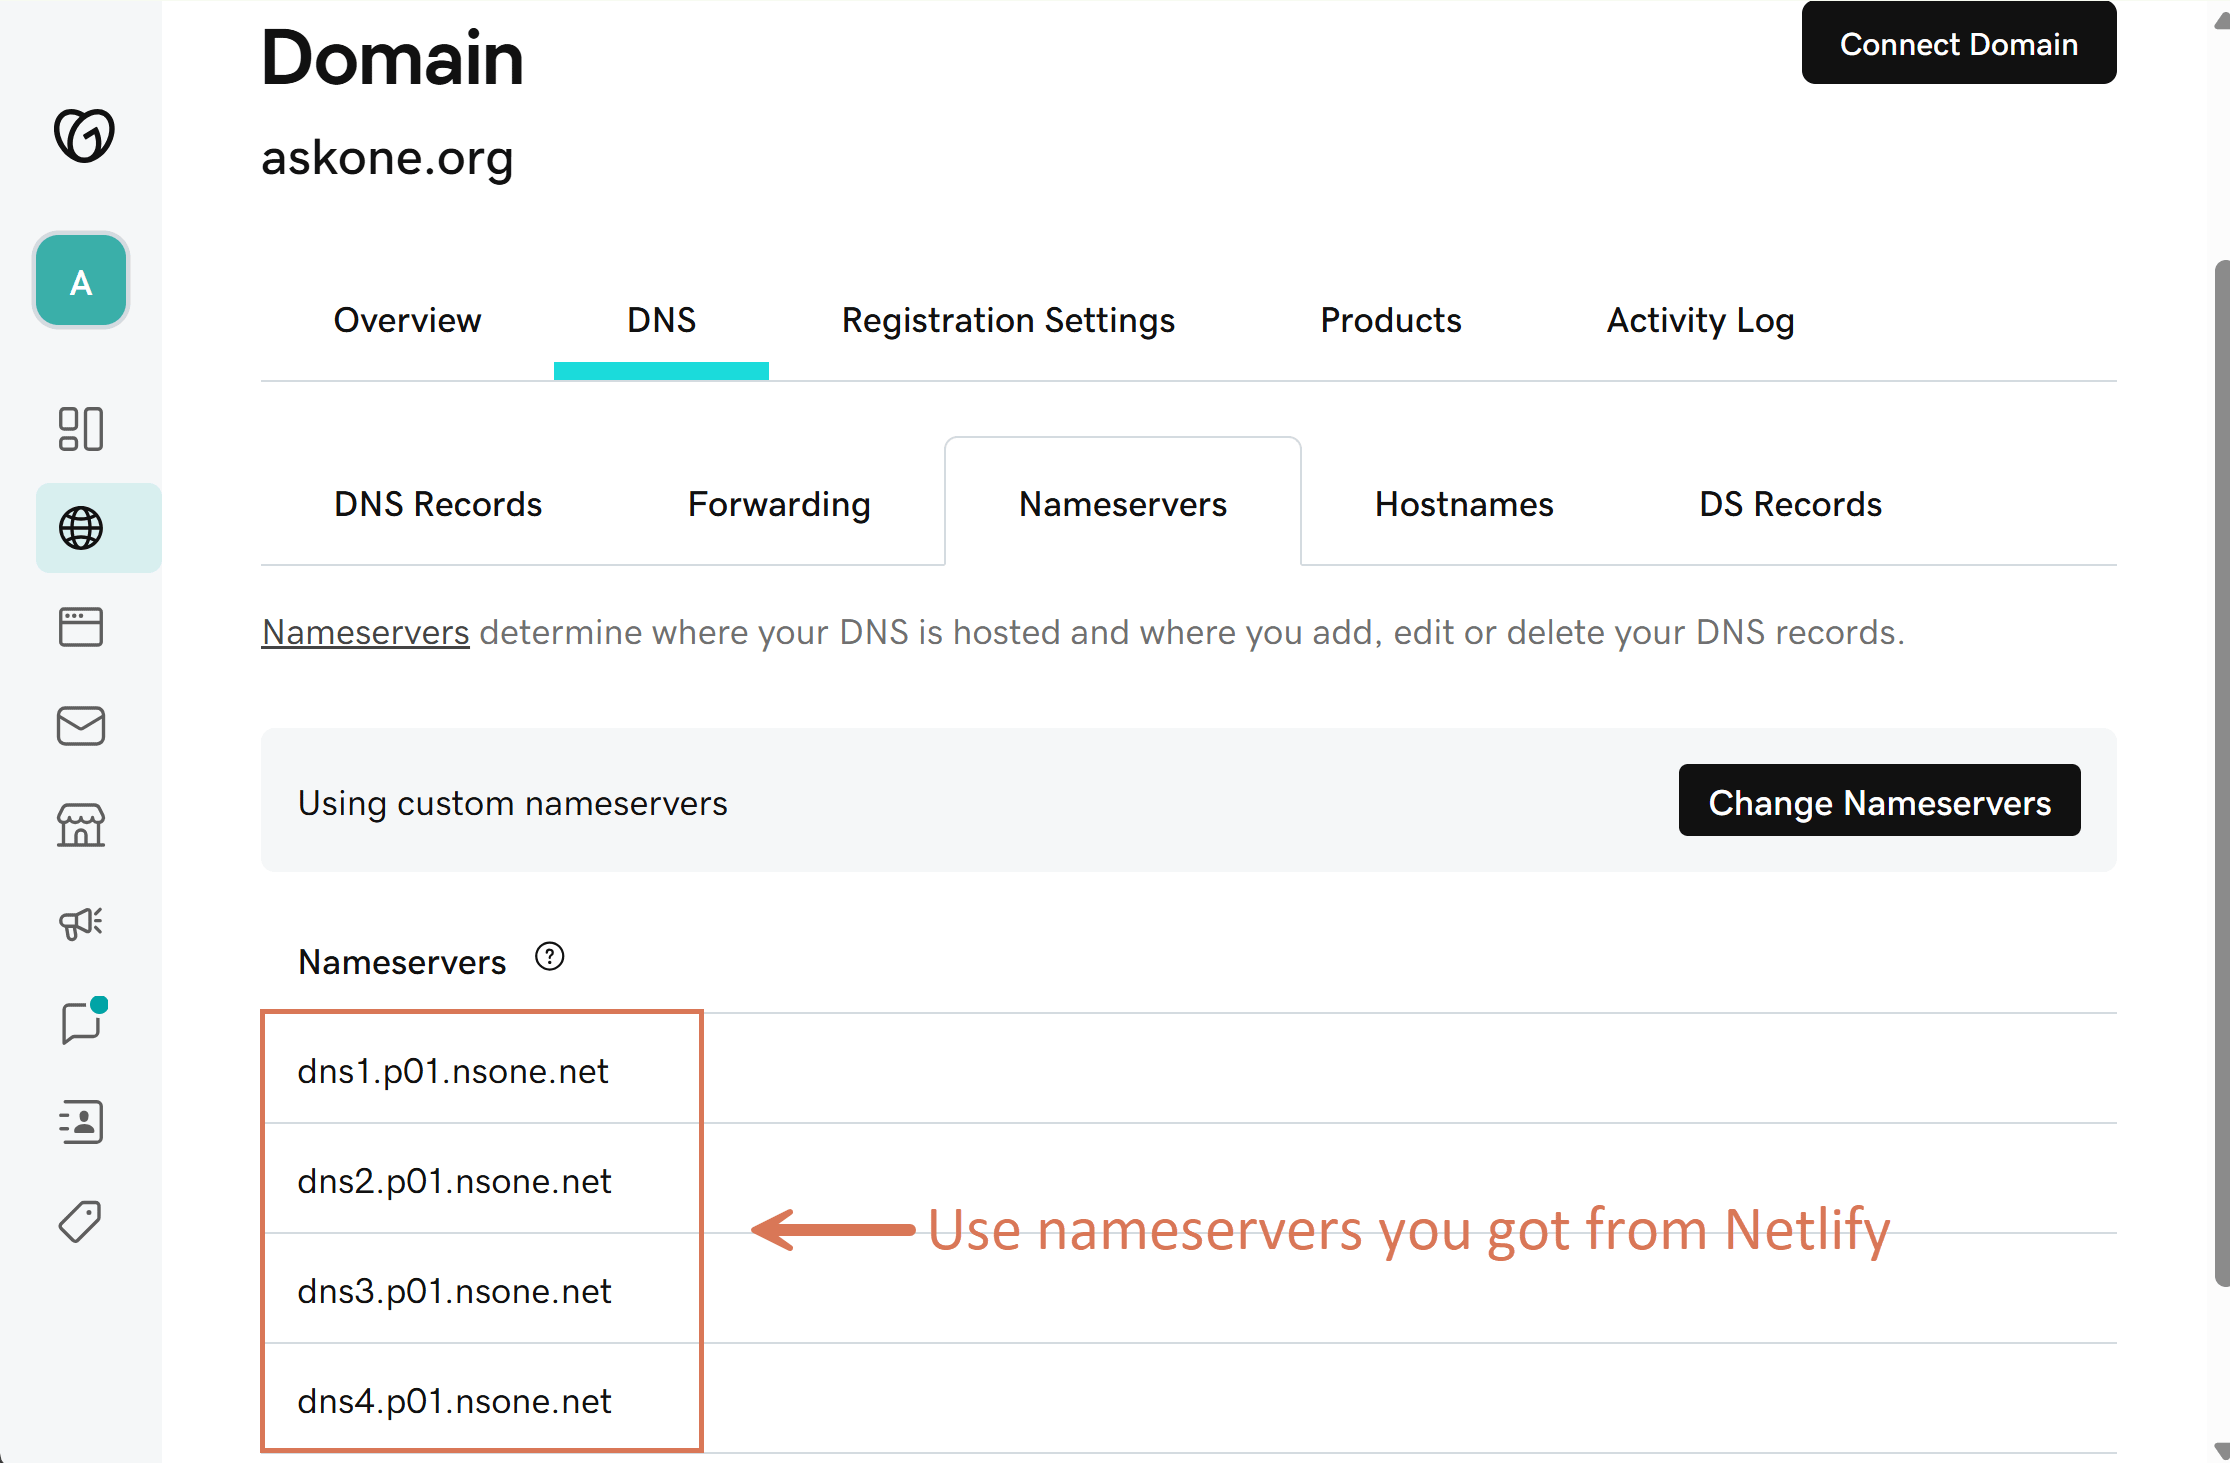
📌 I first tried a CNAME record in GoDaddy. It didn’t propagate during the live session. Netlify DNS is the easiest option.
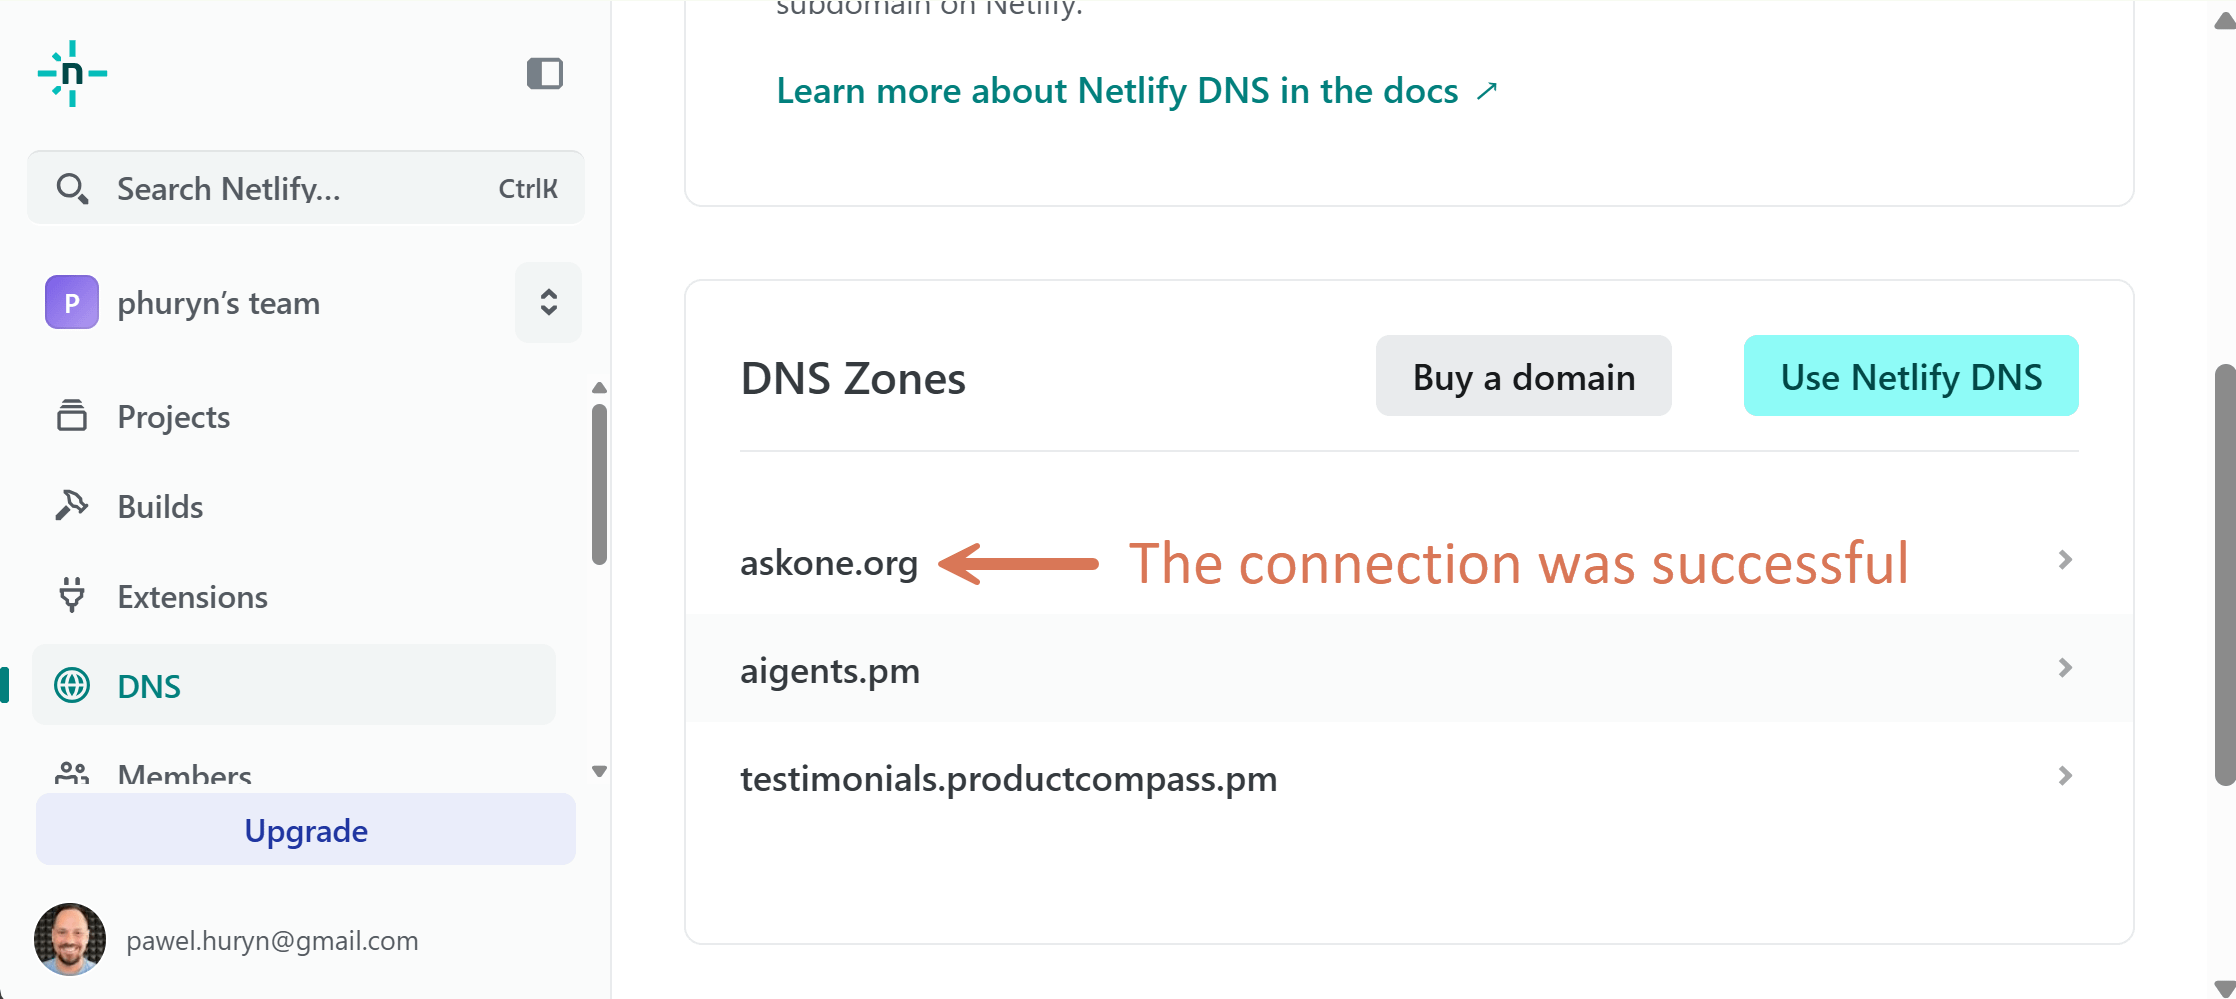
Step 6.3: Wait
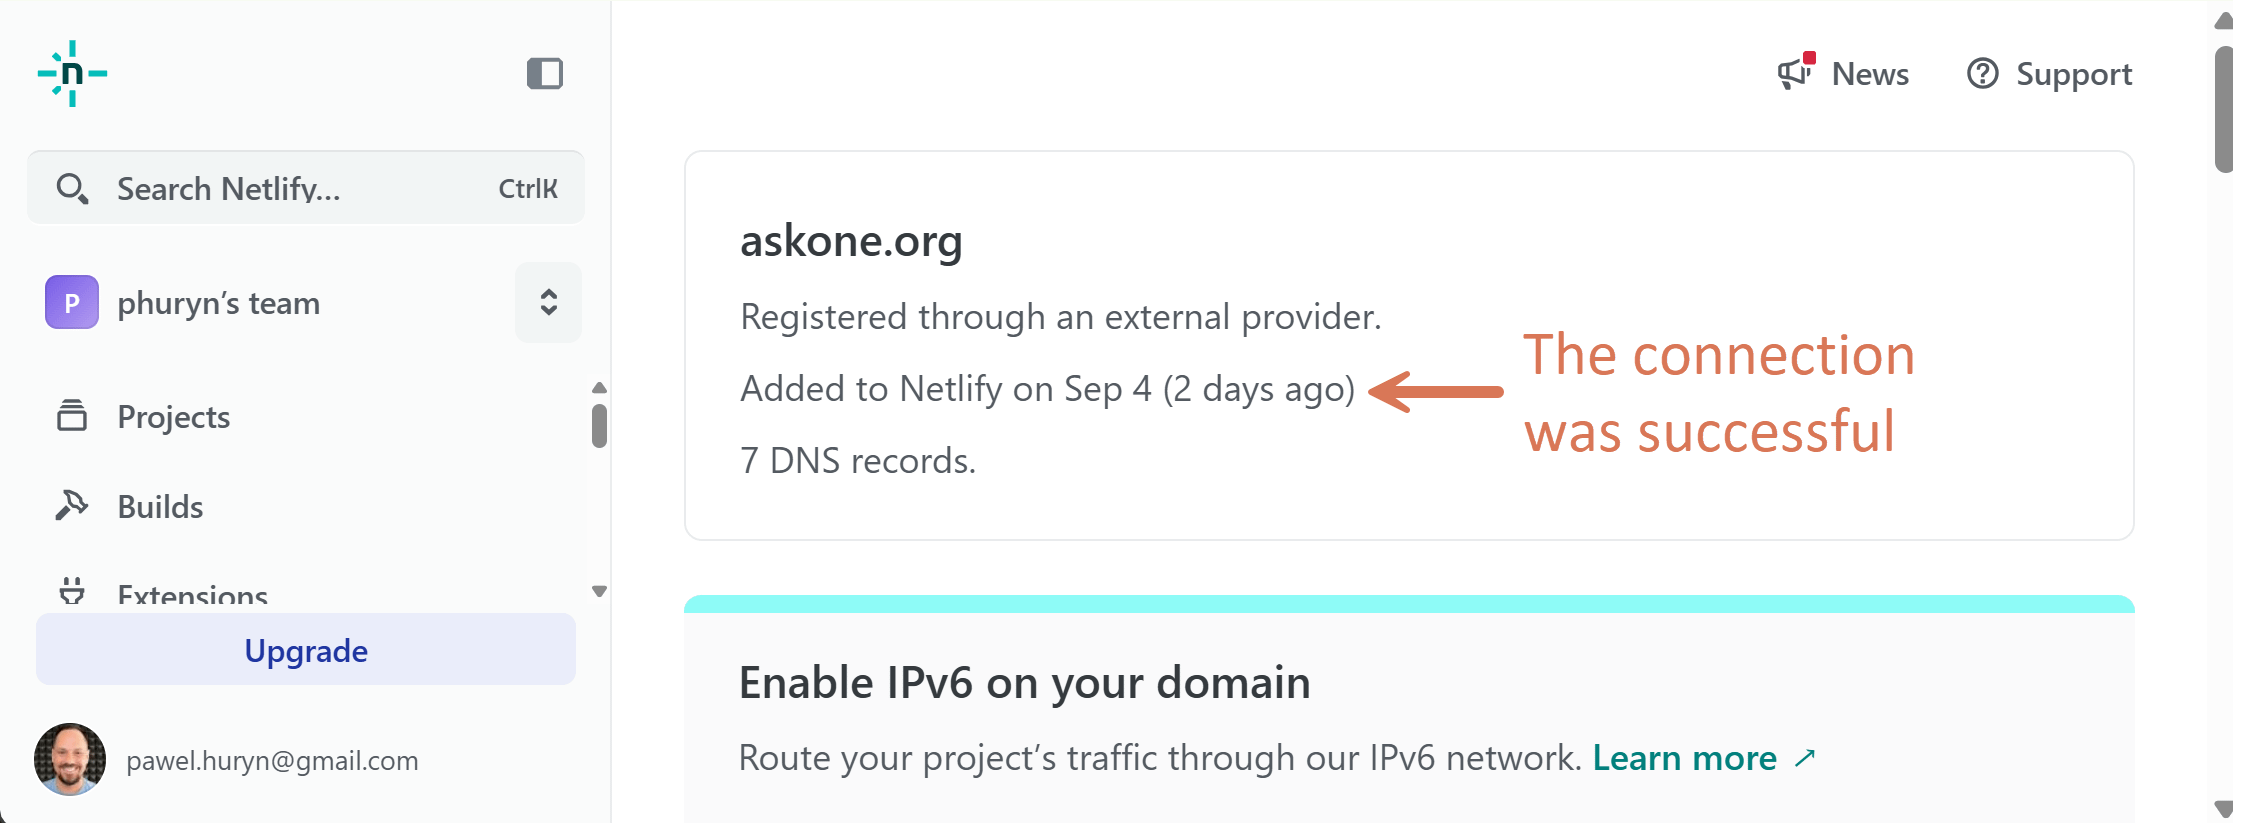
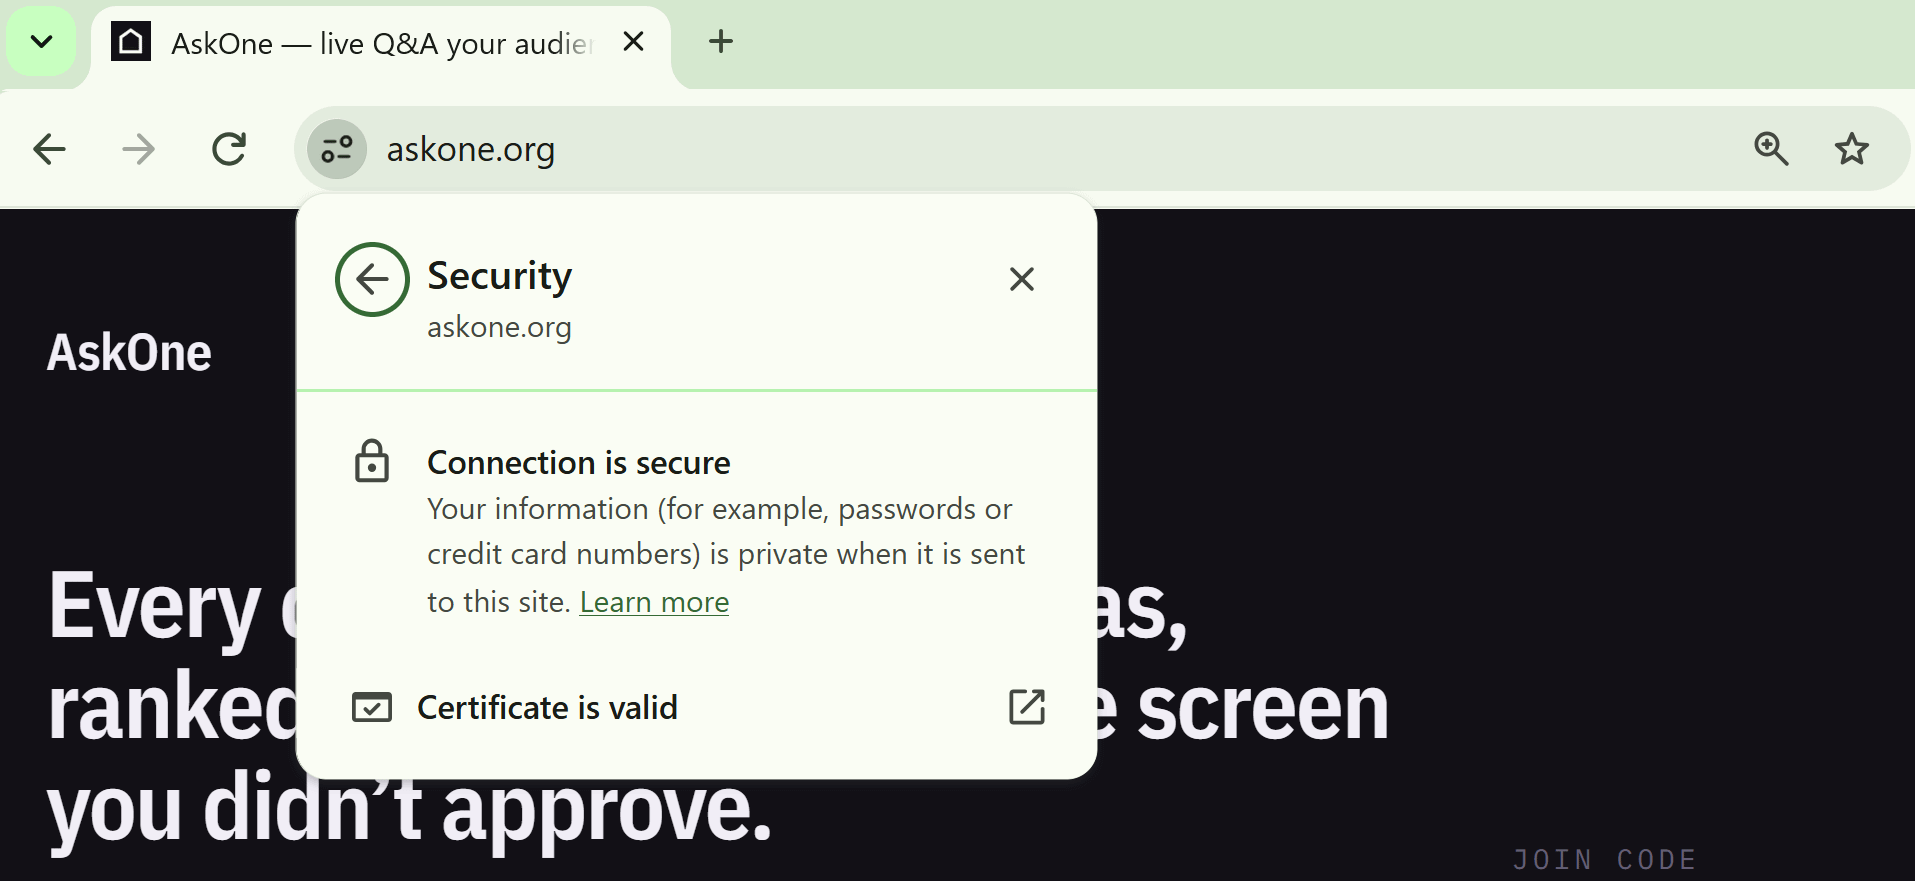
It can take up to an hour. Then Netlify detects the domain, and DNS verification is successful. What it means is that Netlify will provide an automatic certificate for us, and our domain will be secure (HTTPS). We don’t have to purchase a certificate. It will just do it automatically:
Step 6.4: Adjust the app URL
The app URL has changed. We need it to display the join codes for participants. In Netlify, go to Project configuration > Environment variables, set APP_URL to https://askone.org, and trigger a deploy, as in Step 5.3.
We discussed how to manage Netlify secrets in Part 1.
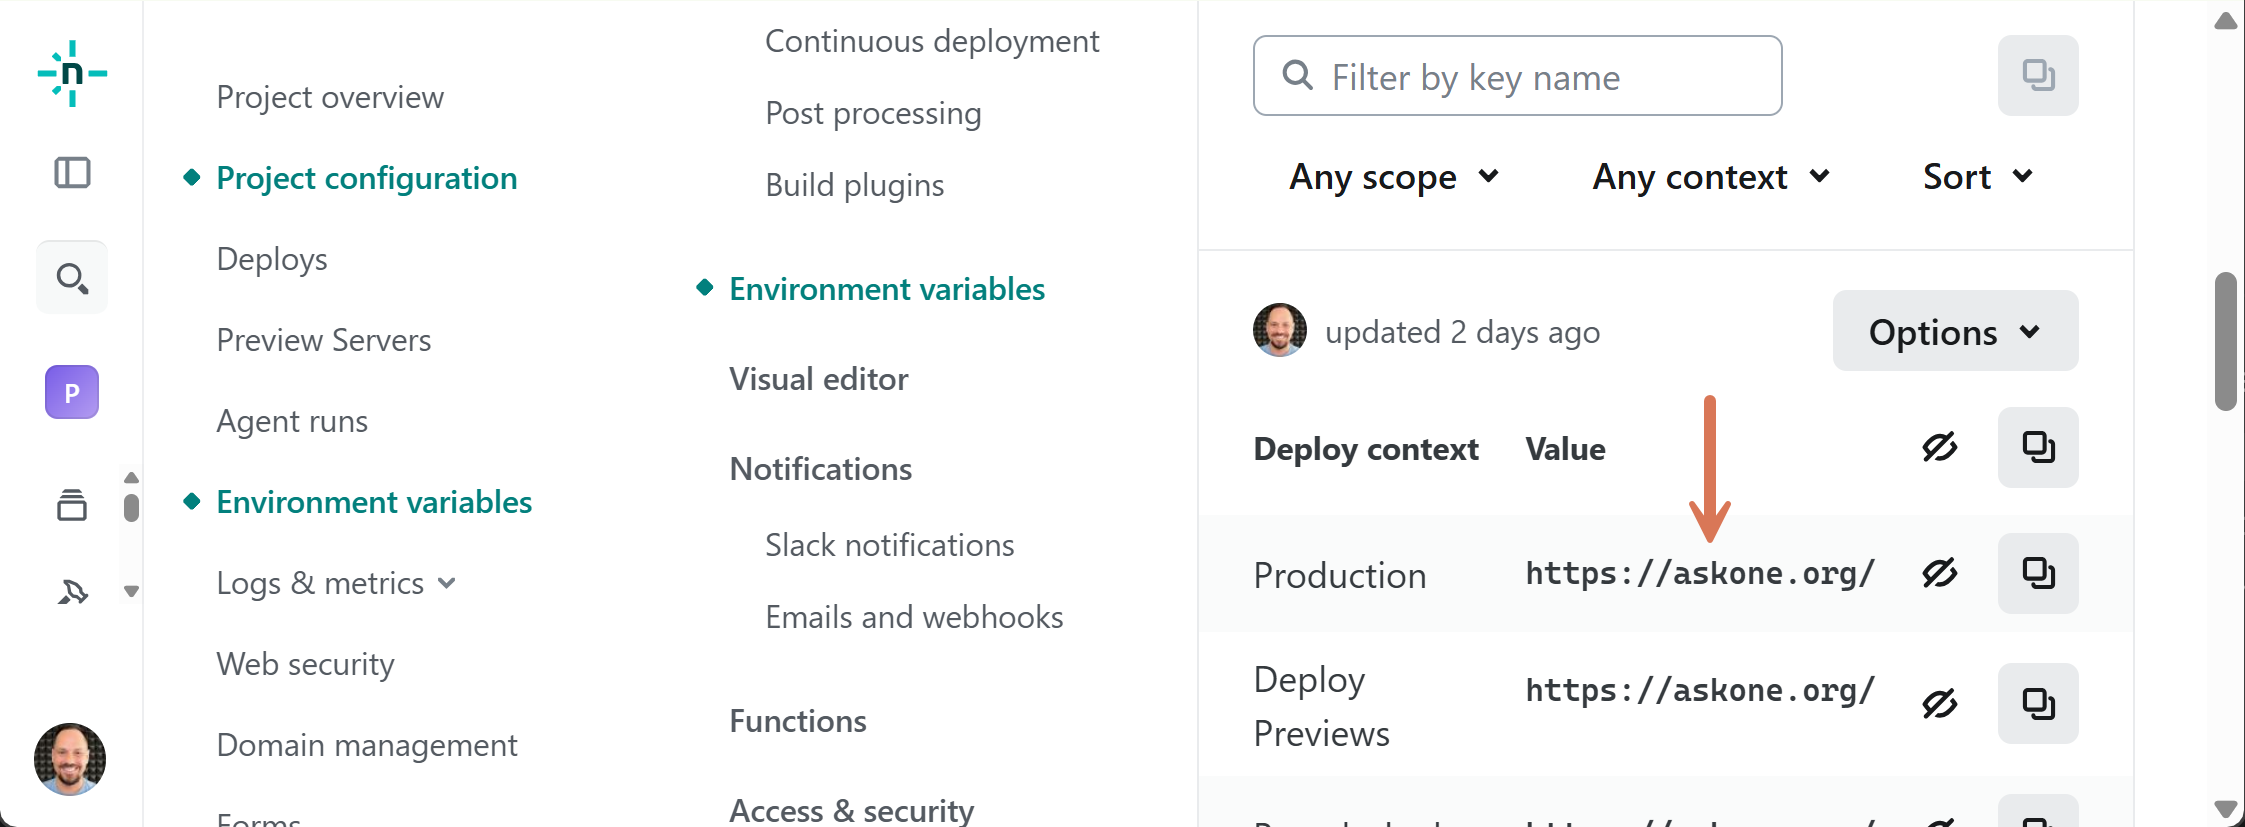
You, too, can access it: https://askone.org. It’s not perfect, but it works, on a real domain.
7. Create a Production Clerk Instance
We have a production app, we have a production URL, but we don’t have production users yet. And we do not want to use the dev/test users in production.
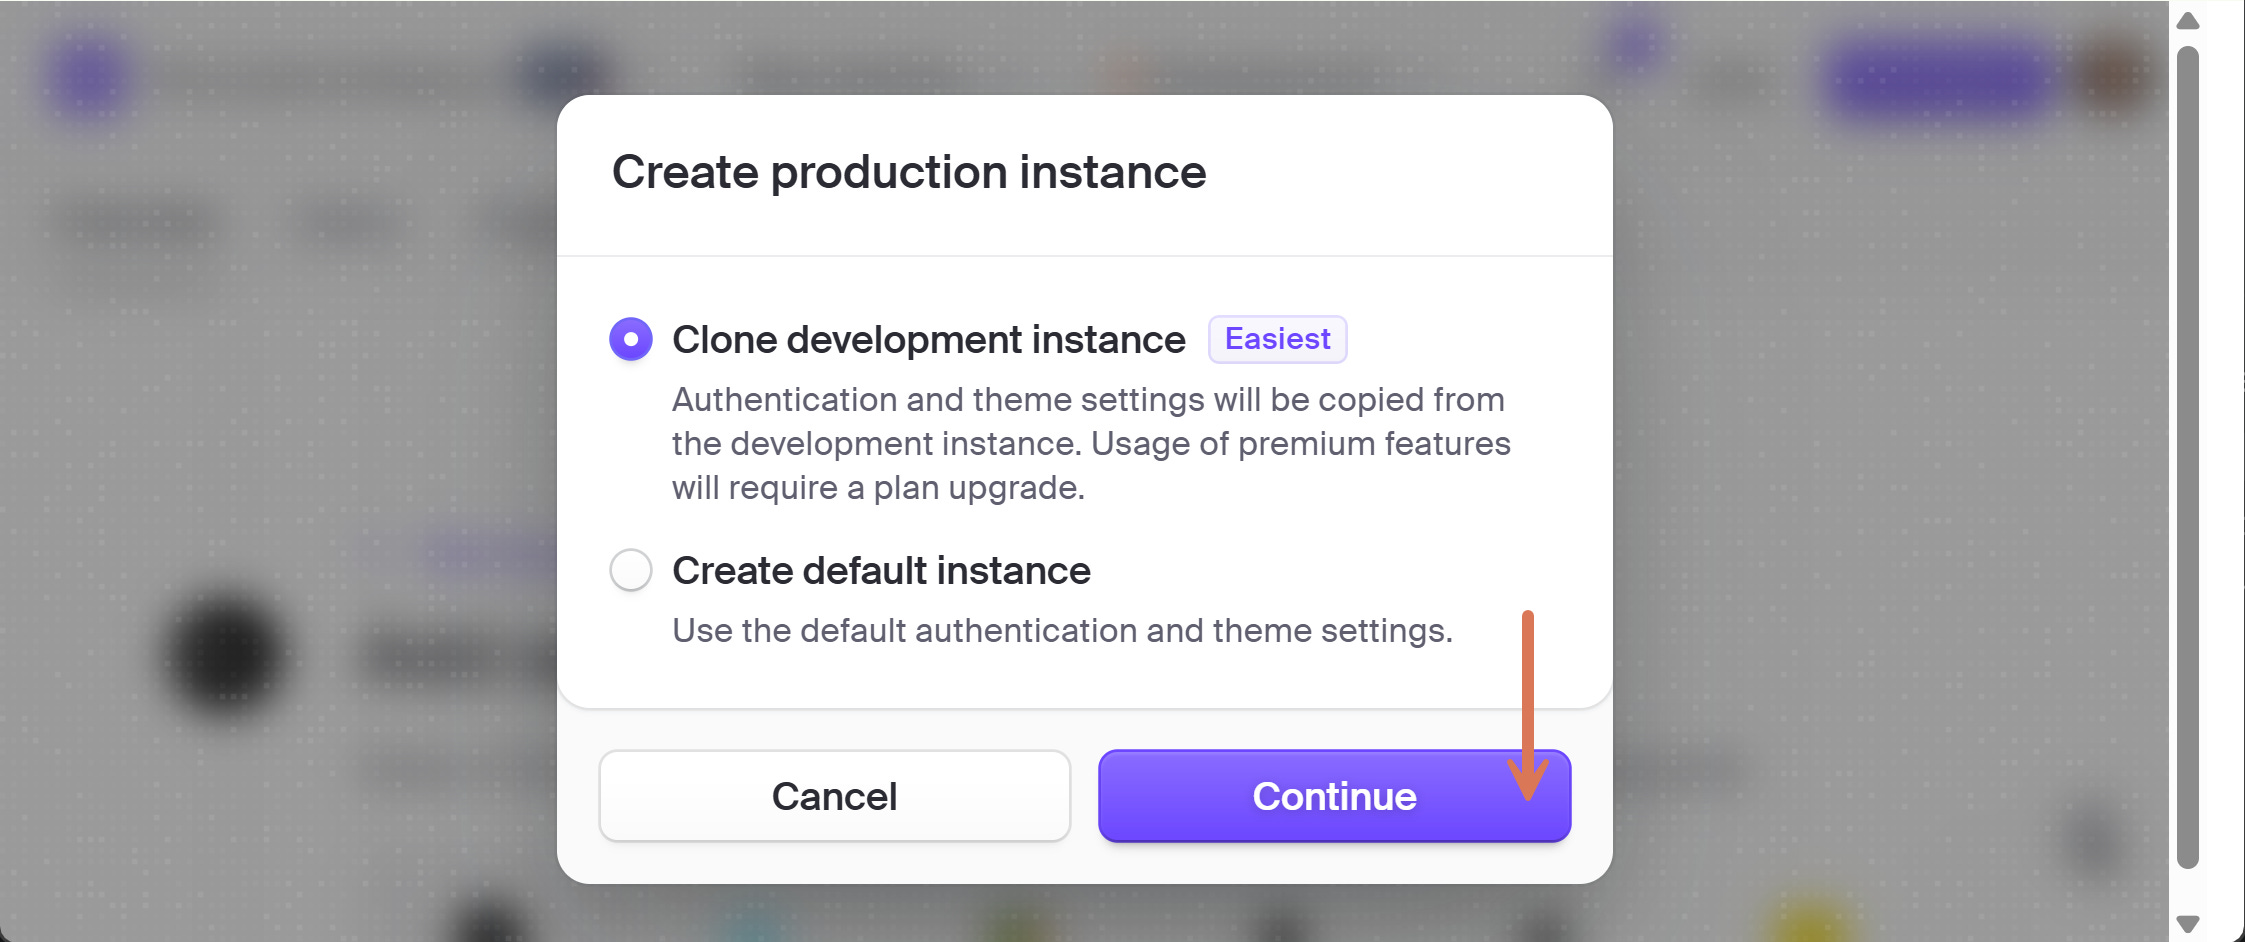
To fix that, go to Clerk Dashboard, click “Go to Production,” and clone your development instance. All the pricing plans and features will be cloned. The application domain will be askone.org. This is where users can access the app:

And we have a new secret key for Clerk that we need to configure in environment variables. So let’s do that. Go to Configure > API keys, as in Part 1. Note:
NEXT_PUBLIC_CLERK_PUBLISHABLE_KEYCLERK_SECRET_KEY
In Netlify, go to Project configuration > Environment variables:
CLERK_SECRET_KEY -> again, I will replace it, mark as secret
NEXT_PUBLIC_CLERK_PUBLISHABLE_KEY -> we have a new one, too. This is not a secret
Then trigger a deploy, as in Step 5.3.
What else? SSO connections. Right now, Google is not supported. We will do it in Section 9. And we need to add the DNS records that Clerk requested to Netlify:
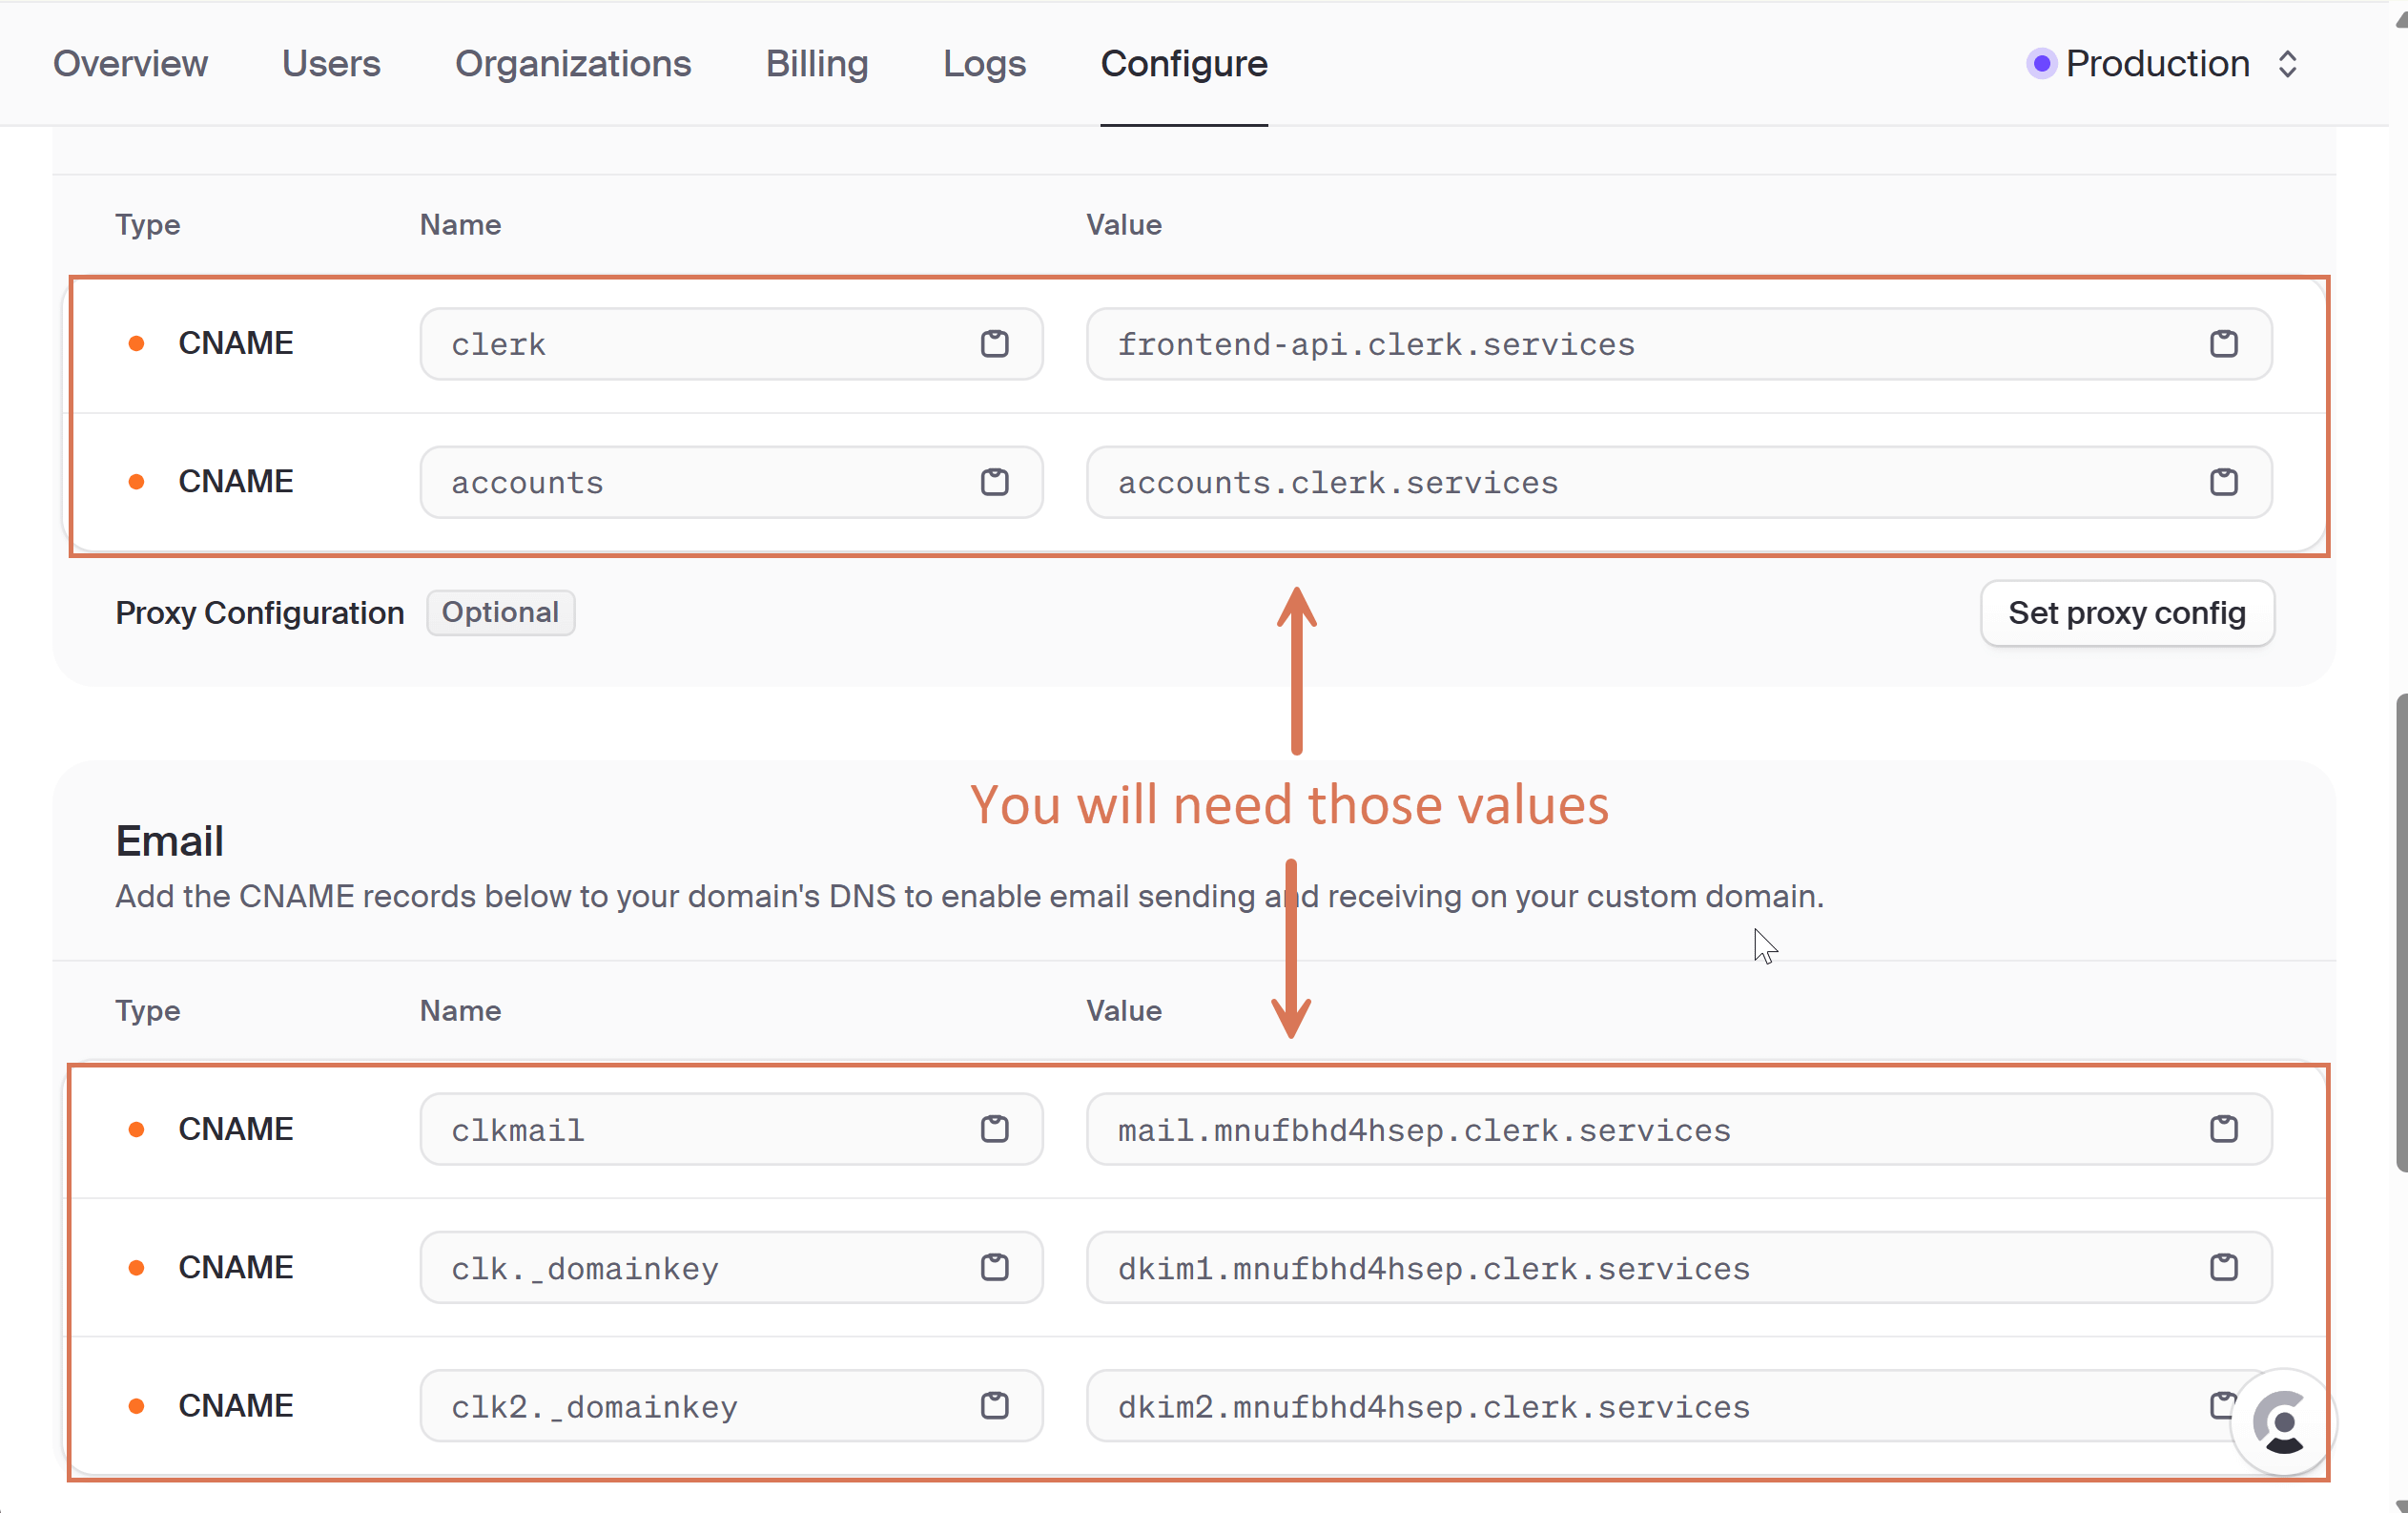
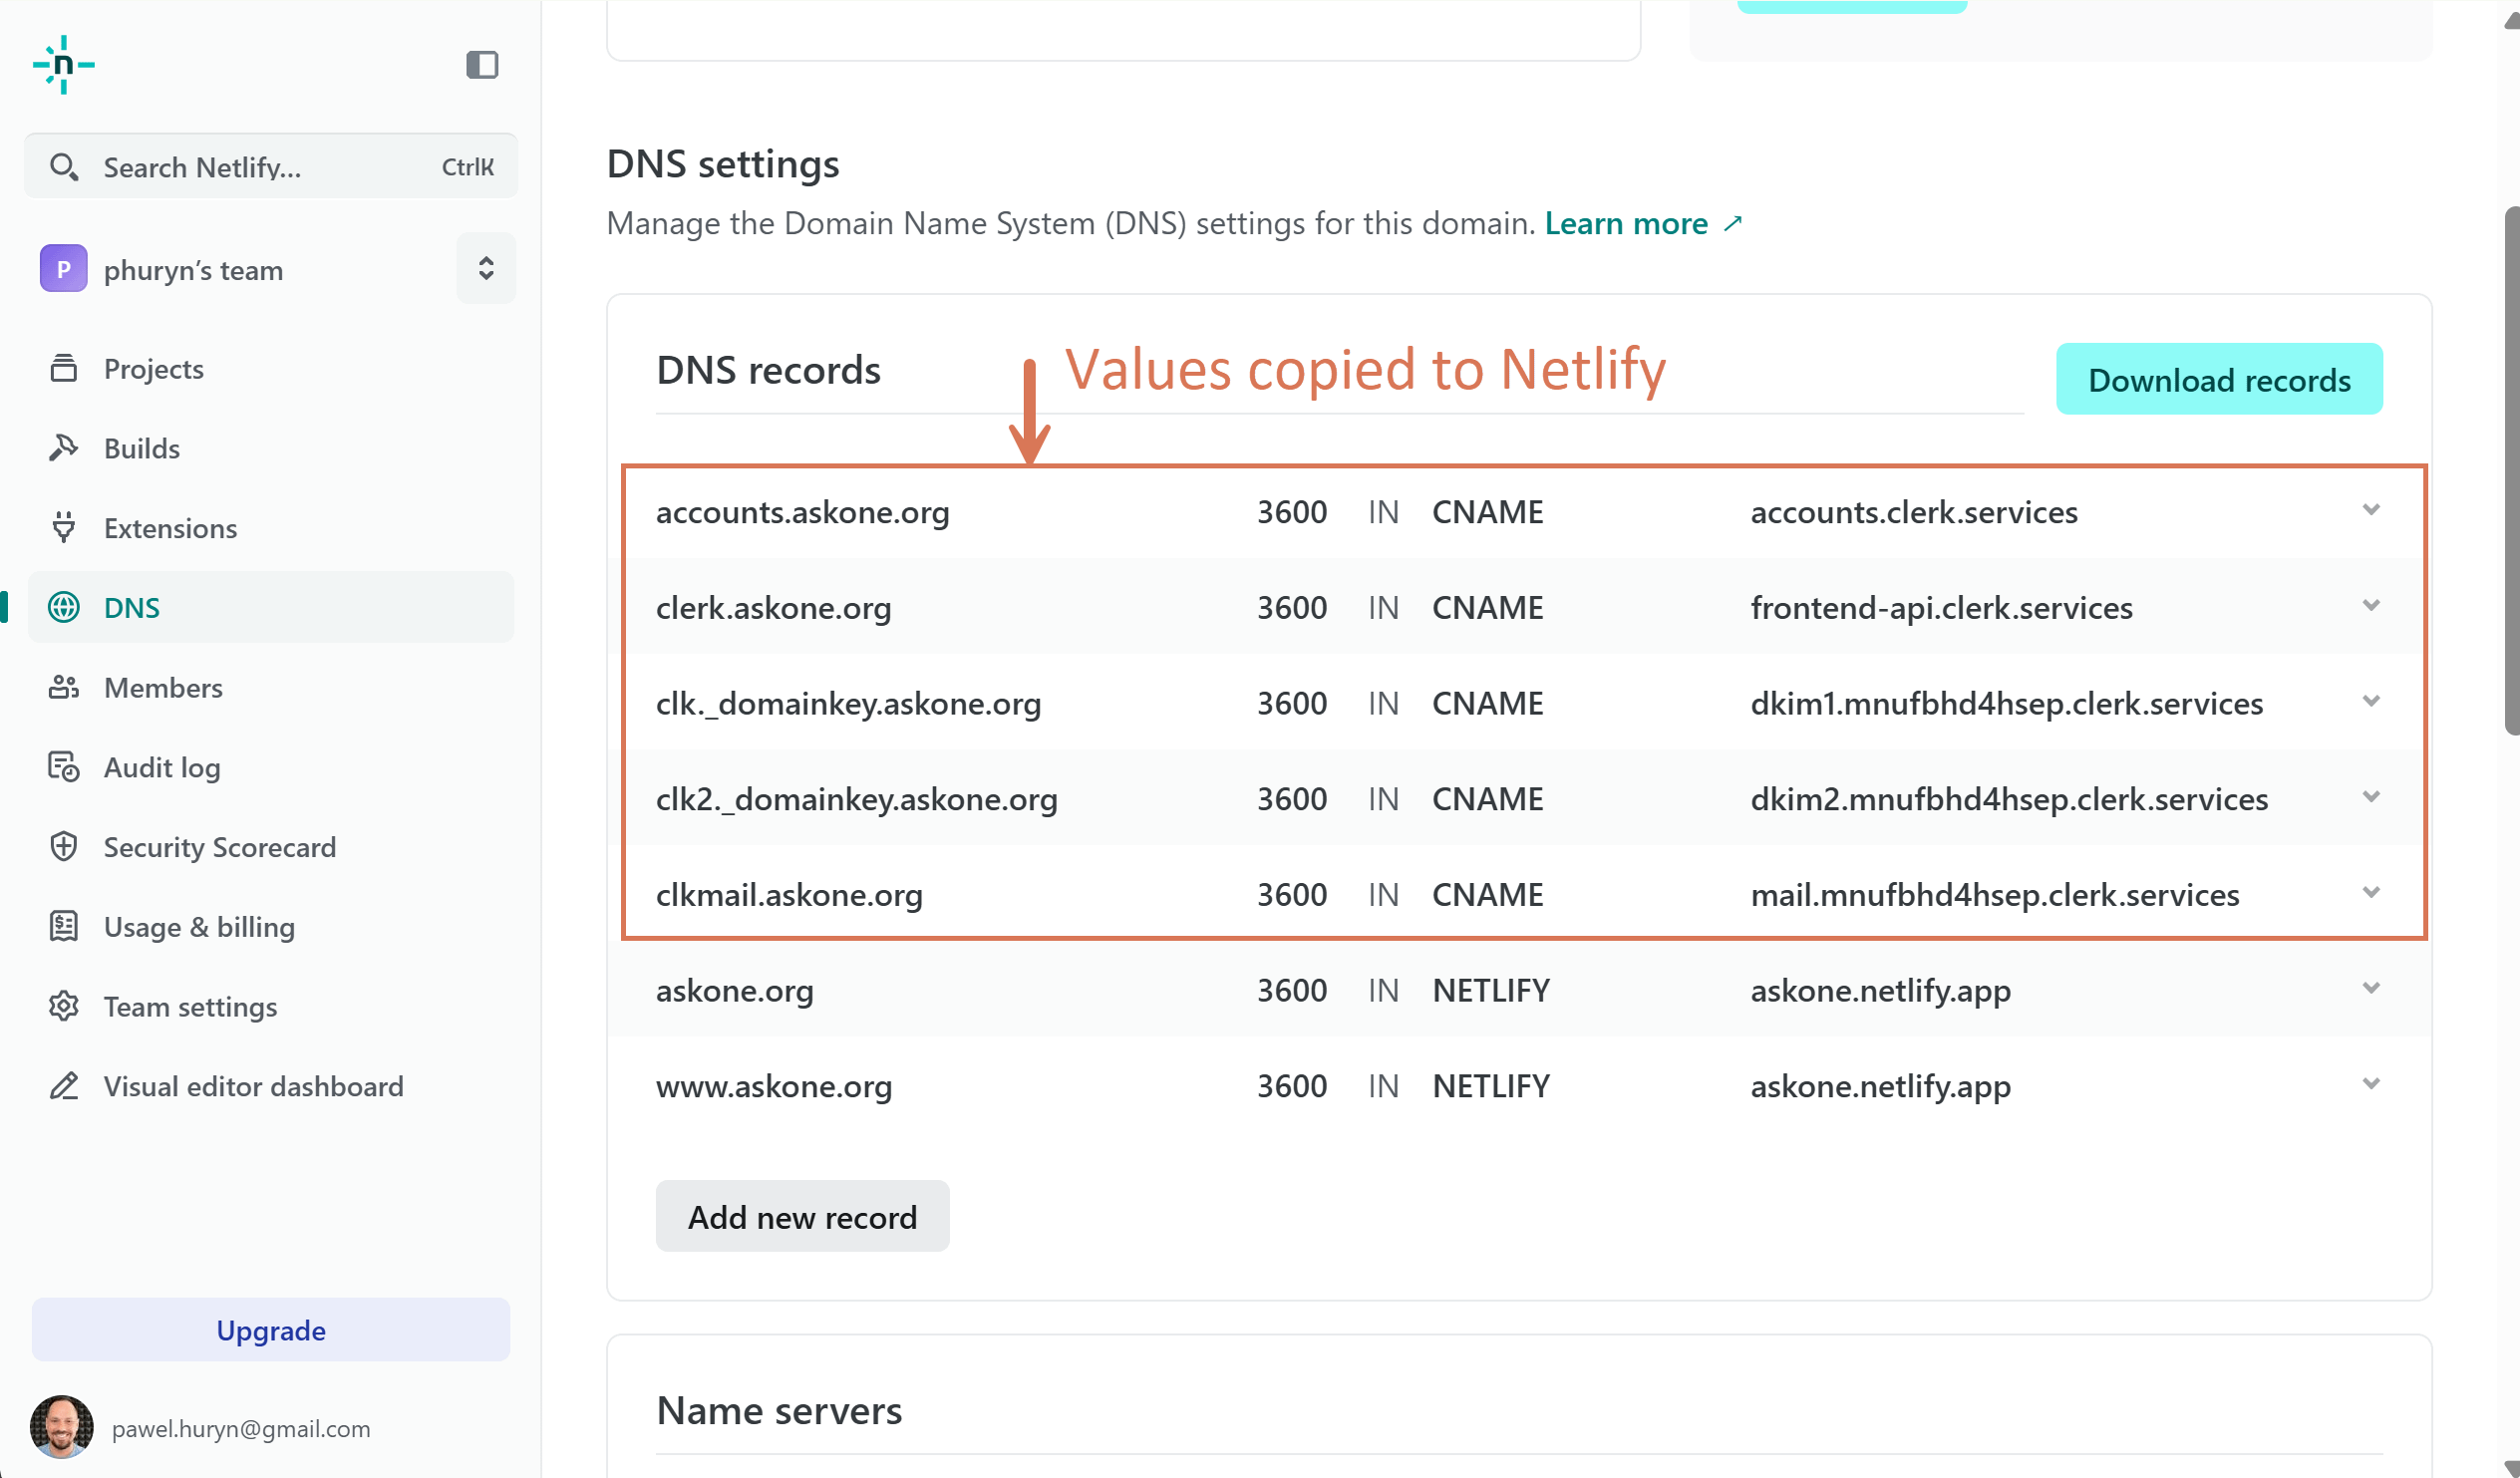
In Netlify, go to DNS > your domain > DNS settings > Add new record. I did it like this:
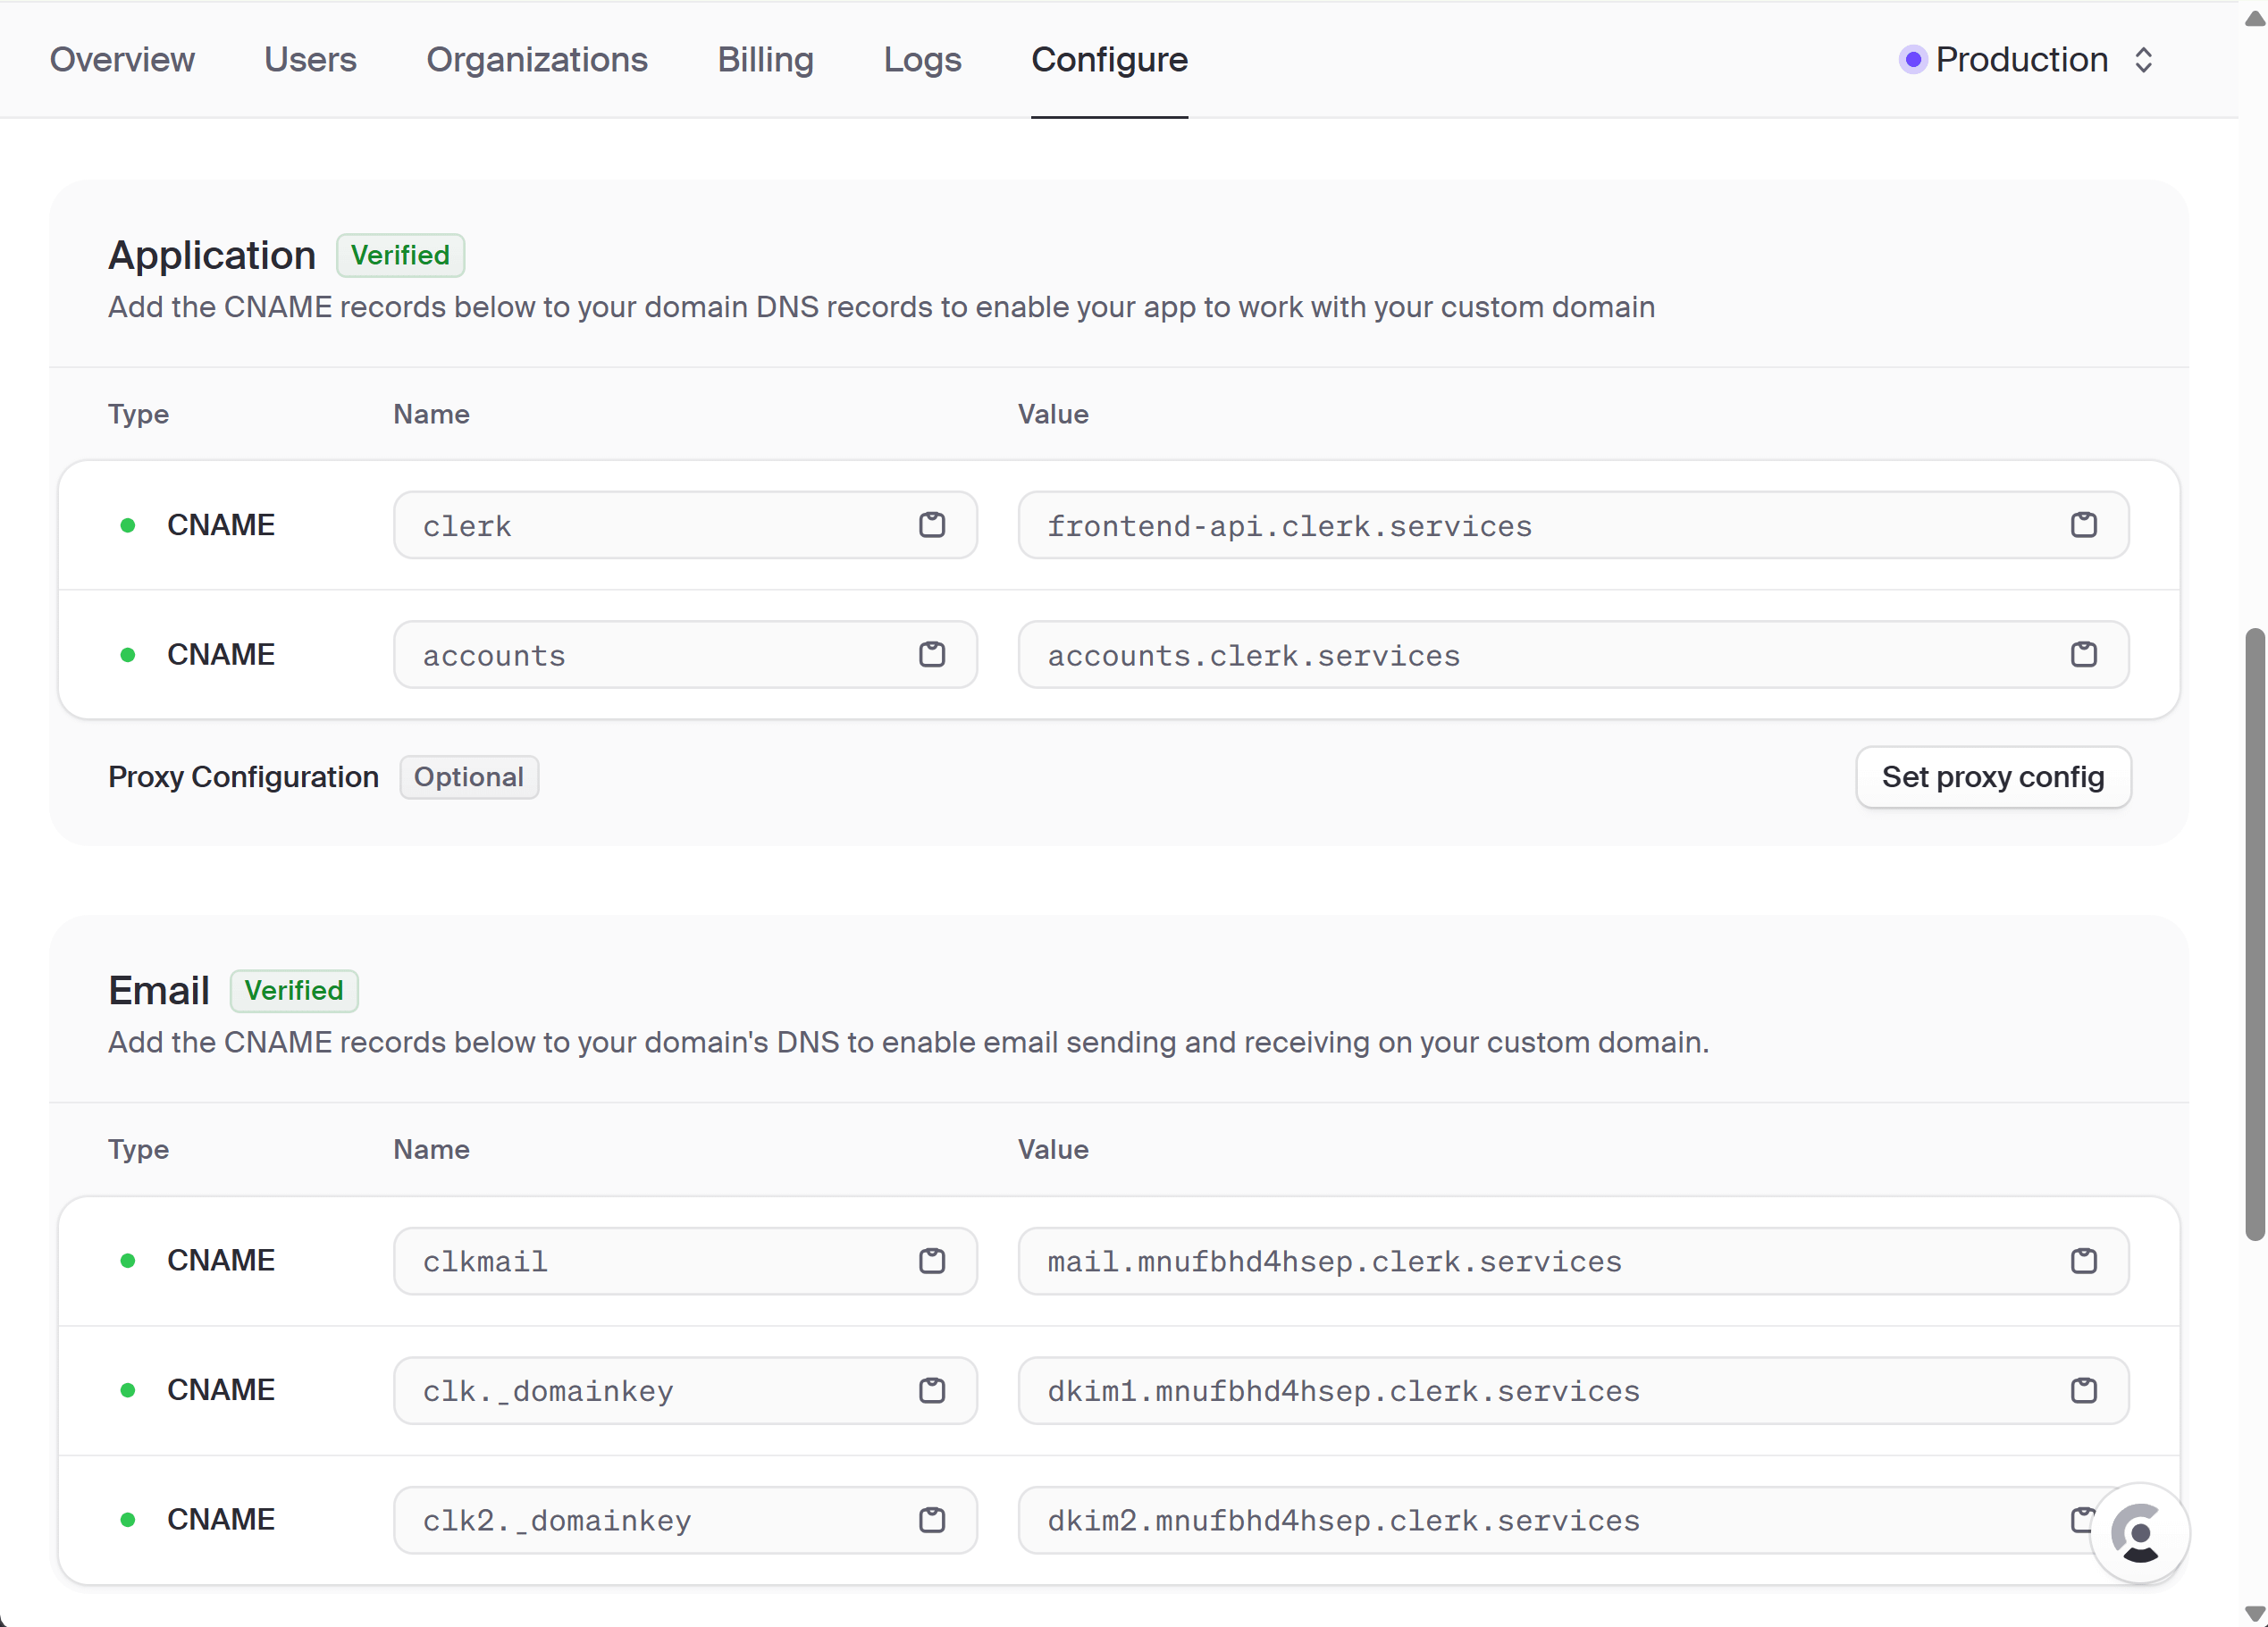
All those records take time to propagate. But once they are verified, Clerk will start serving authentication for our production app:
8. Add Product Analytics
I suggest you start with Microsoft Clarity. It’s 100% free, without limits. Similarly, you can add other tracking codes in the future.
I’m not presenting creating an account. It’s straightforward.
Once inside, create a new project:
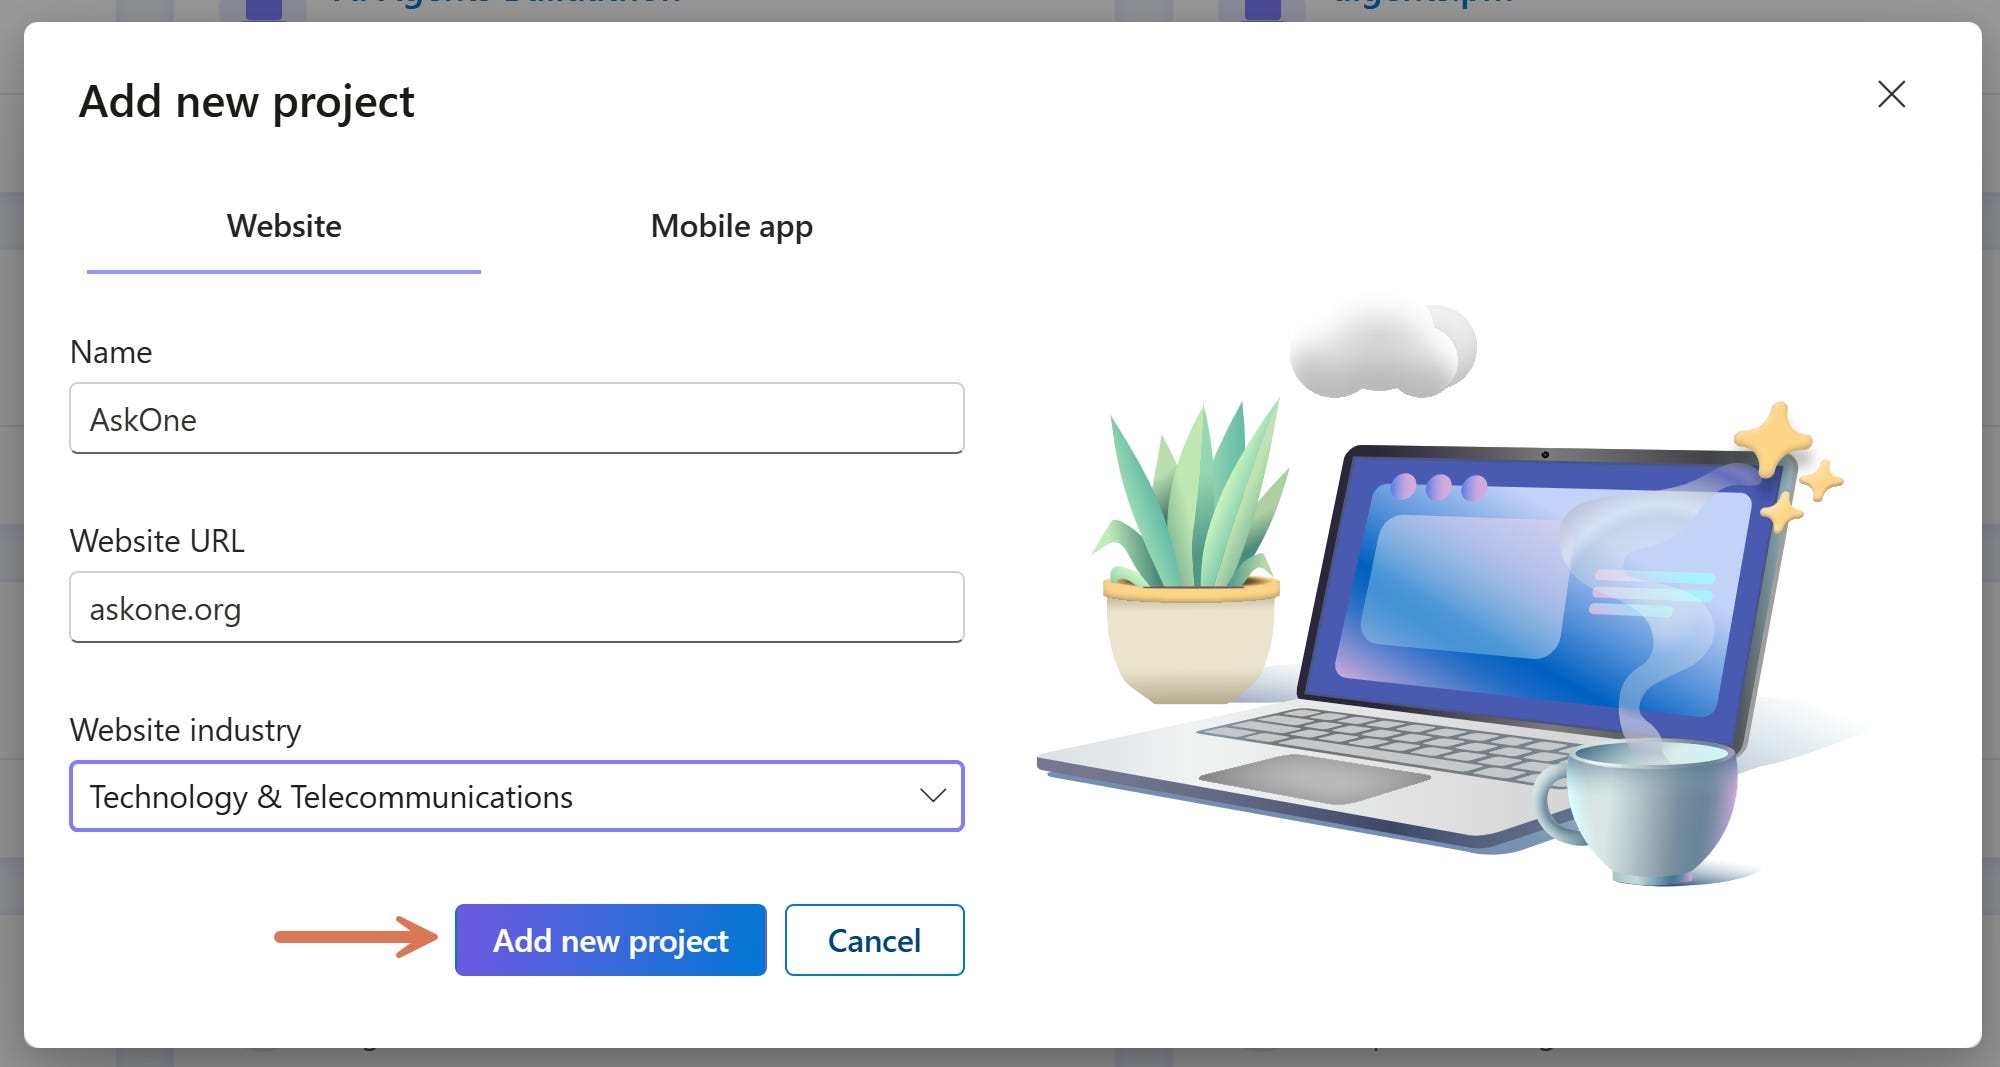
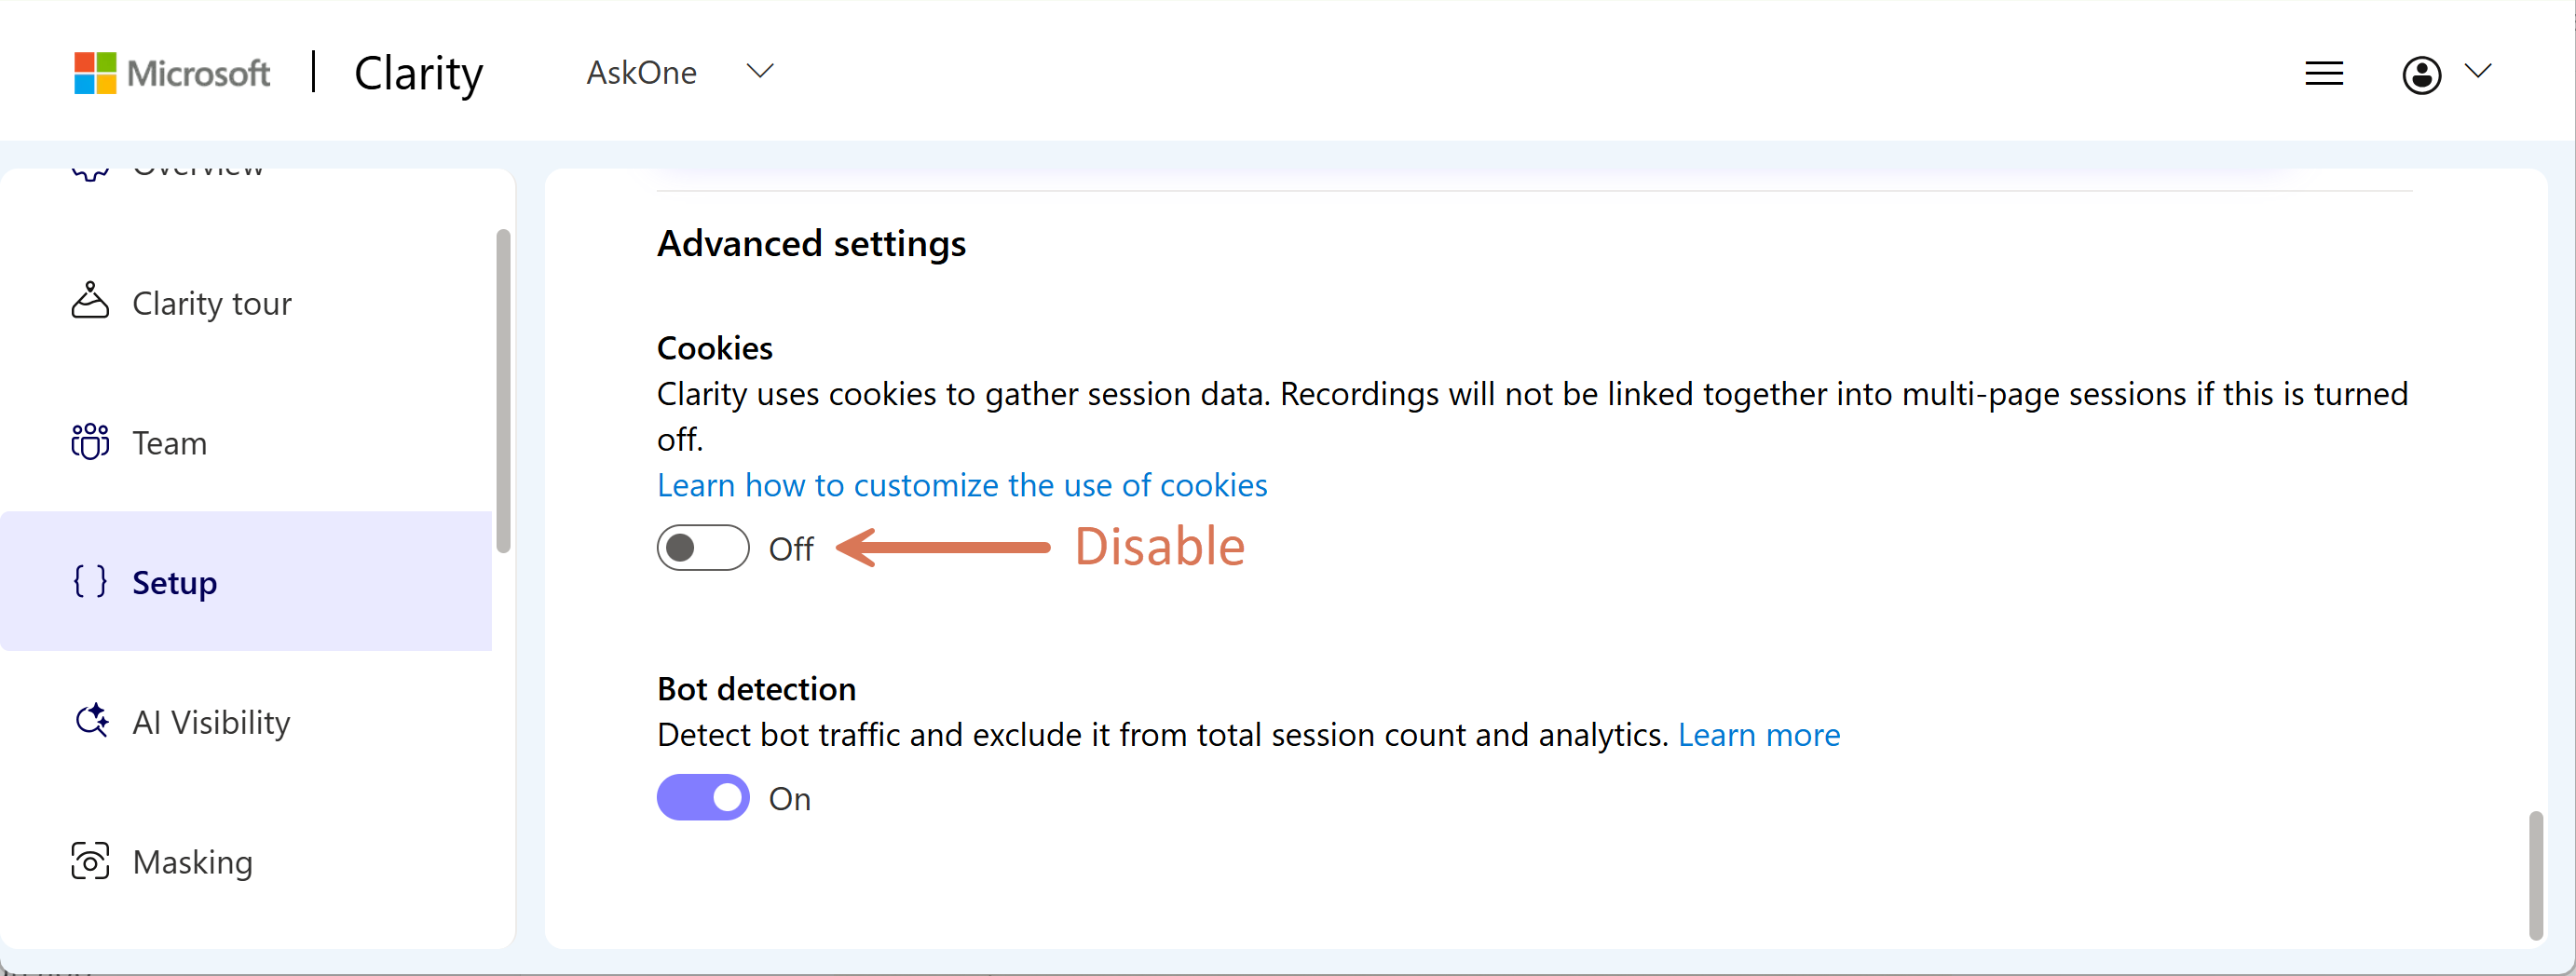
Then go to Settings > Setup > Advanced settings and switch cookies off:
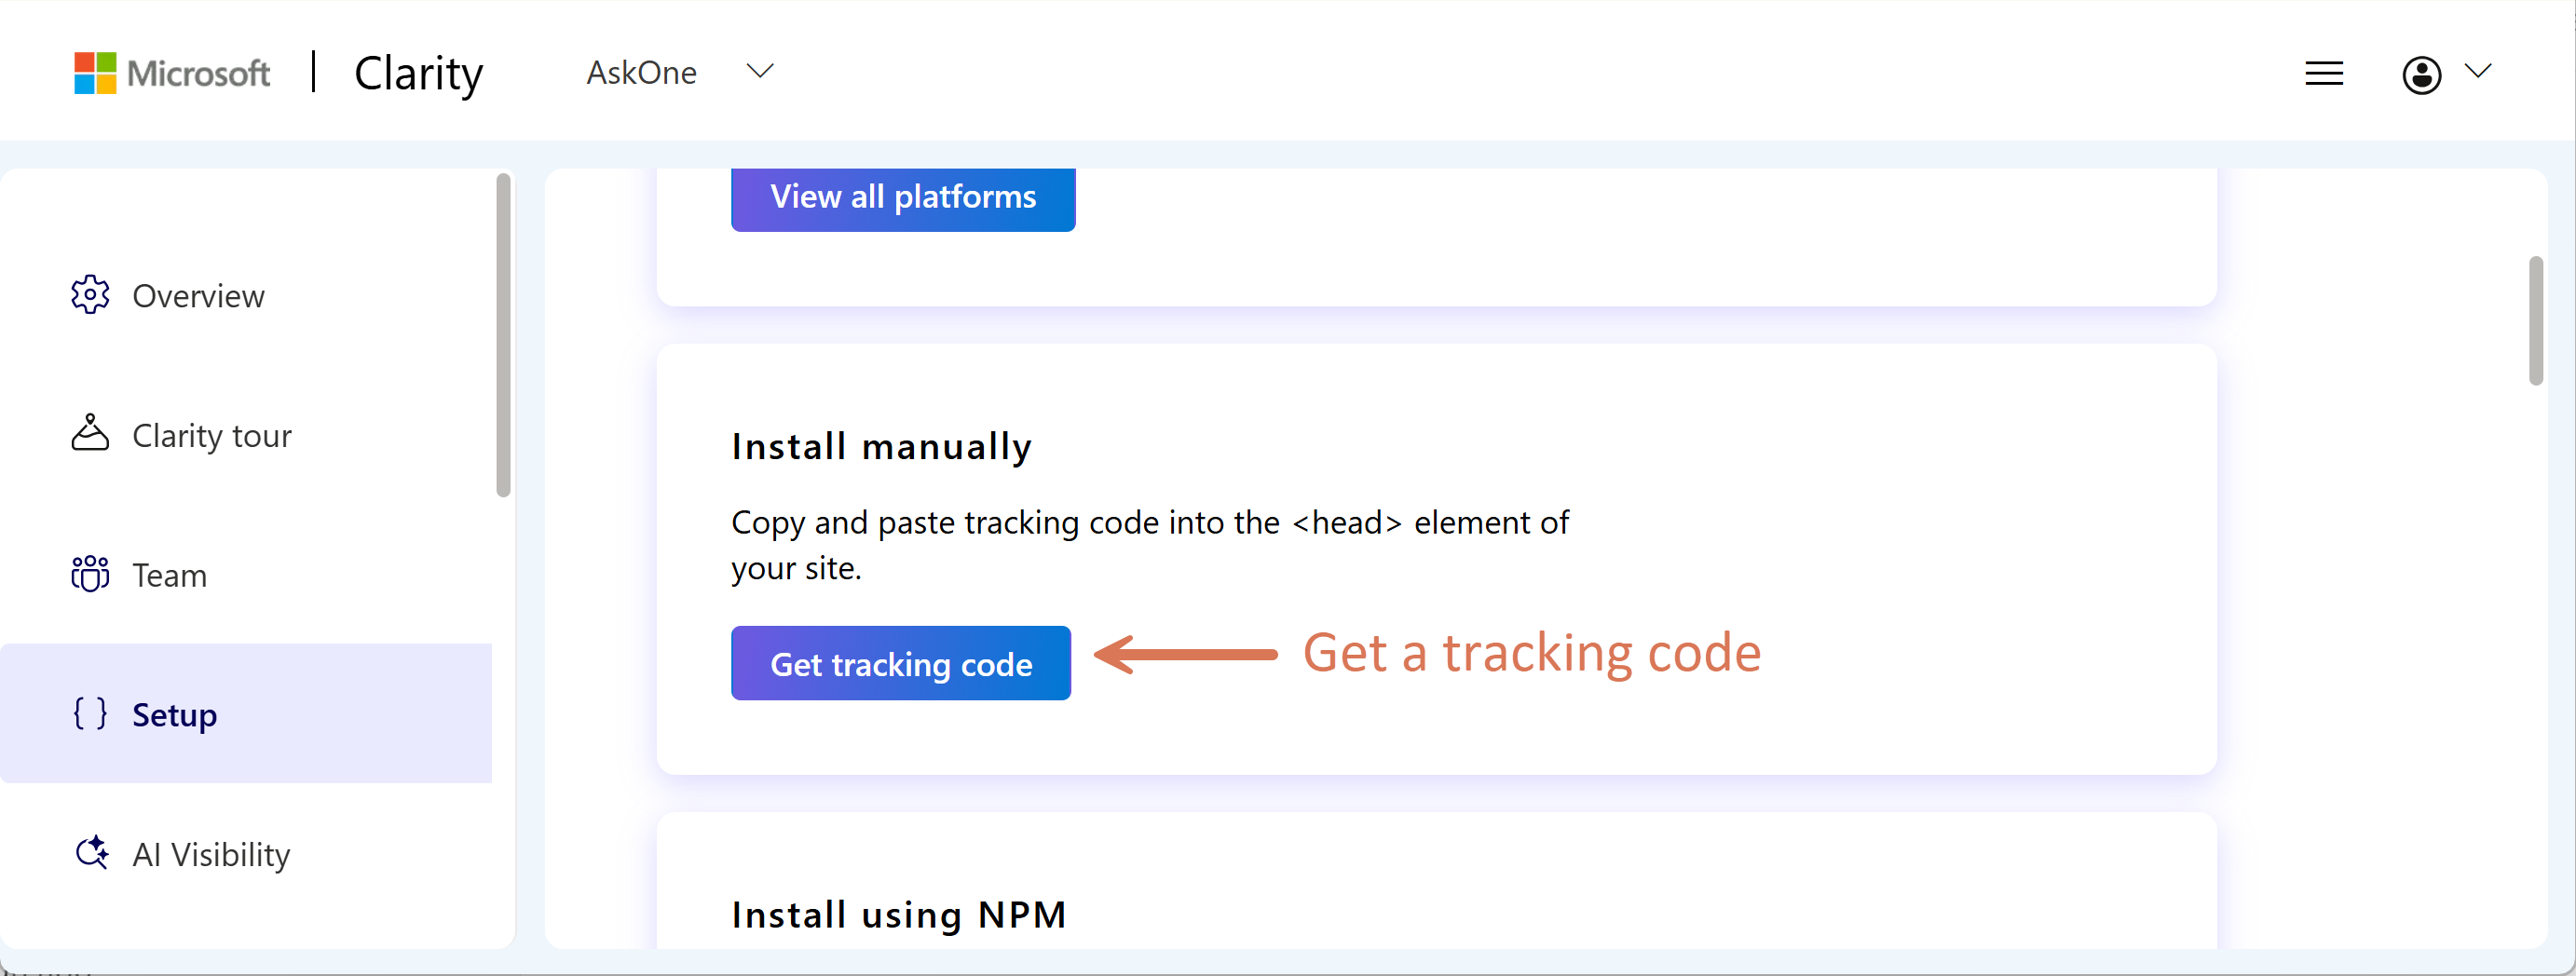
Go to Settings > Setup > Install manually and get a tracking code:
Next, ask the agent (your code will be different):
Inject the following Microsoft Clarity script to every page of our app:

<script type="text/javascript">
    (function(c,l,a,r,i,t,y){
        c[a]=c[a]||function(){(c[a].q=c[a].q||[]).push(arguments)};
        t=l.createElement(r);t.async=1;t.src="https://www.clarity.ms/tag/"+i;
        y=l.getElementsByTagName(r)[0];y.parentNode.insertBefore(t,y);
    })(window, document, "clarity", "script", "yej44djiyd");
</script>
An example report you will see (a different app):
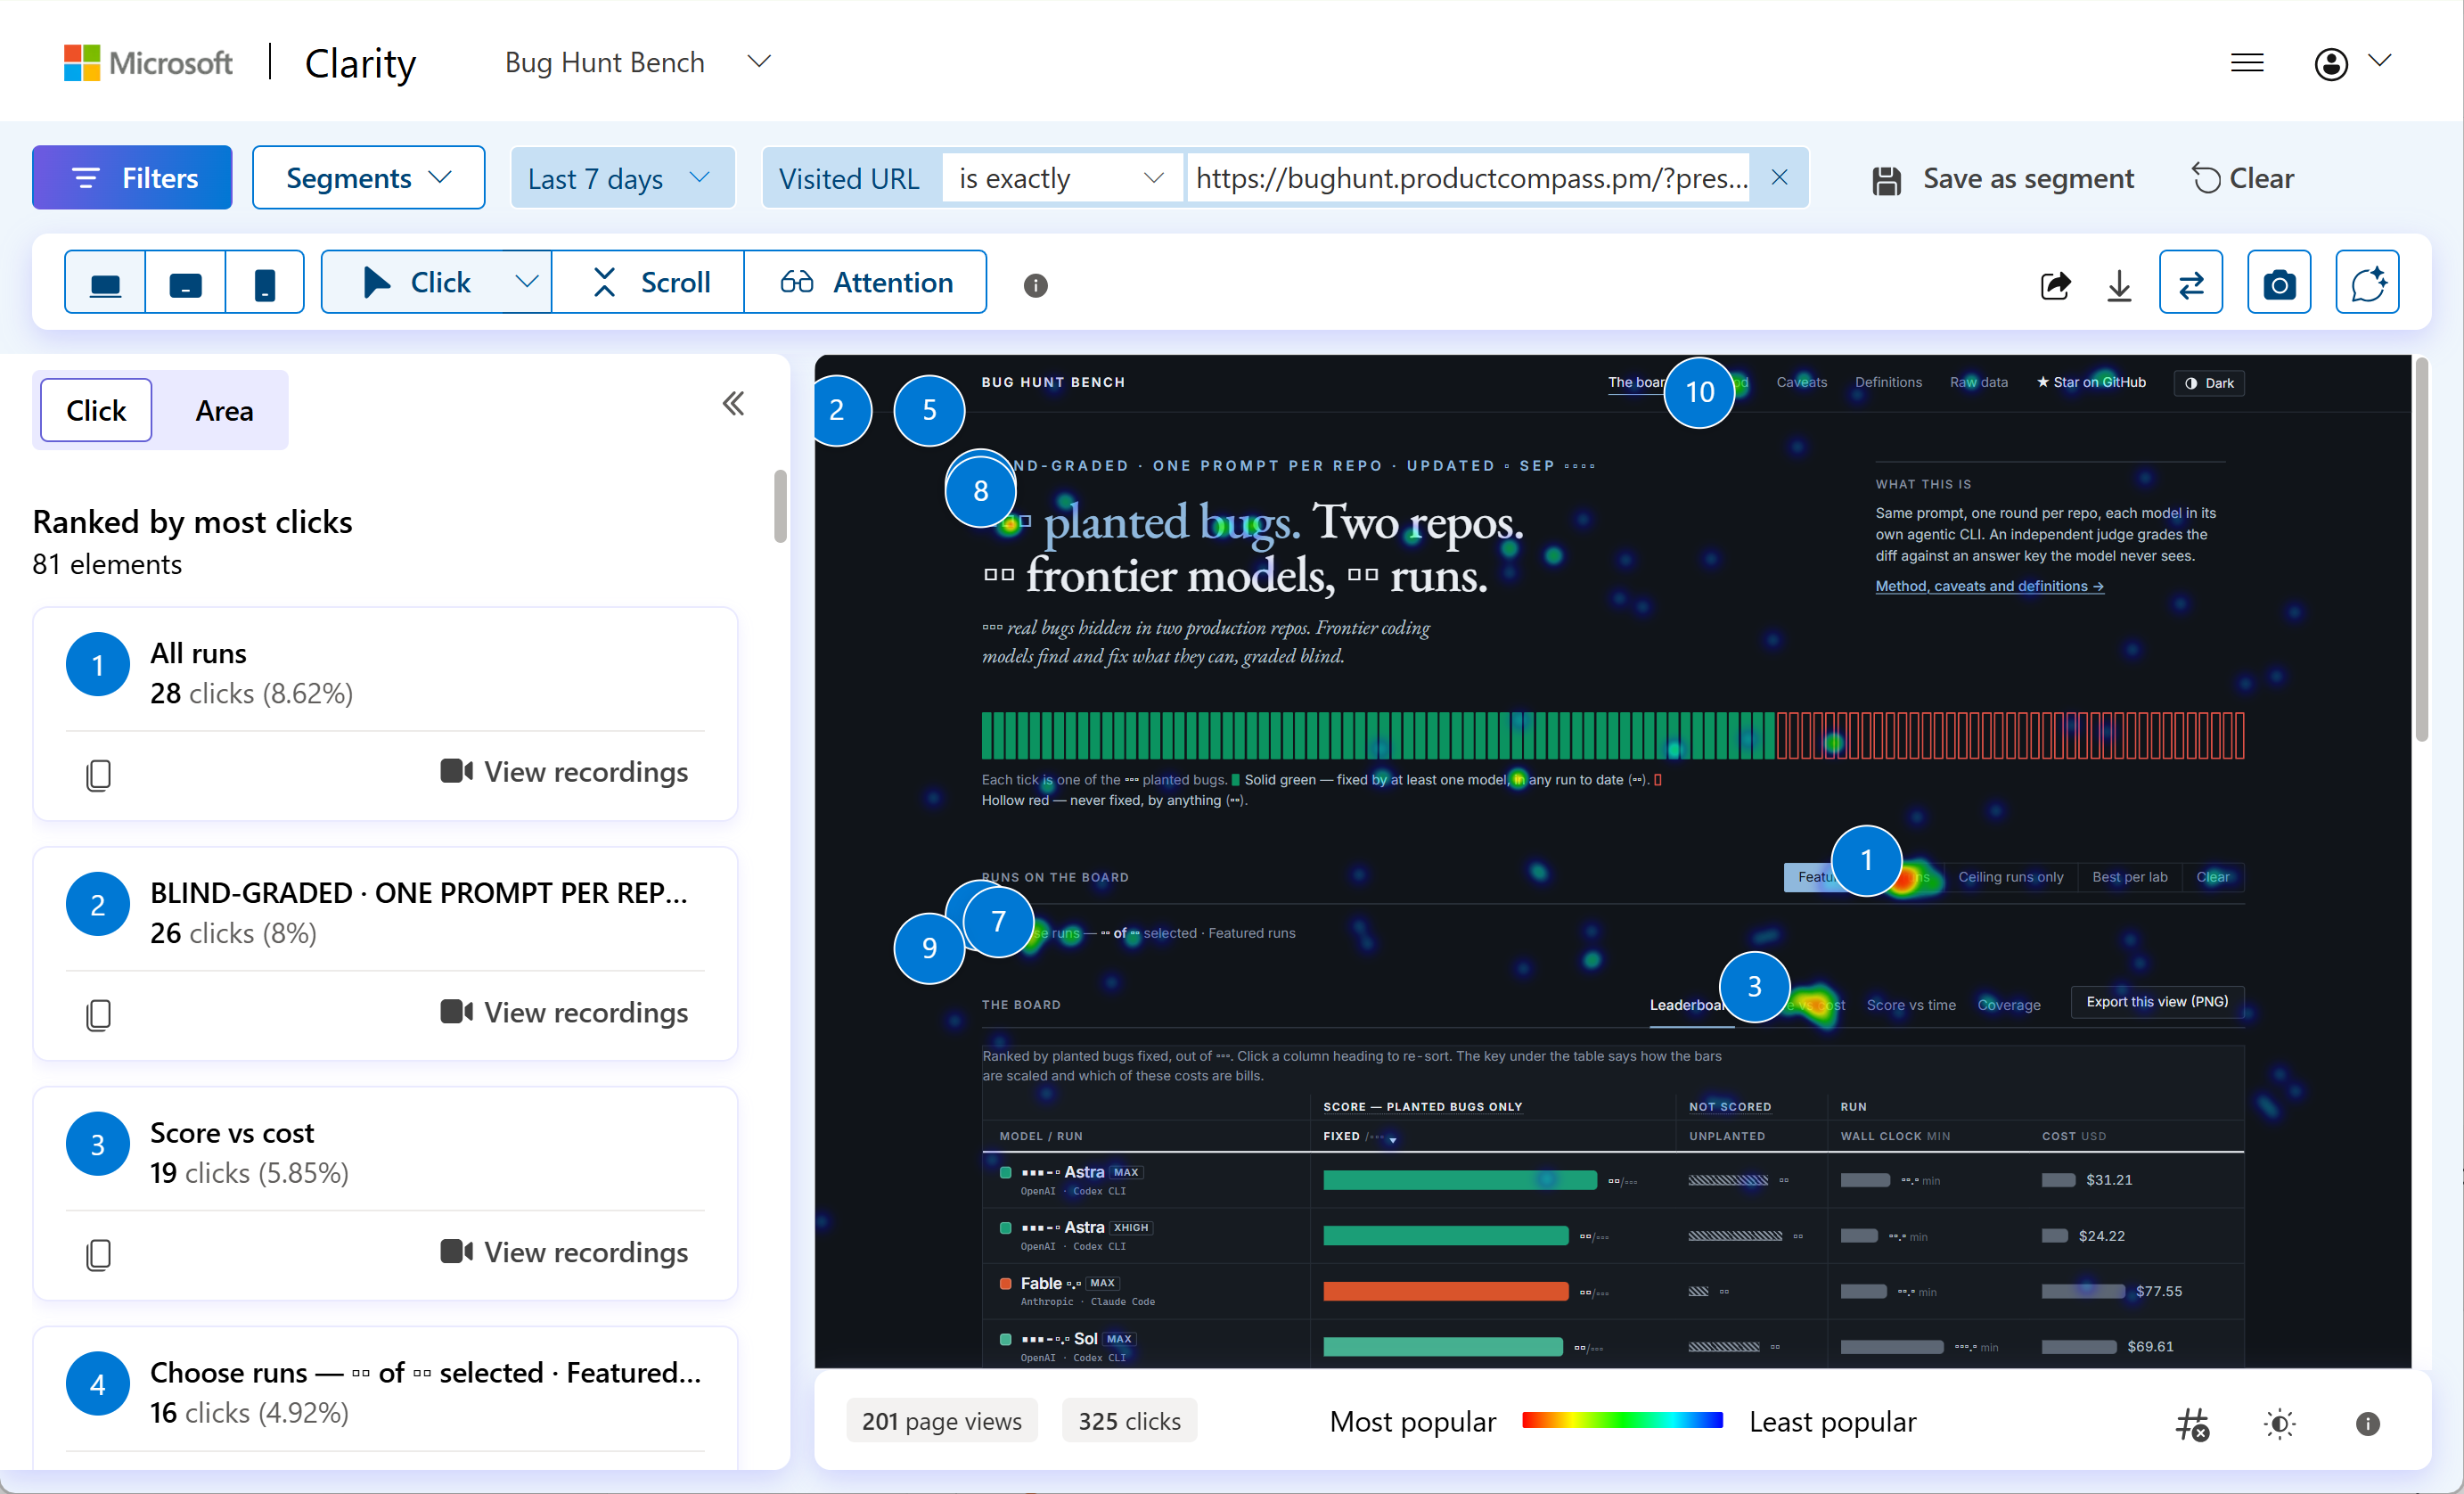
📌 No cookies means no cookie banner and no consent in the code. You will lose the ability to track the returning users, but this setup is all you need to analyze the landing page, view heatmaps, or watch session recordings and involves much less risk.
9. Add Google Auth (For Real)
In development, Clerk provides shared Google credentials. In production, you need your own. The entire process (no screenshots, we would need too many):
I’m not presenting creating a Google Cloud Console (GCC) account. It’s straightforward. Once inside:
[GCC] Create a new or select an existing project
[GCC] Go to APIs & Services > OAuth > Get Started
[GCC] Add app information (External)
[GCC] Create OAuth client ID, note “Client ID” and “Client secret”
[GCC] Add your app URL to Authorized JavaScript Origins
[GCC] Go to Branding: add the app logo and the app domain, provide the terms of service and privacy policy links (we created those pages together with our landing page)
[GCC] Go to Audience > Publish app
[GCC] Go to Branding > Verify branding
If the branding verification fails, go to Google Search Console (GSC) and verify you’re the owner of the domain:
[GSC] Add a website
[GSC] Copy TXT record for DNS configuration
[Netlify] Paste this record in Netlify > DNS
[GSC] Click Verify
[GCC] Go to Branding > Verify branding
Next, configure Google Auth in Clerk:
[Clerk] Configure > User & authentication > SSO connections > Google > Enable
[Clerk] Configure “Client ID” and “Client secret” you got from Google
[Clerk] Copy “Authorized Redirect URI”
[GCC] Go to your project > Credentials > OAuth 2.0 > use “Authorized Redirect URI” from Clerk
Wait 5 minutes
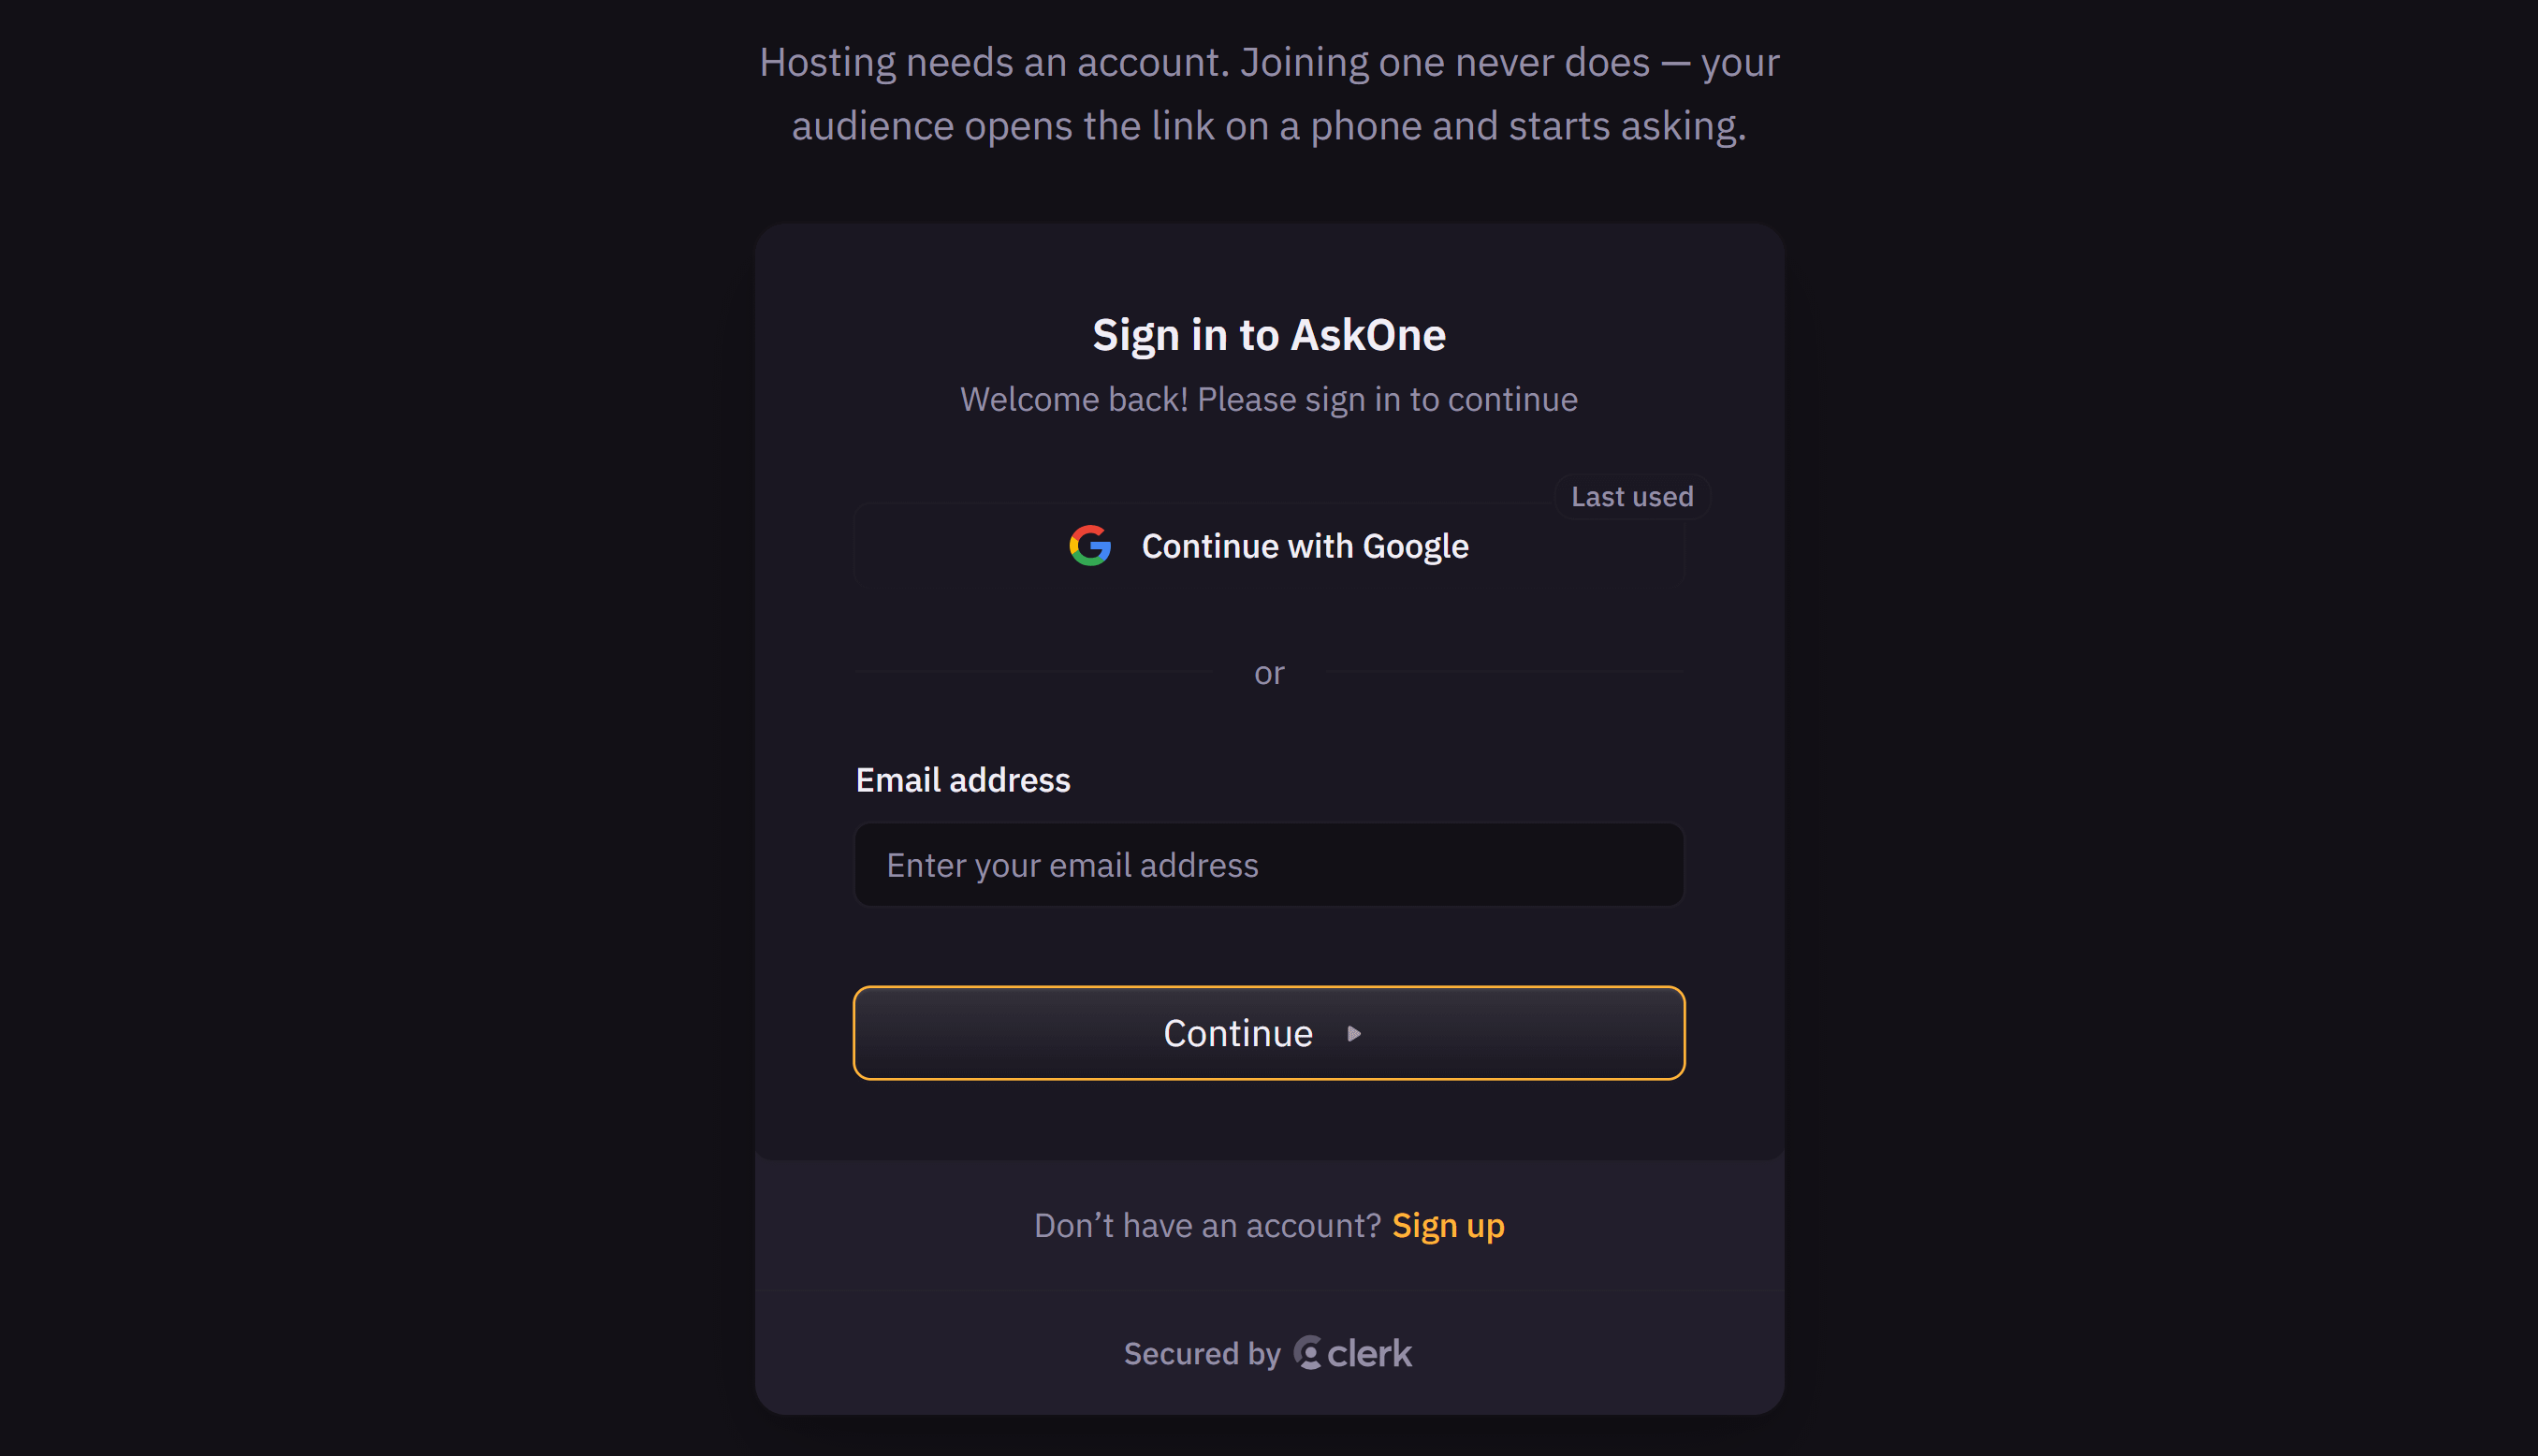
🎉 You can now Sign in / Sign up with Google in production. No “Development environment:”
10. Conclusion
We have a production database, a production app, production users, and a production domain. Development stays on your laptop, but you know how to create more environments, if needed.
We still haven’t opened a file with the code.
Next in the series:
Introducing a change and moving it between environments, end to end: the code and the database (not the data)
Enabling real Stripe payments
App-specific limits. Right now, an organization can have up to 10 active rooms. But can they open and close a room 1,000 times a second? What about free users?
Cloudflare: a web application firewall that guards the app against attacks that exhaust our resources
Tests in more detail: unit, integration, end-to-end, and AI looking at the screens
A checklist to verify that what we build is secure and efficient, and how to make sure AI has enough information to perform that verification
This Thursday, we continue building AskOne: https://go.productcompass.pm/events
11. Live Session Recording, Part 2
Part 1 and Part 2 are available here: https://go.productcompass.pm/events
P.S. If you’re looking for a structured cohort, I just joined Product Faculty as a trainer.

Currently, we offer 8 AI PM cohorts (Anthropic, Google, OpenAI) for the price of one + $1,500 off for my readers: 👉 https://productfaculty.com?code=PAWEL
On Maven, this program would cost ~$22,000. That’s, by far, the best training offer in the market.
And that’s not everything. Everyone who enrolls with the above code can attend our Claudathon for PMs for free: https://go.productcompass.pm/claudathon (send me an email with a purchase confirmation: pawel@productcompass.pm) - we start on Sep 19.
Thanks for Reading The Product Compass
It’s amazing to learn and grow together.
Have an amazing rest of the week,
Paweł
And one more question: should I move agentic engineering (what this series is about) to a separate stream? The first option below is a dedicated newsletter you can subscribe to/unsubscribe from: