How to Build and Scale Full-Stack Apps in Lovable Without Breaking Production
Branching: separate dev, test & prod - a complete no-code guide with proven workflows for building real products (not prototypes) with Lovable.
Hey, welcome to the free edition of The Product Compass newsletter.
Every week, I share actionable tips, resources, and insights for PMs.
Here’s what you might have missed recently:
Consider subscribing and upgrading your account, if you haven’t already, for the full experience:
For months, I’ve been repeating that Lovable is the best solution for building real full-stack apps. No coding.
In How to Quickly Build SaaS Products With AI we discussed the best practices of working with Lovable. In A Complete Course: How to Build a Full-Stack App with Lovable, I shared a 2-hour, step-by-step walkthrough.
But I haven’t addressed one critical question:
How do you keep building your app while real users are using it in production?
Any code or database change can break your app. That’s why the first step in Lovable must be branching and separating environments.
In traditional products, a common setup is:
(Local) - local engineer’s environment
DEV - environment shared by engineers
TEST - environment meant for testing
STAGE - staging environment with configuration and data mimicking production
PROD - production environment used by real users
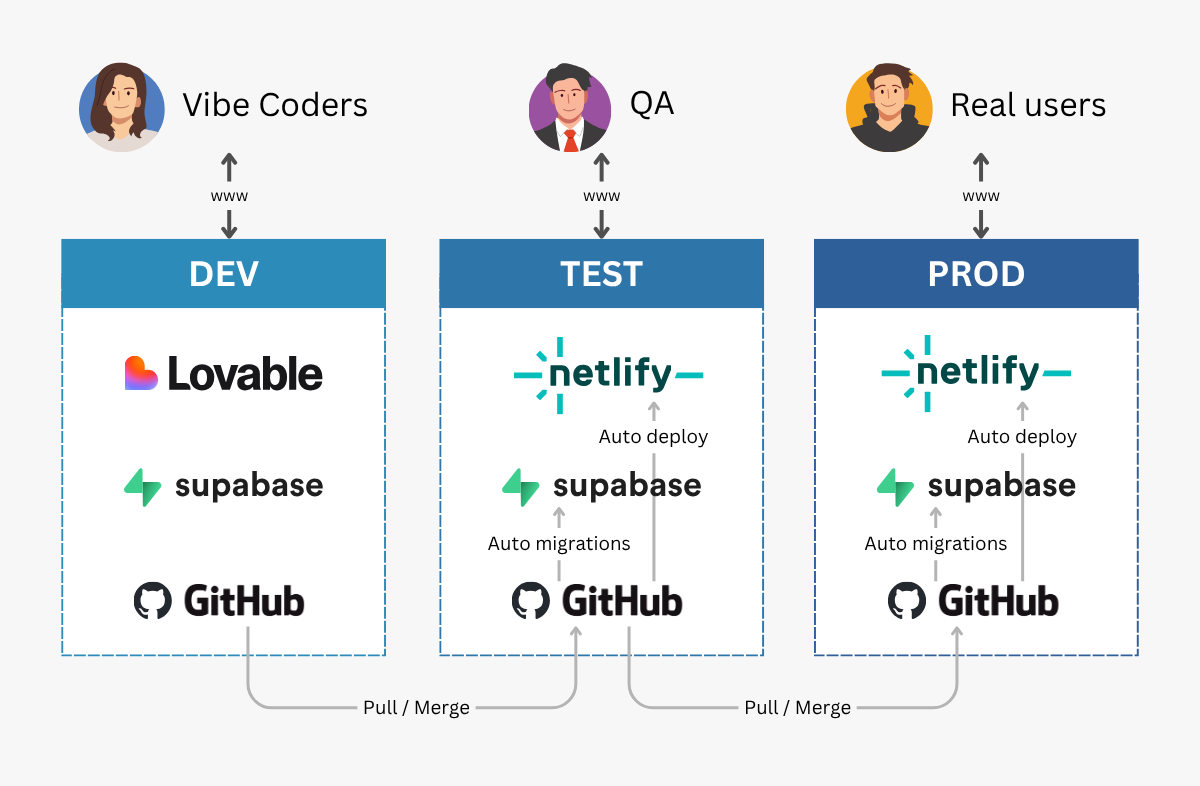
When vibe coding, you might not need that complexity. A better approach might be:
But I recommend starting with the simplest possible setup to make sure your ongoing work doesn’t affect production:
Lovable’s website didn’t provide enough information, I faced many errors, and the available options were confusing.
So, after weeks of research, I’m sharing my tested approach in detail, with step-by-step instructions. As always, no coding:
Lovable Branching: How to Separate DEV and PROD Environments
How to Move Changes Between The Environments
How to Add TEST and Other Environments in Lovable
How to Roll Back Changes if Something Goes Wrong
This post is meant for people who want to quickly build and scale real products without coding and without breaking production.
If you're just experimenting with MVPs or prototypes without paying customers, feel free to skip it and check out other AI Product Management issues.
P.S. And in one of the next posts I’ll demonstrate plugging automatic tests.
1. Lovable Branching: How to Separate DEV and PROD Environments
As part of my no-code SaaS PoC, I’m developing a credentials management app using Lovable. It will replace Accredible (from $996/year).
In 12 hours, I implemented:
Multi-tenant B2B SaaS
Admin and member roles for each organization
Google & email authentication
Drag & drop certificate editor
Downloading certificates as PDFs and images
Payments
I wanted to share it with coaches to get their feedback. But I planned a few significant changes that might break the app.
I knew I needed to separate and manage:
Source code
Supabase database
Web app hosting
Here’s how I separated my PROD and DEV environments:
Step 1: Create a new ‘dev’ GitHub branch in Lovable
Lovable supports 2-way sync with GitHub, which can store the code and its modification history.
To isolate the environments, we need to create a copy of the default “main” (PROD) branch in a way that will allow us to migrate our changes between the environments, for example DEV > PROD:
Open your project in Lovable and click the GitHub icon. Enable GitHub integration if you haven’t already.
Next, click the “main” branch and create a new “dev” branch:
The result: When you edit your app in Lovable, code changes will be saved in a ‘dev’ GitHub branch without affecting the ‘main’ production branch.
Step 2: Create a new Supabase database
We also need a new Supabase instance. To create it:
Log in to your Supabase dashboard. You can find the link in the right upper corner of Lovable.
Next, create a new database for DEV environment. I called it “dev-certificates:”
(I didn’t use Supabase branching because deployments on a DEV environment are managed by Lovable. I wanted to fully isolate it from the other environments.)
The result: An empty database for the DEV environment.
Step 3: Switch Lovable to the new Supabase
Wait a few minutes. Once the new database is created:
Open your project in Lovable and click the Supabase icon
Switch the database (in my case, “dev-certificates”)
The result: When you change data structure or backend functions in Lovable (tables, edge functions, RLS policies), it will try to deploy those changes to the DEV Supabase, without affecting the PROD.
Step 4: Ask Lovable to run SQL migrations
The database we created in point 2 is empty and has no objects, such as tables.
Ask Lovable to execute the SQL migration scripts in order to get the same database structure. I suggest the following prompt:
Execute existing Supabase migrations without creating new migration files by:
- Taking the SQL content from your migration files
- Running it through the lov-sql block for me to review and approve
If migrations don’t exist, create a new SQL migration file first.


(We could also execute those migrations manually or through Supabase CLI. I wanted to maximally simplify the process.)
The result: Your DEV environment has the same SQL tables, SQL functions, storage, and RLS policies as PROD. Future updates will be managed by Lovable.
Step 5: Ask Lovable to redeploy edge functions
Edge functions contain your business logic. They are deployed differently and were not included in SQL migrations.
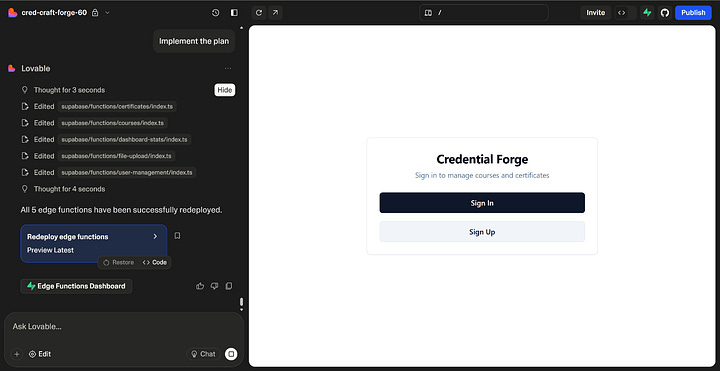
Ask Lovable in the Chat Mode to:
Can you re-deploy all existing edge functions?
Next, click “Implement the plan” if Lovable hasn’t deployed them automatically.
I didn’t need it, still, I repeated the process to generate screenshots:



(We could also execute those migrations manually or through Supabase CLI. I wanted to maximally simplify the process.)
The result: Your DEV environment has the same edge functions as PROD. Future updates will be managed by Lovable.
Step 6: (Optional) Add Supabase secrets
If you’re using integrations like OpenAI or Clerk, their API keys are likely stored as Supabase secrets and have not been added to a new Supabase.
The simplest approach is to copy them manually:
(Note that some API keys might be different depending on the environment. For example, you might want to use a different Clerk instance for DEV and PROD.)
The result: Your DEV environment has the right Supabase secrets.
Step 7: Fix hardcoded IDs
Even though we theoretically connected Lovable to the new Supabase project, in some cases, Lovable hardcodes the old project ID, e.g. in the edge functions.
In that case, your app will still display data from PROD :)
You can get your project ID from the Supabase dashboard:
Next, ask Lovable (use your project IDs and the Chat Mode):
I get the impression that somewhere in the code we still have the old Supabase connected or we might be using the old endpoints. Make sure we're connected to project ID etblqdmkutnigpoeeiha (the current ID) and we do not use awosmozntgjdxxfumewh (the old ID).
It turned out the old project ID was hardcoded in multiple places, so rather than accepting the plan, I asked Lovable:
Can't you move it to one place?
And only then clicked “Implement the Plan:”
The DEV environment stopped displaying data from PROD. I was able to create a new course without seeing the previous courses:
The result: Your DEV environment is fully connected to a new Supabase project.
Step 8: How I fixed hardcoded project IDs in the main (PROD) branch
What about the ‘main’ branch? After all, project IDs were hardcoded there, too.
I didn’t have to fix it, as the hardcoded values were correct. But I coudln’t sleep well at night if I didn’t fix it.
I used standard GitHub features:
Create a pull request from “dev” to “main”
Merge changes from “dev” to “main” while fixing project ID
I had to change my custom file containing project ID (from Step 7):
src/lib/constants.ts
When using standard Supabase policies, you might have to change this Lovable file containing project ID and Supabase publishable key. Just in case, verify its content:
src/integrations/supabase/client.ts
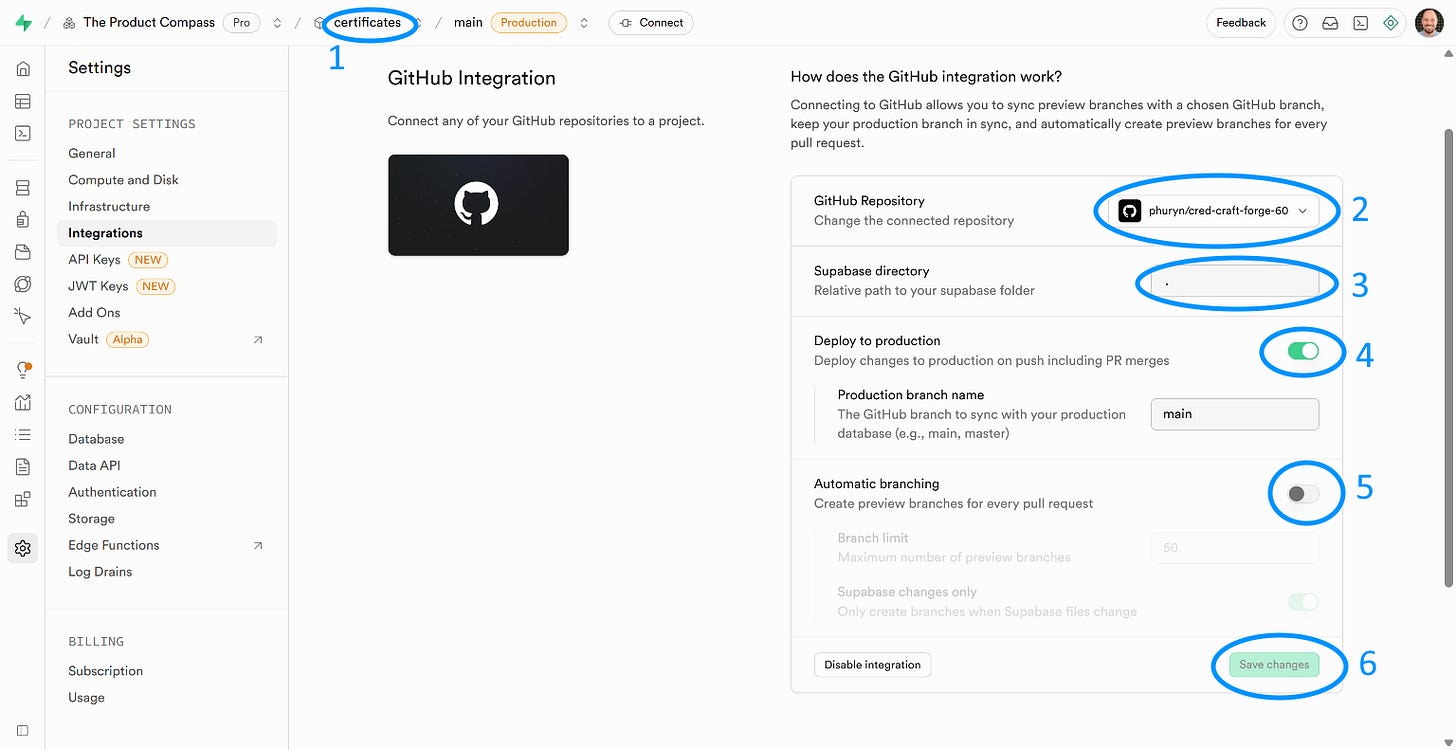
Step 9: Enable automatic deployments for PROD Supabase
Whenever we use GitHub to move a new feature from ‘dev’ to ‘main’ (DEV > PROD), we want those changes to be automatically deployed to PROD Supabase.
Go to your Supabase dashboard:
Select the PROD database \ Integrations
Connect Supabase to your GitHub repository
Leave “.” as Supabase directory (Lovable’s default)
Enable automatic deployments to PROD from the “main” branch
Disable automatic branching
Save changes
The result: When you merge changes to the “main” GitHub branch, Supabase will automatically run SQL migration scripts and redeploy edge functions.
You can later review the logs of those operations here:
Step 10: Host and automatically deploy UI on PROD
Finally, we need to host UI for PROD. For that, I used a free Netlify account.
All you need to do is to create a new Netlify project and connect it to your GitHub “main” branch:
That way, I get two different apps:
DEV hosted by Lovable (one student certificate visible in the recording above)
PROD hosted by Netlify (two student certificates visible in the recording above)
The result: When you merge your changes to the “main” GitHub branch, Netlify will automatically rebuild the front end and host a new UI. You can also easily connect a custom domain in Netlify configuration.
2. How to Move Changes Between The Environments
Important prerequisites
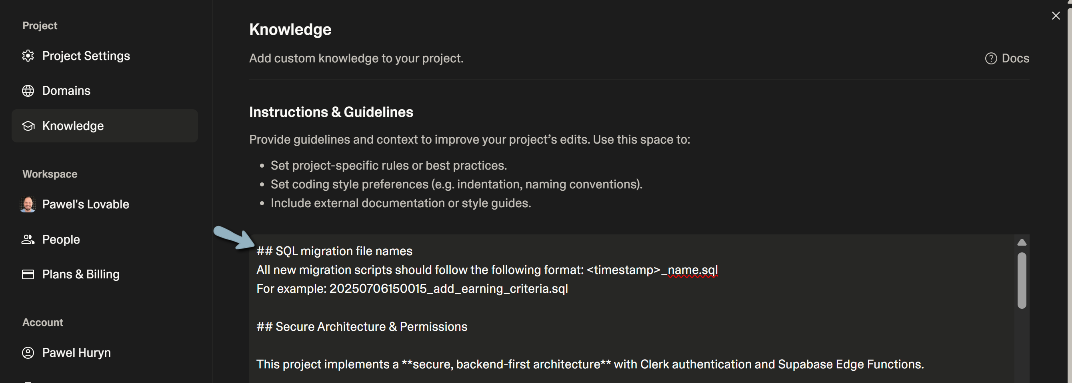
Before moving forward, you must instruct Lovable that from now on, each migration script should follow the following format required by Supabase:
## SQL migration file names
All new migration scripts should follow the following format: <timestamp>_name.sql
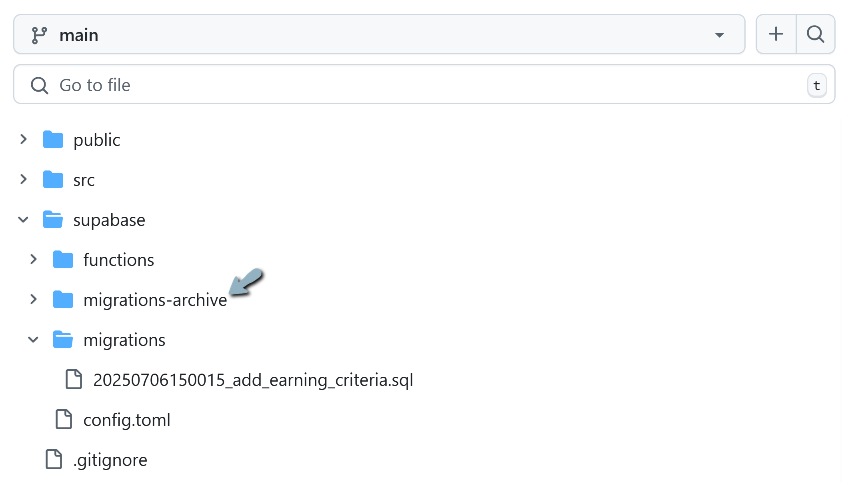
Example: 20250706150015_add_earning_criteria.sql
You can add this information to project knowledge in Lovable:
Migrations troubleshooting
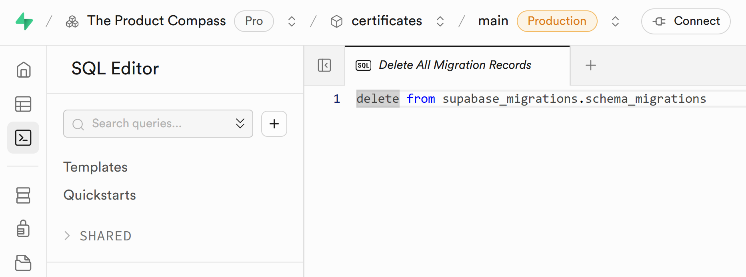
If, like me, you did a mistake of renaming old migrations, Supabase won’t migrate anything. In that and similar cases:
Execute delete from supabase_migrations.schema_migrations in Supabase to clean a migration history:
Move old migration files to the archive, e.g., to a separate folder using GitHub Desktop or remove them from the main branch (in that second scenario, make sure you know what you’re doing). That way, those files will be skipped (Lovable doesn’t create them in a way that you can execute them multiple times):
How to move changes between the environments
Below, I recorded a video in which:
I asked Lovable to add a new field “Earning Criteria” to the course form. This changes the code and SQL database (a new column “earning_criteria”).
After testing, I created a pull request from dev to main (PROD) in GitHub and merged it.
Supabase detected a new migration file and updated the PROD database.
Netlify detected a GitHub change and deployed a new front end.
(No voice, I’m still recovering after being sick this week. But I added descriptions.)
3. How to Add TEST and Other Environments
This process is way easier. We do not have to deal with Lovable anymore.
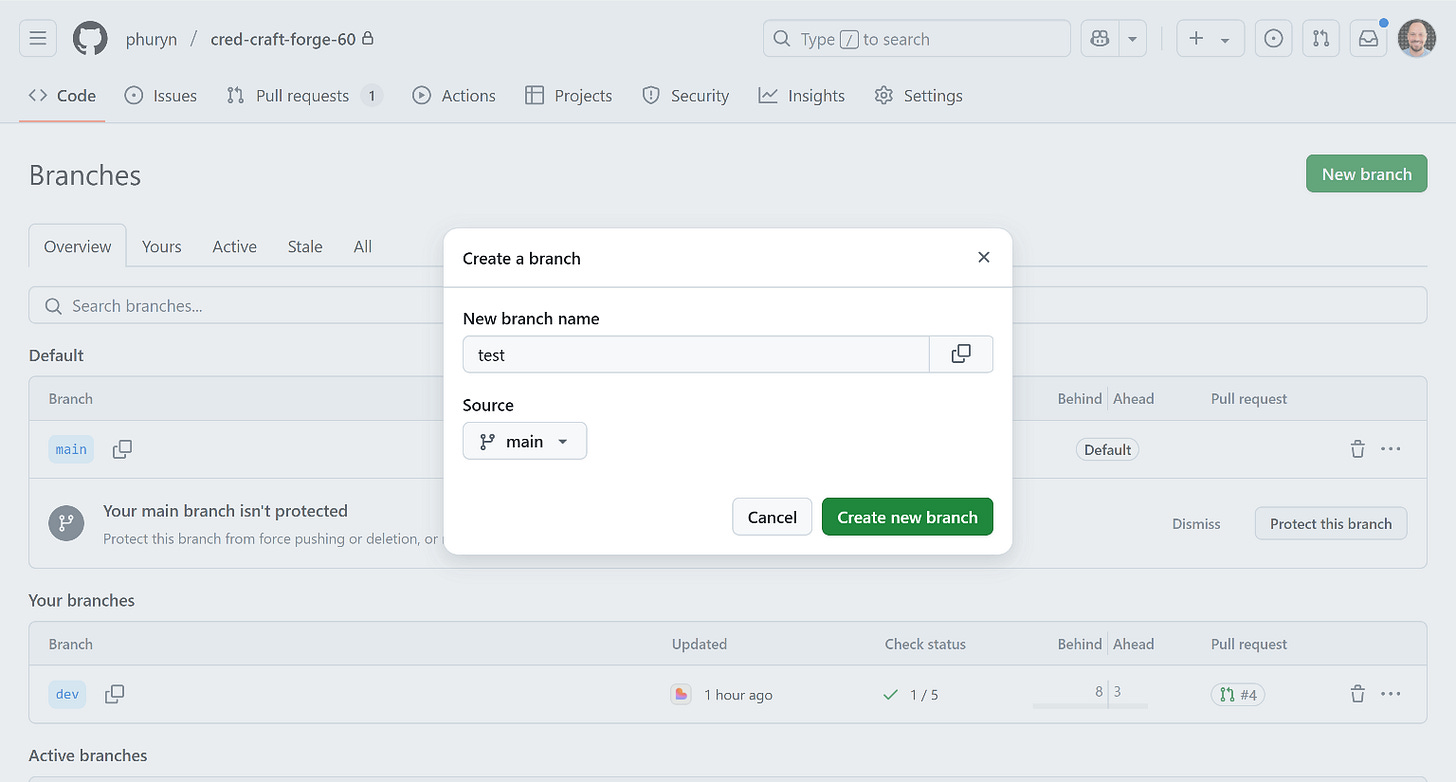
Step A: Create a new GitHub branch from ‘main’ e.g., ‘test’
You can use GitHub UI:
The result: You have a new GitHub branch for the new environment.
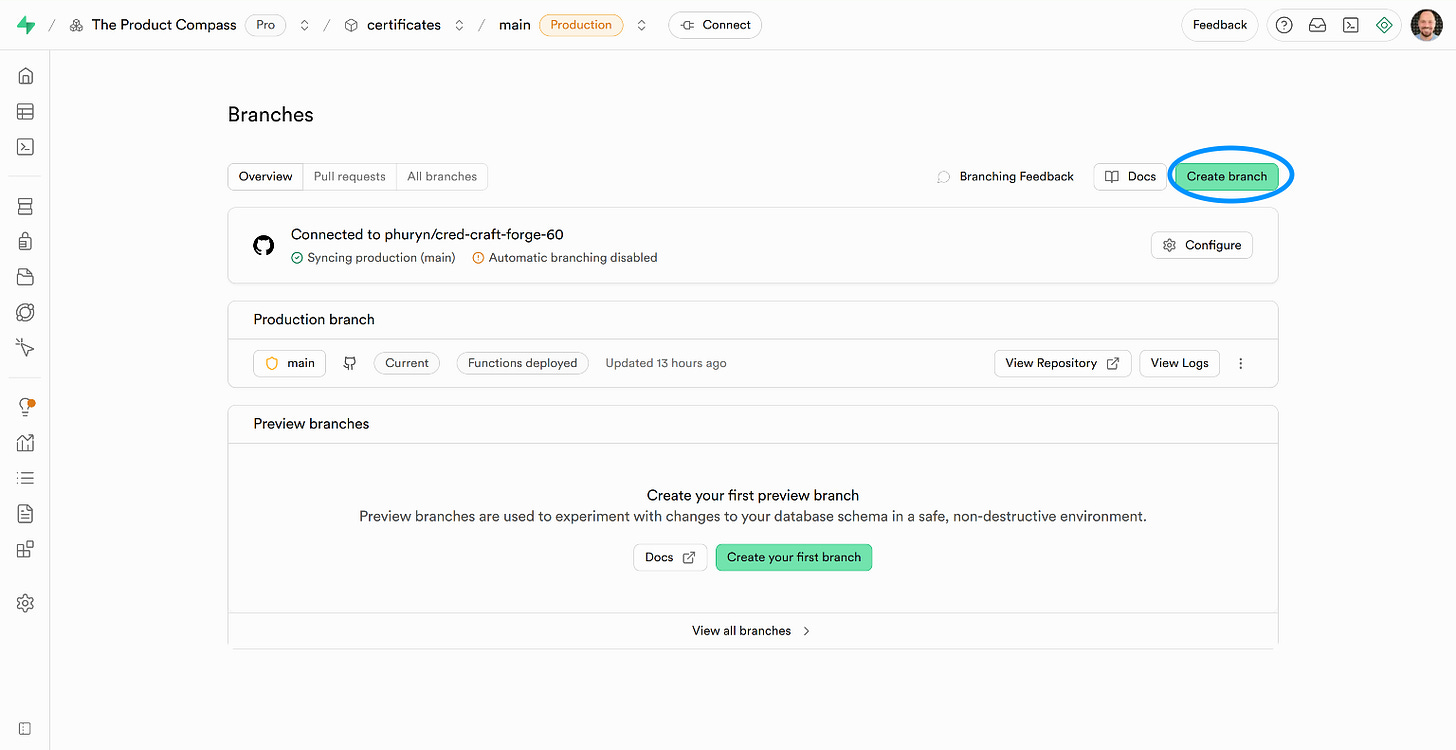
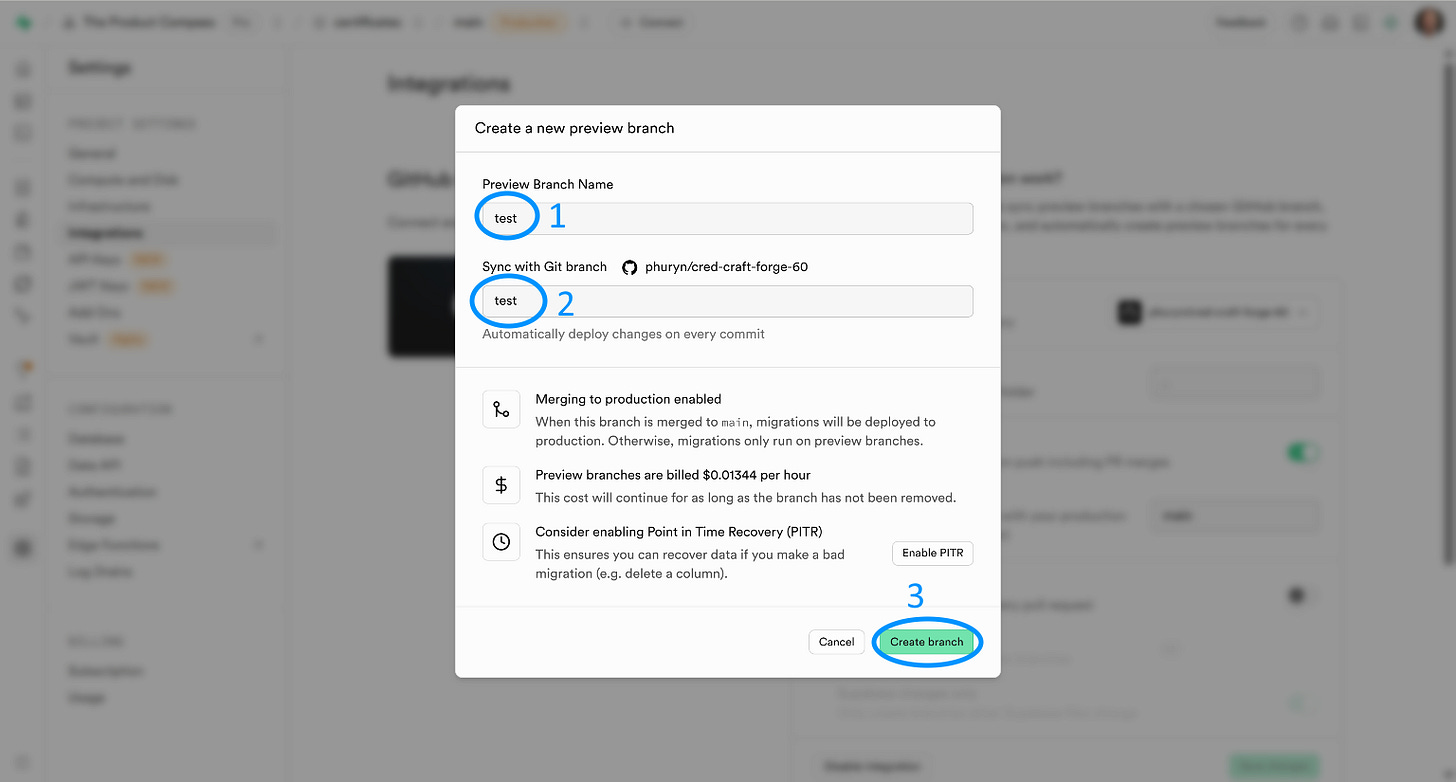
Step B: Go to Supabase and create a new branch, e.g., ‘test’
Sync it with the GitHub branch you’ve created:
The result: You have a new Supabase branch for the new environment. All database changes will be deployed automatically.
Step C: Repeat steps from the previous point
Step 6: Add Supabase secrets (if applicable)
Manually edit project ID and Supabase publishable key as explained in Step 8
Step 10: Host and automatically deploy UI on PROD (Netlify)
After completing those steps, you have three isolated environments: DEV, TEST, PROD.
The result: When you merge your changes to the “main” or “test” GitHub branch (DEV > TEST), the Supabase is automatically updated. Netlify will automatically rebuild the front end and host a new UI.
4. How to Roll Back Changes if Something Goes Wrong
Despite testing, sometimes things break. In that case:
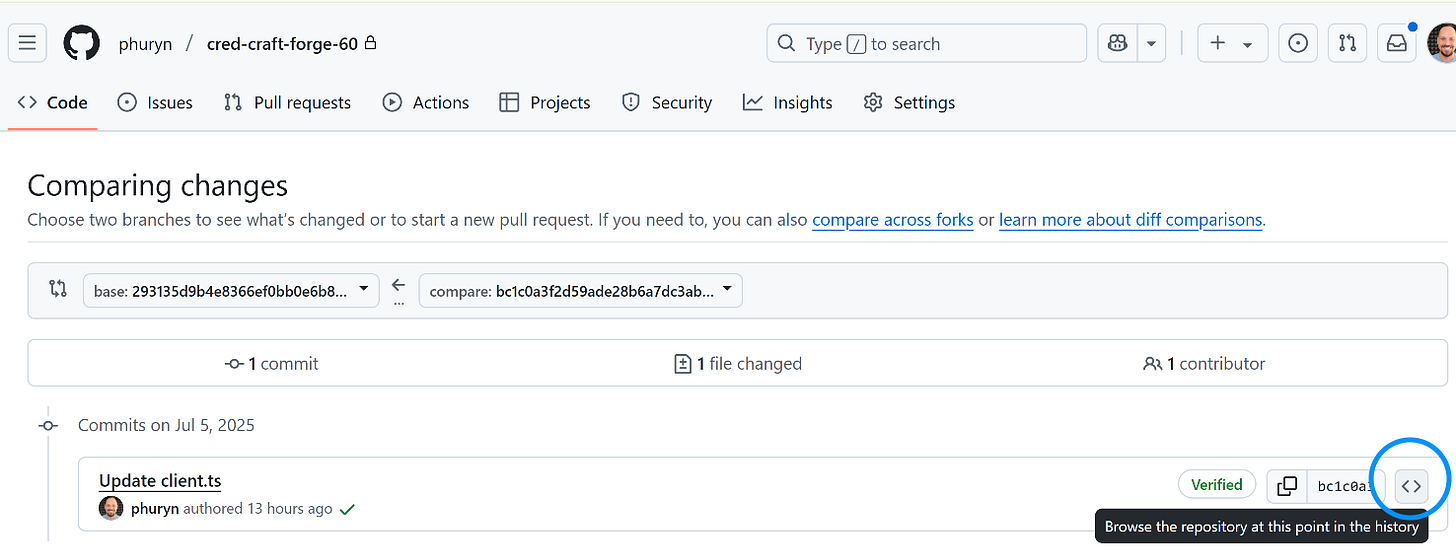
Revert GitHub
You can view repository at the time of a specific commit and download files manually:
Another option is reverting the most recent pull request:
Restoring GitHub to any point in time is outside the scope of this post and might require running git console commands, e.g., to create a temporary branch based on a working commit ID.
Restore Supabase
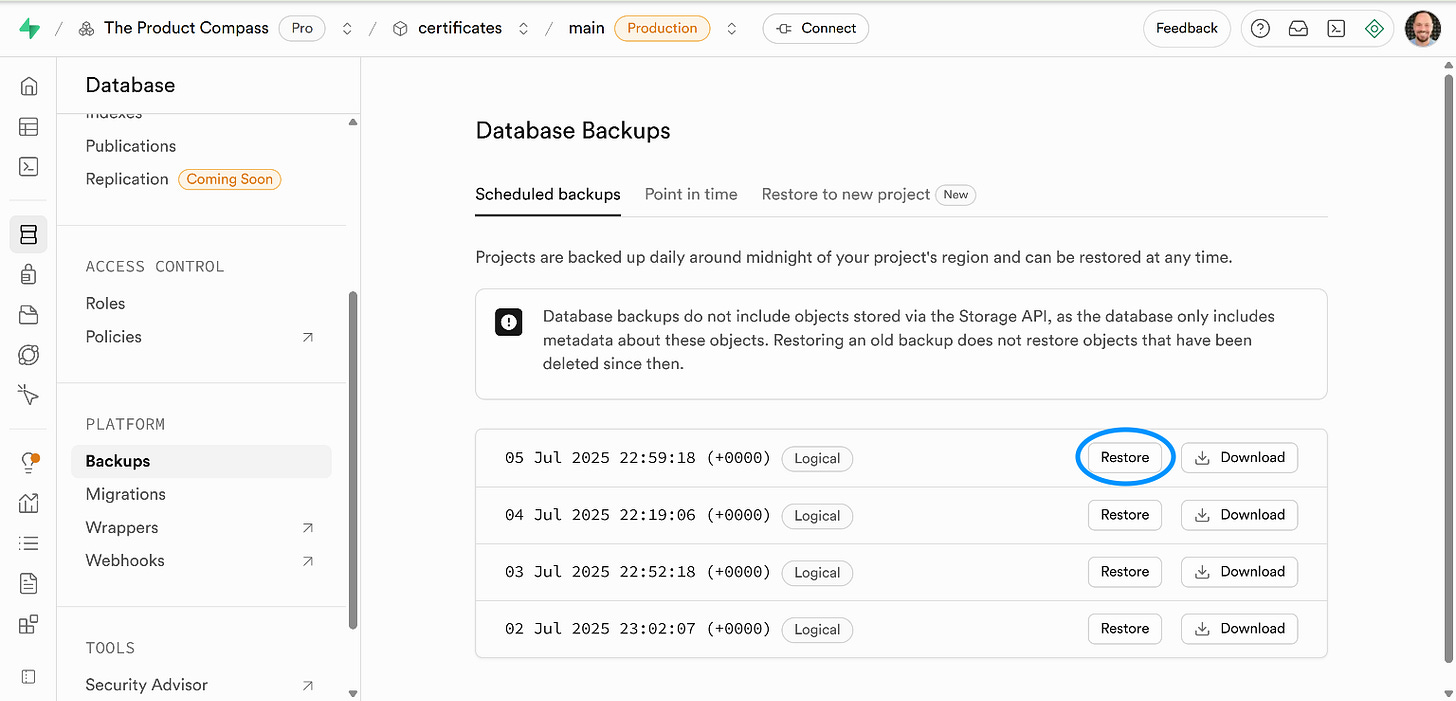
If your database was modified, you might need to restore it from a backup.
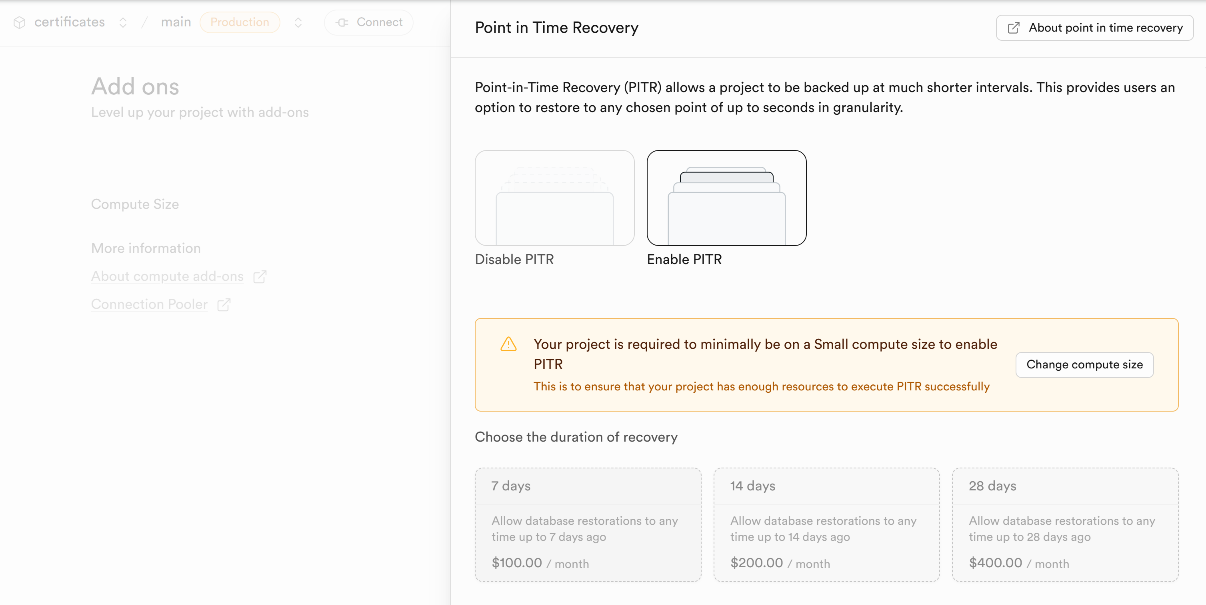
Ideally, you can restore your Supabase to a selected point in time. But it costs $100/month with a 7-day backup period:
At minimum enable daily backups and plan larger deployments just after a new backup is created. This feature is available in the cheapest $10/month plan:
Thanks for Reading The Product Compass Newsletter
I wanted to share this for those who, like me, use Lovable to build real full-stack apps.
On Tuesday, I’ll demonstrate a practical example of creating DEV and TEST environments for a simple Lovable project during our office hours. The recording will be, as always, available here.
In the coming weeks, I’ll demonstrate (no coding):
Plug in unit testing to your CI/CD pipeline
Build a multi-tenant B2B SaaS with payments (my PoC resumed)
GTM to get real users (my PoC continued)
Have an awesome rest of the week and a fantastic week ahead!
Paweł




Great walkthrough.
This seems like an existing project?
How do you seperate the PROD (with database and edge functions) from DEV for a new project?
Amazing article on branching with AI tools! This overcomes one of the biggest issues in using AI coding - Git versioning isn’t enough. You need this article to fully sever the dependencies beyond the code in Git. Thank you!